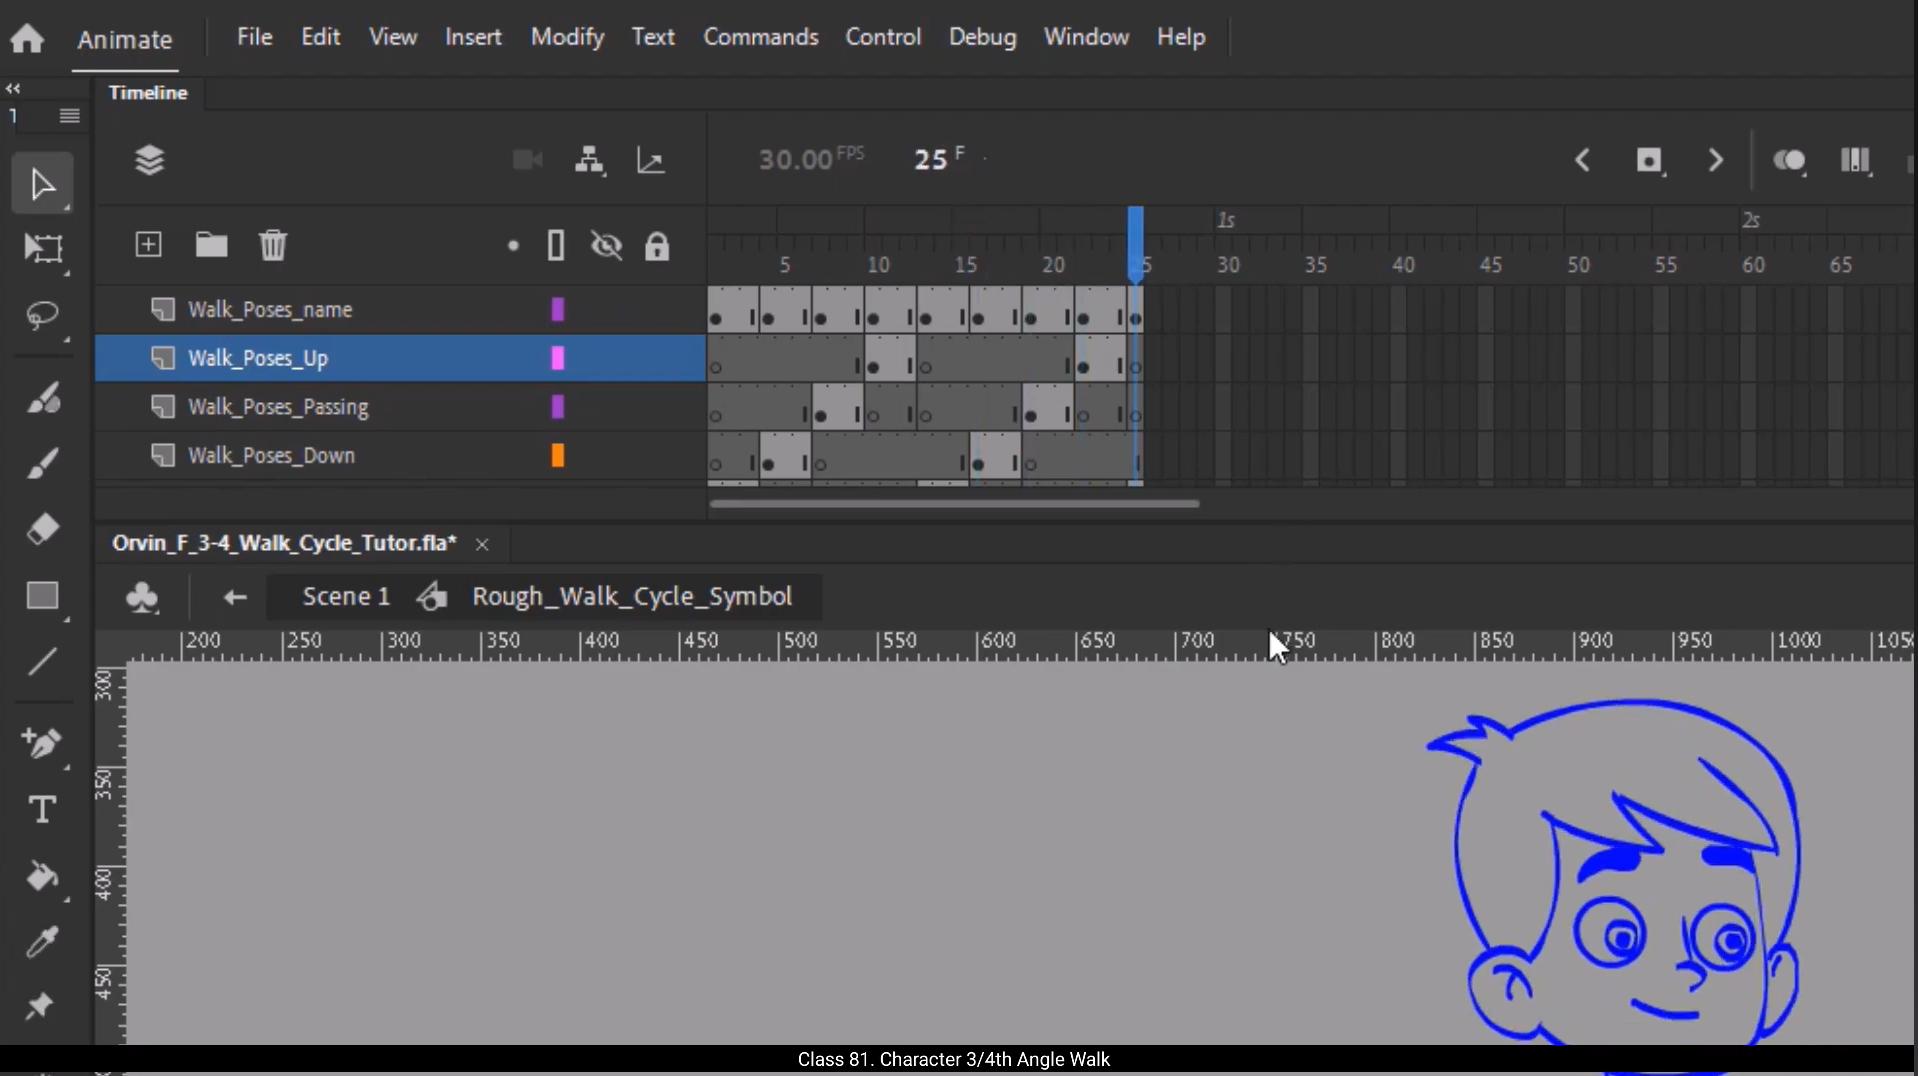
Hello students, in today's tutorial we're going to learn how to animate Orvin's 3/4 front walk cycle. Earlier we explored the profile or side angle walk and now we'll apply the same core steps but from a slightly more complex perspective.For this walk cycle, I've chosen to work on threes, which means we'll hold each drawing for three frames. This gives us a slightly slower rhythm and makes the animation easier to manage while maintaining clarity in the motion.Now, before we begin, let me show you the rough poses I've already prepared for this animation. We'll follow the standard walk cycle poses, which are contact, down, passing up, opposite contact, and then repeat down, passing up, and finally back to contact.The total loop will complete by frame #25 unlike the profile walk where we worked directly inside a motion symbol, here we're going to animate frame by frame directly on the timeline. We won't be using classic tweens for this. Our aim is to match each rough pose exactly and then clean them up with vector drawings.Now here's a very important note. Whenever you're animating a three quarters walk cycle, or any walk cycle, it's essential to either have a background with a defined perspective or at least draw guidelines for the ground plane.If your background is missing, you must sketch a baseline or perspective lines. This helps anchor the character and defines The Walking direction.Why is this important? Because in a three quarters view, your character isn't walking straight left or right. They're typically moving at an angle like 30° or 60° depending on the scene composition. So based on the chosen angle, set your character's path using guidelines. Once that's done, you can begin drawing the roughs.Let's start with the first contact pose. 😘 This pose will also appear again at the end of the cycle, which is frame 25. These two drawings must be identical. This ensures a smooth loop without a hitch when the cycle repeats.After that, move to the middle frame, which is frame 13 in this case. Here you'll draw the opposite contact pose, meaning the other leg comes forward and the hands switch rolls.It's very important that the distance between the feet in both contact poses first and opposite is consistent. That's what maintains balance in the walk.To check this, turn on onion skinning. This allows you to compare both drawings visually. Look at the spacing between the heels and toes of both contact poses. They should be nearly identical in length and placement, just flipped in leg direction.Also observe the arm angles. If the right arm is forward in the first contact, the left arm should be forward in the opposite contact, maintaining the same swing arc. In 3/4 view, not all limbs are fully visible, so don't force symmetry. For instance, the far hand may be hidden behind the body depending on the character's direction.Next, add the down pose, which happens after the contact. This is where the character's body lowers slightly to absorb the weight.Then comes the passing pose, where the back leg passes the front leg and the arms cross paths. Finally, the up pose, where the character's body lifts upward, preparing for the next contact.Repeat the same structure for the second-half of the cycle down, passing up and contact again. I've included all the rough drawings as JPEG images in the downloadable resources for your reference. You can use them to guide your animation.So let's begin by vectorizing the first contact pose. Before we start matching the vector drawings with the rough poses, I will copy the rough drawing layer and paste it inside the Orvin character symbol on a new layer. 😘 This way I won't have to go in and out of the symbol every time just to refer to the rough poses. Next, I'll select all elements on the rough drawing layer and reposition them to align with the vector drawings.Also, I'll remove any extra frames to match the timeline properly.I'll turn on wireframe mode to make it easier to see both layers clearly.We'll begin with the right leg of the character.So let's enter the right thigh symbol and extend the frames up to frame 25.Then I'll break apart this symbol and distribute both drawings pant and knee onto separate layers.I'll also add a keyframe on frame 13 for the opposite contact pose.Now on the 1st frame, I'll start editing the shape.Before editing, it's important to set the pivot point correctly.In this drawing, the pivot of the shape should be positioned here.So first I'll place the pivot point at the correct position.Then I'll rotate the symbol in the direction needed to match the rough drawing.Now that the rotation is done, let's go inside and edit the actual shape of the thigh.After that, we'll position the knee shape in place.Since the knee is coming closer to the camera will slightly scale up the shape to show depth and perspective.I'll turn on wireframe mode to fine tune the shape alignment.Next I'll add a patch layer.This is a small detail that gives the pan shape a more dimensional and realistic look.I'll use the eyedropper tool to pick the same pant and outline colors.And then draw a patch using the rectangle tool.Make sure to place this patch layer below the knee layer.Once the rectangle is in place, we'll refine its shape to a more conical form, add a few extra nodes, and adjust the curves to give it a smooth, structured look.After that, rotate the lower leg to match the angle of the ground beneath the character.Back in the right leg symbol, I'll again extend the frames up to frame 25 and insert a keyframe on frame 13 for the opposite contact pose. 😘 On frame one will break apart the drawing group and begin reshaping the leg according to the rough pose. If the angle doesn't quite match the reference, use the free transform tool to slightly rotate or scale the shape.When adjusting the shape, it's a good idea to use the sub selection tool to tweak individual points. This gives you more precision and helps avoid unwanted glitches in the animation.Next, let's work on the shoes. Start by aligning the pivot point of the shoe shape correctly.Then go inside the shoe symbol, extend the frames up to frame 25, and add a keyframe on frame 13 for the opposite contact pose.Now, instead of editing the existing shape, I'll simply use the pencil tool to draw the new shoe shape.Make sure object drawing mode is enabled while drawing.Once the shape is complete, fill it with color and add small details to the lower part of the shoe sole to enhance realism. Next, we'll move on to matching all the other body parts using the same steps and techniques.As you work through the poses, you can also scale down some shapes in passing or down positions to show depth.In certain frames, rather than modifying an existing shape, use the pencil tool to quickly sketch a new version. Especially useful for inner details or subtle angle shifts.Again, make sure object drawing mode is turned on for better control and editability.Once you're done drawing, fill the shape with color and ensure it blends well with the rest of the design.Repeat this process for each element to complete the full body matching.Our first contact pose is ready.This same pose will be used again on frame 25 to complete one full walk cycle loop.Next, we'll trace the opposite contact pose on frame 13. After that, we'll create the remaining key poses, the passing pose, then the up pose and finally the downpours.These keyframes together complete 1/2 of the walk cycle.The second-half is just a mirrored version of these same poses. 😘 To save time and keep this tutorial engaging, I'm going to skip the tracing process for the rest of the poses and jump directly to the final result.Now that our tracing part is done, let's quickly summarize the sequence. This is the contact pose, followed by the down pose, then the passing pose, the up pose, and at the midway point we have the opposite contact pose. For the second-half of the animation, we start with a mirrored down pose, then the mirrored passing pose, followed by the mirrored up pose, and finally we return to the original contact pose on frame 25.This breakdown helps us clearly visualize the structure of the walk cycle and keeps everything well organized for smooth animation.Let's take a look at the timeline inside each body part symbol to better understand the structure of the walk cycle.We'll start by going inside the shoe symbol.Here you must add keyframes at every major pose like contact, down, passing and up.The same applies to the leg. Make sure to insert keyframes for each pose. In some of these frames, you might need to scale up or scale down the leg to show depth and dimension, especially when the leg is moving backward or forward in perspective. Repeat this process for every relevant symbol in the body.Now let's talk about the upper body motion. One detail that adds a lot of life to your character is a slight twist in the shoulders and the necks V shape movement. It's subtle but very effective.Inside the bicep symbol, you'll also find a sleeve layer. I've added a dark colored patch here to give the sleeve some extra depth. And just like before, we'll add keyframes for each major pose.Don't forget the hair. It might seem like a minor detail, but hair can dramatically enhance the animation when animated properly. 😘 I've added a slight bounce to the hair across the walk cycle.As the character goes down, the hair follows slightly later.This is an example of follow through and overlapping action. For example, on frame 7, the hair droops a little on the up pose, it lifts slightly higher, then it comes back down on the next contact pose. It's a soft motion, but it adds a great sense of believability and flow to the character. Now let's play the animation for our 3/4 angle walk. And remember in this three fourth walk we are not adding any tweens to the character. The walk is kept on threes and it completes the cycle by frame #25.Now let's summarize both the profile and three quarters walk cycles by reviewing the animation principles we applied.Pose to pose animation.In both walk cycles we use the post-to-pose approach rather than animating straight ahead.We started by planning the key poses, the starting contact pose and ending contact pose. Then we add the middle pose. Next we added in between poses like up, down and passing.This method gives us more control and clarity while structuring the movement.Our principle Inside the hand, leg, and other limb symbols, we followed the natural arc of motion.When the arms swing, the hands don't move in straight lines, they follow a curved path.This happens because body joints rotate around pivot points, creating arcs. If your animation lacks arcs, it ends up looking stiff or robotic. Arcs make motion feel smooth and believable.Overlapping action and follow through.You can see this principle in action with the hair and forearm. When the main body moves, these parts slightly lag behind. For example, when the arm stops, the hand continues just a bit further before settling.The hair also reacts with a slight delay and bounce as the character goes up or down. 😘 This is what we call overlapping action and follow through.These small touches, arcs, follow through, proper spacing, all contribute to the appeal of the animation.Appeal is not just about how a character looks, but also how engaging and believable the motion feels, which is another principle of animation that is appeal.Weight, mass, and volume.Watch how the back leg lifts. You can feel the weight shifting from one leg to the other.Pay attention to weight distribution.Notice how the hips drop slightly as the foot lands and as the leg moves back, the heel lifts, the toe bends and volume is maintained. Even adding a curve to the shoe as it lifts prevents it from looking like a stiff object. These details give a sense of mass, gravity, and flexibility.Timing and spacing.The three quarters walk is animated on threes, meaning there's a new pose every 3 frames. This makes the movement quicker and snappier compared to the profile walk which was animated on ones.Animating on ones gives smoother motion but requires more effort and more in betweens.Animating on threes is more efficient and works well for simple looped cycles. Since the 3/4 view already involves complex perspective and overlapping parts, we kept the timing simple with a loop structure.Now let's talk about some of the most important tips when animating a character walk cycle.This was a neutral walk, but a character's emotion can completely change how they walk, for example.A sad walk might have longer frames and slower, heavier movements. A happy warp would be more upright, sharp, and energetic. An angry walk might involve stronger stomps and tense body parts.Adapting the walk to reflect the character's emotion is key to delivering strong, believable performances. 😘 One big difference between profile and three fourth walks is visibility.In a profile walk, you must draw the far leg, arm, and other hidden parts, even if they aren't visible in still poses.Because during movement they briefly come into view. So Always draw full poses, even for hidden parts.Let's go over a few mistakes beginner animators often make. In a normal walk, at least one foot should always be touching the ground. If both feet are off the ground at the same time, it becomes a run, or worse, a floaty, unrealistic walk. Avoid ignoring bicep and sleeve movements. When the arm swings forward, don't forget the bicep spacing from the sleeve. It creates a sense of compression and extension, adding realism to your arm motion.The same applies to thigh and leg movement. Observe and maintain correct spacing and rotation.Avoid using flat lines for the torso or hips. Always add a slight curve to the pelvis for better dynamics and body flow.Overlapping lines help show depth and body twist. Don't connect outlines in a way that removes depth. Instead, keep overlaps for clarity and 3D form inside symbols like the bicep. You can improve direction and perspective by adding another curved line or flipping the drawing. A slight curve adjustment or patch can completely change the perspective. These micro adjustments go a long way in improving Consistency across frames and angles. So that's how we animate a clean, appealing 3/4 walk cycle using Adobe Animate. Walk cycles are a foundation of character animation and once you've mastered this, you're ready to move on to character specific emotional or advanced walks. I hope you learned something new today. We'll see you in the next tutorial where we learn the character run cycle. Thanks for following.Along keep practicing, keep animating, and stay creative. 😘😘😘😘😘😘😘😘😘😘😘😘😘😘😘😘😘😘😘😘😘😘😘😘😘😘😘😘😘😘😘😘😘😘😘😘😘😘😘😘 नमस्ते स्टूडेंट्स, आज के इस ट्यूटोरियल में हम सीखेंगे कि Orvin का 3/4 फ्रंट वॉक साइकिल कैसे एनिमेट किया जाता है। इससे पहले हम प्रोफाइल या साइड एंगल वॉक साइकिल देख चुके हैं, और अब हम वही बेसिक स्टेप्स थोड़े ज़्यादा कॉम्प्लेक्स पर्सपेक्टिव से अप्लाई करेंगे। इस वॉक साइकिल के लिए मैंने थ्रीज़ पर काम करने का फैसला किया है, यानी हर एक ड्रॉइंग को तीन फ्रेम तक होल्ड किया जाएगा। इससे मूवमेंट का रिदम थोड़ा स्लो हो जाता है और एनिमेशन को मैनेज करना आसान होता है, साथ ही मोशन की क्लैरिटी भी बनी रहती है। अब शुरू करने से पहले, मैं आपको वे रफ पोज़ दिखाना चाहता हूँ जो मैंने इस एनिमेशन के लिए पहले से तैयार किए हैं। हम स्टैंडर्ड वॉक साइकिल पोज़ को फॉलो करेंगे, जैसे कॉन्टैक्ट, डाउन, पासिंग अप, अपोज़िट कॉन्टैक्ट, और फिर दोबारा डाउन, पासिंग अप, और आखिर में वापस कॉन्टैक्ट पोज़। पूरा लूप फ्रेम नंबर 25 पर कम्प्लीट हो जाएगा। प्रोफाइल वॉक के मुकाबले यहाँ एक बड़ा फर्क यह है कि उस समय हमने मोशन सिंबल के अंदर काम किया था, जबकि इस बार हम सीधे मेन टाइमलाइन पर फ्रेम-बाय-फ्रेम एनिमेशन करेंगे। इसमें हम क्लासिक ट्वीन का इस्तेमाल नहीं करेंगे। हमारा मकसद हर रफ पोज़ को बिल्कुल मैच करना है और फिर उन्हें वेक्टर ड्रॉइंग्स से क्लीन करना है। अब यहाँ एक बहुत ही ज़रूरी बात ध्यान रखने वाली है। जब भी आप थ्री क्वार्टर वॉक साइकिल या किसी भी तरह की वॉक साइकिल एनिमेट करते हैं, तो आपके पास या तो एक ऐसा बैकग्राउंड होना चाहिए जिसमें सही पर्सपेक्टिव डिफाइंड हो, या फिर कम से कम ग्राउंड प्लेन के लिए गाइडलाइन्स ड्रॉ की हुई हों। अगर आपका बैकग्राउंड मौजूद नहीं है, तो आपको एक बेसलाइन या पर्सपेक्टिव लाइन्स ज़रूर स्केच करनी चाहिए। इससे कैरेक्टर को ज़मीन से एंकर करने में मदद मिलती है और वॉकिंग की डायरेक्शन साफ़ तरीके से डिफाइन होती है। यह इतना ज़रूरी क्यों है? क्योंकि थ्री क्वार्टर व्यू में कैरेक्टर सीधा लेफ्ट या राइट नहीं चलता। आमतौर पर वह किसी एंगल पर मूव करता है, जैसे 30 डिग्री या 60 डिग्री, जो सीन की कंपोज़िशन पर डिपेंड करता है। इसलिए जो भी एंगल आपने चुना है, उसी के हिसाब से गाइडलाइन्स की मदद से कैरेक्टर का पाथ सेट करें। एक बार यह सेटअप हो जाए, उसके बाद आप आराम से रफ ड्रॉइंग्स बनाना शुरू कर सकते हैं। अब चलिए पहले कॉन्टैक्ट पोज़ से शुरुआत करते हैं। 😘 यह पोज़ साइकिल के अंत में भी दोबारा दिखाई देगा, जो कि फ्रेम 25 है। ये दोनों ड्रॉइंग्स बिल्कुल एक जैसी होनी चाहिए। इससे यह सुनिश्चित होता है कि जब वॉक साइकिल रिपीट हो, तो एनिमेशन स्मूद तरीके से लूप हो और कहीं भी झटका या अटकाव महसूस न हो। इसके बाद मिडिल फ्रेम पर जाएँ, जो इस केस में फ्रेम 13 है। यहाँ आप अपोज़िट कॉन्टैक्ट पोज़ ड्रॉ करेंगे, यानी अब दूसरी टाँग आगे आएगी और हाथों की पोज़िशन भी आपस में बदल जाएगी। यह बहुत ज़रूरी है कि दोनों कॉन्टैक्ट पोज़—पहला और अपोज़िट—में पैरों के बीच की दूरी एक जैसी रहे। यही चीज़ वॉक में बैलेंस बनाए रखती है। इसे चेक करने के लिए ऑनियन स्किनिंग ऑन करें। इससे आप दोनों ड्रॉइंग्स को एक साथ देखकर आसानी से तुलना कर सकते हैं। दोनों कॉन्टैक्ट पोज़ में एड़ियों और पंजों के बीच की दूरी देखें। उनकी लंबाई और पोज़िशन लगभग एक जैसी होनी चाहिए, बस लेग डायरेक्शन उलटी होगी। इसके साथ ही हाथों के एंगल्स पर भी ध्यान दें। अगर पहले कॉन्टैक्ट पोज़ में राइट आर्म आगे है, तो अपोज़िट कॉन्टैक्ट पोज़ में लेफ्ट आर्म आगे होना चाहिए और स्विंग का आर्क भी वही रहना चाहिए। 3/4 व्यू में सभी लिम्ब्स पूरी तरह दिखाई नहीं देते, इसलिए जबरदस्ती सिमेट्री बनाने की कोशिश न करें। उदाहरण के लिए, दूर वाला हाथ कैरेक्टर की बॉडी के पीछे छिपा हुआ भी हो सकता है, यह इस बात पर निर्भर करता है कि कैरेक्टर किस दिशा में चल रहा है। इसके बाद डाउन पोज़ ऐड करें, जो कॉन्टैक्ट के ठीक बाद आता है। इस पोज़ में कैरेक्टर का शरीर थोड़ा नीचे जाता है ताकि वज़न को एब्ज़ॉर्ब किया जा सके। फिर आता है पासिंग पोज़, जहाँ पीछे वाली टाँग आगे वाली टाँग को क्रॉस करते हुए आगे निकलती है और हाथ एक-दूसरे को क्रॉस करते हैं। इसके बाद अप पोज़ आता है, जिसमें कैरेक्टर का शरीर ऊपर की ओर उठता है और अगली कॉन्टैक्ट पोज़ के लिए तैयारी करता है। यही स्ट्रक्चर साइकिल के दूसरे हाफ में भी दोहराएँ—डाउन, पासिंग, अप और फिर दोबारा कॉन्टैक्ट पोज़। आपकी मदद के लिए मैंने सभी रफ ड्रॉइंग्स को JPEG इमेजेज़ के रूप में डाउनलोडेबल रिसोर्सेज़ में शामिल किया है। आप उन्हें रेफरेंस के तौर पर इस्तेमाल करके अपना एनिमेशन गाइड कर सकते हैं। अब चलिए पहले कॉन्टैक्ट पोज़ को वेक्टराइज़ करना शुरू करते हैं। वेक्टर ड्रॉइंग्स को रफ पोज़ से मैच करने से पहले, मैं रफ ड्रॉइंग लेयर को कॉपी करूँगा और उसे Orvin कैरेक्टर सिंबल के अंदर एक नई लेयर पर पेस्ट कर दूँगा। 😘 इस तरह मुझे हर बार रफ पोज़ को देखने के लिए बार-बार सिंबल के अंदर-बाहर जाने की ज़रूरत नहीं पड़ेगी। इसके बाद मैं रफ ड्रॉइंग लेयर पर मौजूद सभी एलिमेंट्स को सेलेक्ट करूँगा और उन्हें वेक्टर ड्रॉइंग्स के साथ ठीक से अलाइन करने के लिए री-पोज़िशन करूँगा। साथ ही, टाइमलाइन को सही तरह से मैच करने के लिए किसी भी एक्स्ट्रा फ्रेम्स को हटा दूँगा। दोनों लेयर्स को साफ़-साफ़ देखने के लिए मैं वायरफ्रेम मोड ऑन कर लूँगा। अब हम कैरेक्टर की राइट लेग से शुरुआत करेंगे। इसके लिए सबसे पहले राइट थाइ सिंबल के अंदर जाएँगे और फ्रेम्स को बढ़ाकर फ्रेम 25 तक एक्सटेंड करेंगे। फिर मैं इस सिंबल को ब्रेक अप करूँगा और पैंट और नी के दोनों ड्रॉइंग्स को अलग-अलग लेयर्स पर डिस्ट्रिब्यूट कर दूँगा। इसके बाद अपोज़िट कॉन्टैक्ट पोज़ के लिए फ्रेम 13 पर एक कीफ्रेम ऐड करूँगा। अब फ्रेम 1 पर आकर शेप को एडिट करना शुरू करेंगे। एडिट करने से पहले पिवट पॉइंट को सही जगह पर सेट करना बहुत ज़रूरी है। इस ड्रॉइंग में शेप का पिवट यहाँ होना चाहिए, इसलिए सबसे पहले मैं पिवट पॉइंट को सही पोज़िशन पर रखूँगा। इसके बाद सिंबल को ज़रूरत के अनुसार रोटेट करूँगा ताकि वह रफ ड्रॉइंग से मैच हो जाए। जब रोटेशन हो जाएगा, तब मैं अंदर जाकर थाइ की असली शेप को एडिट करूँगा। इसके बाद नी शेप को उसकी सही जगह पर पोज़िशन करेंगे। चूँकि नी कैमरे के क़रीब आ रही है, इसलिए डेप्थ और परस्पेक्टिव दिखाने के लिए मैं उसे थोड़ा सा स्केल अप करूँगा। शेप अलाइनमेंट को और बेहतर बनाने के लिए मैं फिर से वायरफ्रेम मोड ऑन कर लूँगा। इसके बाद मैं एक पैच लेयर ऐड करूँगा। यह एक छोटा सा डिटेल है जो पैंट की शेप को ज़्यादा डाइमेंशनल और रियलिस्टिक लुक देता है। आईड्रॉपर टूल से मैं वही पैंट और आउटलाइन कलर्स पिक करूँगा और फिर रेक्टैंगल टूल की मदद से एक पैच ड्रॉ करूँगा। ध्यान रखें कि यह पैच लेयर नी लेयर के नीचे होनी चाहिए। जब रेक्टैंगल बन जाए, तो हम उसकी शेप को थोड़ा कोनिकल फॉर्म में रिफाइन करेंगे, कुछ एक्स्ट्रा नोड्स ऐड करेंगे और कर्व्स को एडजस्ट करेंगे ताकि वह स्मूद और स्ट्रक्चर्ड दिखाई दे। इसके बाद लोअर लेग को रोटेट करेंगे ताकि वह कैरेक्टर के नीचे ज़मीन के एंगल से मैच हो जाए। वापस राइट लेग सिंबल में आकर मैं फिर से फ्रेम्स को फ्रेम 25 तक एक्सटेंड करूँगा और अपोज़िट कॉन्टैक्ट पोज़ के लिए फ्रेम 13 पर एक कीफ्रेम इंसर्ट करूँगा। 😘 फ्रेम एक पर हम ड्रॉइंग ग्रुप को ब्रेक अप करेंगे और रफ पोज़ के अनुसार लेग की शेप को दोबारा बनाना शुरू करेंगे। अगर एंगल रेफरेंस से पूरी तरह मैच नहीं कर रहा है, तो फ्री ट्रांसफॉर्म टूल का इस्तेमाल करके शेप को हल्का सा रोटेट या स्केल कर सकते हैं। शेप को एडजस्ट करते समय सब-सेलेक्शन टूल का इस्तेमाल करना एक अच्छा आइडिया है, क्योंकि इससे आप इंडिविजुअल पॉइंट्स को ज्यादा प्रिसिशन के साथ ट्वीक कर सकते हैं और एनीमेशन में अनचाहे ग्लिच से बच सकते हैं। इसके बाद हम शूज़ पर काम करेंगे। सबसे पहले शू शेप के पिवट पॉइंट को सही जगह पर अलाइन करें। फिर शू सिंबल के अंदर जाएँ, फ्रेम्स को फ्रेम 25 तक एक्सटेंड करें और अपोज़िट कॉन्टैक्ट पोज़ के लिए फ्रेम 13 पर एक कीफ्रेम ऐड करें। अब मौजूदा शेप को एडिट करने के बजाय, मैं पेंसिल टूल का इस्तेमाल करके नई शू शेप ड्रॉ करूँगा। ड्रॉ करते समय यह सुनिश्चित करें कि ऑब्जेक्ट ड्रॉइंग मोड ऑन हो। शेप पूरी हो जाने के बाद उसमें कलर भरें और शू सोल के निचले हिस्से में छोटे-छोटे डिटेल्स ऐड करें ताकि वह ज्यादा रियलिस्टिक लगे। इसके बाद हम बाकी सभी बॉडी पार्ट्स को भी इन्हीं स्टेप्स और टेक्नीक्स का इस्तेमाल करके मैच करेंगे। पोज़ पर काम करते समय आप पासिंग या डाउन पोज़ में कुछ शेप्स को थोड़ा सा स्केल डाउन भी कर सकते हैं ताकि डेप्थ दिखे। कुछ फ्रेम्स में मौजूदा शेप को मॉडिफाई करने की बजाय, पेंसिल टूल से जल्दी से नया वर्ज़न स्केच करना ज्यादा आसान और बेहतर होता है, खासकर इनर डिटेल्स या हल्के एंगल चेंज के लिए। फिर से ध्यान रखें कि ऑब्जेक्ट ड्रॉइंग मोड ऑन हो ताकि कंट्रोल और एडिटेबिलिटी बेहतर रहे। ड्रॉइंग पूरी होने के बाद शेप में कलर भरें और यह चेक करें कि वह बाकी डिज़ाइन के साथ अच्छे से ब्लेंड हो रही है। इसी प्रोसेस को हर एलिमेंट के लिए रिपीट करें ताकि पूरा बॉडी मैचिंग पूरा हो सके। अब हमारा पहला कॉन्टैक्ट पोज़ रेडी है। यही पोज़ फ्रेम 25 पर फिर से इस्तेमाल किया जाएगा ताकि एक पूरा वॉक साइकिल लूप कम्प्लीट हो सके। इसके बाद हम फ्रेम 13 पर अपोज़िट कॉन्टैक्ट पोज़ को ट्रेस करेंगे। फिर बाकी की-पोज़ बनाएँगे, पहले पासिंग पोज़, फिर अप पोज़ और आखिर में डाउन पोज़। ये सभी कीफ्रेम मिलकर वॉक साइकिल का आधा हिस्सा पूरा करते हैं। दूसरा हाफ इन्हीं पोज़ का मिरर्ड वर्ज़न होता है। 😘 समय बचाने और इस ट्यूटोरियल को ज़्यादा एंगेजिंग बनाए रखने के लिए, मैं बाकी पोज़ का ट्रेसिंग प्रोसेस स्किप कर रहा हूँ और सीधे फाइनल रिज़ल्ट पर जा रहा हूँ। अब जब हमारा ट्रेसिंग पार्ट पूरा हो चुका है, तो चलिए जल्दी से पूरे सीक्वेंस को समरी कर लेते हैं। सबसे पहले हमारे पास कॉन्टैक्ट पोज़ है, उसके बाद डाउन पोज़ आता है, फिर पासिंग पोज़, उसके बाद अप पोज़, और ठीक बीच में हमें अपोज़िट कॉन्टैक्ट पोज़ मिलता है। एनीमेशन के दूसरे हाफ में हम मिरर्ड डाउन पोज़ से शुरुआत करते हैं, फिर मिरर्ड पासिंग पोज़, उसके बाद मिरर्ड अप पोज़ आता है, और आखिर में हम फ्रेम 25 पर वापस ओरिजिनल कॉन्टैक्ट पोज़ पर लौट आते हैं। यह पूरा ब्रेकडाउन हमें वॉक साइकिल की स्ट्रक्चर को साफ़-साफ़ समझने में मदद करता है और एनीमेशन को स्मूद और ऑर्गनाइज़्ड बनाए रखता है। अब चलिए हर बॉडी पार्ट सिंबल के अंदर टाइमलाइन को देखते हैं ताकि वॉक साइकिल की बनावट को बेहतर तरीके से समझ सकें। सबसे पहले हम शू सिंबल के अंदर जाएंगे। यहाँ आपको हर मेजर पोज़ जैसे कॉन्टैक्ट, डाउन, पासिंग और अप पर कीफ्रेम ऐड करने होते हैं। यही प्रोसेस लेग के लिए भी अप्लाई होती है। हर पोज़ के लिए कीफ्रेम डालना ज़रूरी है। कुछ फ्रेम्स में आपको लेग को थोड़ा स्केल अप या स्केल डाउन करना पड़ सकता है ताकि डेप्थ और डाइमेंशन दिखाई दे, खासकर तब जब लेग परस्पेक्टिव में आगे या पीछे की ओर मूव कर रहा हो। यही प्रोसेस शरीर के हर ज़रूरी सिंबल के लिए रिपीट करें। अब बात करते हैं अपर बॉडी मूवमेंट की। एक छोटा सा लेकिन बहुत असरदार डिटेल है शोल्डर्स में हल्का ट्विस्ट और नेक के वी-शेप का मूवमेंट। यह बहुत सूक्ष्म होता है, लेकिन कैरेक्टर में काफी जान डाल देता है। बाइसेप सिंबल के अंदर आपको एक स्लीव लेयर भी मिलेगी। यहाँ मैंने एक डार्क कलर का पैच ऐड किया है ताकि स्लीव में एक्स्ट्रा डेप्थ आ सके। और पहले की तरह, यहाँ भी हर मेजर पोज़ के लिए कीफ्रेम ऐड करेंगे। बालों को भूलना मत। भले ही यह एक छोटा डिटेल लगे, लेकिन जब हेयर को सही तरीके से एनिमेट किया जाता है, तो यह एनीमेशन को काफी ज़्यादा लाइफफुल और नैचुरल बना देता है। 😘 मैंने पूरे वॉक साइकिल में बालों में हल्का सा बाउंस जोड़ा है। जब कैरेक्टर नीचे जाता है, तो बाल थोड़ा सा देर से उसे फॉलो करते हैं। यह फॉलो थ्रू और ओवरलैपिंग एक्शन का एक अच्छा उदाहरण है। उदाहरण के लिए, फ्रेम 7 पर बाल थोड़ा सा नीचे की ओर झुकते हैं। अप पोज़ पर बाल हल्के से ऊपर उठते हैं, और फिर अगले कॉन्टैक्ट पोज़ पर वापस नीचे आ जाते हैं। यह मूवमेंट बहुत सॉफ्ट है, लेकिन इससे कैरेक्टर में काफ़ी ज़्यादा रियलिज़्म और फ्लो आ जाता है। अब चलिए हमारे 3/4 एंगल वॉक एनीमेशन को प्ले करते हैं। और याद रखिए, इस थ्री-फोर्थ वॉक में हमने कैरेक्टर पर कोई भी ट्वीन इस्तेमाल नहीं किया है। यह वॉक “थ्रीज़” पर रखा गया है और फ्रेम नंबर 25 पर पूरा साइकिल कंप्लीट हो जाता है। अब चलिए प्रोफाइल और थ्री-कोर्टर दोनों वॉक साइकिल्स को समरी करते हैं और उन एनीमेशन प्रिंसिपल्स को रिव्यू करते हैं जिन्हें हमने अप्लाई किया है। पोज़ टू पोज़ एनीमेशन दोनों वॉक साइकिल्स में हमने स्ट्रेट-अहेड एनीमेशन की बजाय पोज़-टू-पोज़ अप्रोच का इस्तेमाल किया है। हमने सबसे पहले की पोज़ प्लान कीं — स्टार्टिंग कॉन्टैक्ट पोज़ और एंडिंग कॉन्टैक्ट पोज़। उसके बाद हमने मिडल पोज़ ऐड किया। फिर इन-बिटवीन पोज़ जैसे अप, डाउन और पासिंग जोड़े। यह मेथड हमें मूवमेंट को स्ट्रक्चर करते समय ज़्यादा कंट्रोल और क्लैरिटी देता है। आर्क्स का प्रिंसिपल हाथ, पैर और दूसरे लिम्ब सिंबल्स के अंदर हमने मूवमेंट के नैचुरल आर्क्स को फॉलो किया है। जब बाज़ू स्विंग करते हैं, तो हाथ सीधी लाइन में मूव नहीं करते, बल्कि कर्व्ड पाथ में चलते हैं। ऐसा इसलिए होता है क्योंकि बॉडी जॉइंट्स पिवट पॉइंट्स के चारों ओर घूमते हैं, जिससे आर्क्स बनते हैं। अगर आपकी एनीमेशन में आर्क्स नहीं होते, तो मूवमेंट स्टिफ़ और रोबोटिक लगने लगता है। आर्क्स मोशन को स्मूद और बिलीवेबल बनाते हैं। ओवरलैपिंग एक्शन और फॉलो थ्रू यह प्रिंसिपल आप बालों और फोरआर्म में साफ़ देख सकते हैं। जब मेन बॉडी मूव करती है, तो ये पार्ट्स थोड़ी देर से रिएक्ट करते हैं। उदाहरण के लिए, जब हाथ रुकता है, तो हथेली थोड़ा सा आगे तक मूव करके फिर सेटल होती है। बाल भी इसी तरह हल्की सी डिले और बाउंस के साथ ऊपर-नीचे मूव करते हैं, जिससे पूरी एनीमेशन ज़्यादा नैचुरल और लाइफफुल लगती है। 😘 इसे ही हम ओवरलैपिंग एक्शन और फॉलो थ्रू कहते हैं। ये छोटे-छोटे टचेज़ जैसे आर्क्स, फॉलो थ्रू और सही स्पेसिंग मिलकर एनीमेशन की अपील बढ़ाते हैं। अपील सिर्फ़ इस बात पर नहीं होती कि कैरेक्टर दिखने में कैसा है, बल्कि इस पर भी होती है कि उसका मूवमेंट कितना एंगेजिंग और बिलीवेबल महसूस होता है। यह भी एनीमेशन का एक अहम सिद्धांत है। अब बात करते हैं वेट, मास और वॉल्यूम की। ध्यान से देखें कि पीछे वाला पैर कैसे ऊपर उठता है। आपको साफ़ महसूस होगा कि वज़न एक पैर से दूसरे पैर पर शिफ्ट हो रहा है। वेट डिस्ट्रीब्यूशन पर ध्यान दें। जैसे ही पैर ज़मीन पर लैंड करता है, हिप्स थोड़ा सा नीचे ड्रॉप करते हैं, और जब पैर पीछे जाता है तो एड़ी ऊपर उठती है, पैर का अगला हिस्सा मुड़ता है और वॉल्यूम बना रहता है। जूते में हल्की सी कर्व जोड़ना भी उसे सख़्त ऑब्जेक्ट की तरह दिखने से बचाता है। ये सारी डिटेल्स मिलकर मास, ग्रैविटी और फ्लेक्सिबिलिटी का अहसास देती हैं। अब टाइमिंग और स्पेसिंग की बात करें। थ्री-कोर्टर वॉक को हमने “थ्रीज़” पर एनीमेट किया है, यानी हर 3 फ्रेम पर एक नया पोज़ है। इससे मूवमेंट प्रोफाइल वॉक की तुलना में थोड़ा ज़्यादा क्विक और स्नैपी लगता है, क्योंकि प्रोफाइल वॉक “वन्स” पर एनीमेट किया गया था। वन्स पर एनीमेट करने से मोशन ज़्यादा स्मूद मिलता है, लेकिन उसमें ज़्यादा मेहनत और ज़्यादा इन-बिटवीन ड्रॉइंग्स लगती हैं। थ्रीज़ पर एनीमेशन ज़्यादा एफिशिएंट होता है और सिंपल लूप्ड साइकिल्स के लिए बहुत अच्छा काम करता है। चूँकि 3/4 व्यू में पहले से ही परस्पेक्टिव और ओवरलैपिंग पार्ट्स काफ़ी कॉम्प्लेक्स होते हैं, इसलिए हमने टाइमिंग को सिंपल रखा और एक क्लीन लूप स्ट्रक्चर फॉलो किया। अब चलिए कैरेक्टर वॉक साइकिल एनीमेट करते समय कुछ सबसे ज़रूरी टिप्स पर बात करते हैं। यह एक न्यूट्रल वॉक थी, लेकिन कैरेक्टर की इमोशन उसकी चाल को पूरी तरह बदल सकती है। उदाहरण के लिए, एक उदास चाल में फ्रेम्स ज़्यादा लंबे होंगे और मूवमेंट स्लो व भारी लगेगा। एक खुश चाल ज़्यादा सीधी, शार्प और एनर्जेटिक होगी। वहीं एक ग़ुस्से वाली चाल में ज़ोरदार स्टॉम्प्स और टेंशन से भरे बॉडी पार्ट्स दिखाई देंगे। कैरेक्टर की इमोशन के हिसाब से वॉक को अडैप्ट करना ही स्ट्रॉन्ग और बिलीवेबल परफॉर्मेंस देने की असली कुंजी है। 😘 प्रोफाइल वॉक और थ्री-फोर्थ वॉक के बीच एक बड़ा अंतर विज़िबिलिटी का होता है। प्रोफाइल वॉक में आपको दूर वाला पैर, हाथ और बाकी छुपे हुए बॉडी पार्ट्स भी ड्रॉ करने होते हैं, भले ही वे स्टिल पोज़ में दिखाई न दें, क्योंकि मूवमेंट के दौरान वे कुछ पलों के लिए नज़र आते हैं। इसलिए हमेशा पूरे पोज़ ड्रॉ करें, चाहे कुछ हिस्से छुपे हुए ही क्यों न हों। अब आइए कुछ आम गलतियों पर नज़र डालते हैं जो शुरुआती एनिमेटर्स अक्सर करते हैं। एक नॉर्मल वॉक में कम से कम एक पैर हमेशा ज़मीन को छू रहा होना चाहिए। अगर दोनों पैर एक साथ हवा में हों, तो वह वॉक नहीं बल्कि रन बन जाता है, या उससे भी बुरा, एक फ्लोटी और अनरियलिस्टिक मूवमेंट लगने लगता है। बाइसेप और स्लीव की मूवमेंट को नज़रअंदाज़ न करें। जब हाथ आगे की ओर स्विंग करता है, तो बाइसेप और स्लीव के बीच की स्पेसिंग ज़रूर दिखाएँ। इससे कंप्रेशन और एक्सटेंशन का एहसास मिलता है और हाथ की मूवमेंट ज़्यादा रियल लगती है। यही बात थाई और लेग मूवमेंट पर भी लागू होती है। सही स्पेसिंग और रोटेशन को ध्यान से ऑब्ज़र्व करें और बनाए रखें। टॉर्सो या हिप्स को बिल्कुल सीधी, फ्लैट लाइनों से न बनाएँ। पेल्विस में हमेशा हल्की सी कर्व रखें ताकि बॉडी फ्लो और डायनेमिक फील आए। ओवरलैपिंग लाइन्स गहराई और बॉडी ट्विस्ट दिखाने में मदद करती हैं। आउटलाइन को इस तरह कनेक्ट न करें कि डेप्थ खत्म हो जाए। इसके बजाय, बाइसेप जैसे सिंबल्स के अंदर ओवरलैप बनाए रखें ताकि 3D फॉर्म साफ़ दिखे। आप ड्रॉइंग में एक अतिरिक्त कर्व्ड लाइन जोड़कर या उसे फ्लिप करके भी दिशा और परस्पेक्टिव को बेहतर बना सकते हैं। कभी-कभी सिर्फ़ हल्का सा कर्व एडजस्टमेंट या एक छोटा सा पैच पूरे परस्पेक्टिव को बदल देता है। ये माइक्रो एडजस्टमेंट्स फ्रेम्स और एंगल्स के बीच कंसिस्टेंसी को काफ़ी बेहतर बनाते हैं। तो इस तरह हम Adobe Animate में एक क्लीन और अपीलिंग 3/4 वॉक साइकिल एनिमेट करते हैं। वॉक साइकिल्स कैरेक्टर एनिमेशन की नींव होती हैं, और एक बार आप इसमें महारत हासिल कर लेते हैं, तो आप कैरेक्टर-स्पेसिफिक इमोशनल या एडवांस्ड वॉक्स की ओर बढ़ने के लिए तैयार होते हैं। उम्मीद है कि आज आपने कुछ नया सीखा होगा। अगले ट्यूटोरियल में हम कैरेक्टर रन साइकिल सीखेंगे। देखने के लिए धन्यवाद, लगातार प्रैक्टिस करते रहें, एनिमेट करते रहें और क्रिएटिव बने रहें।