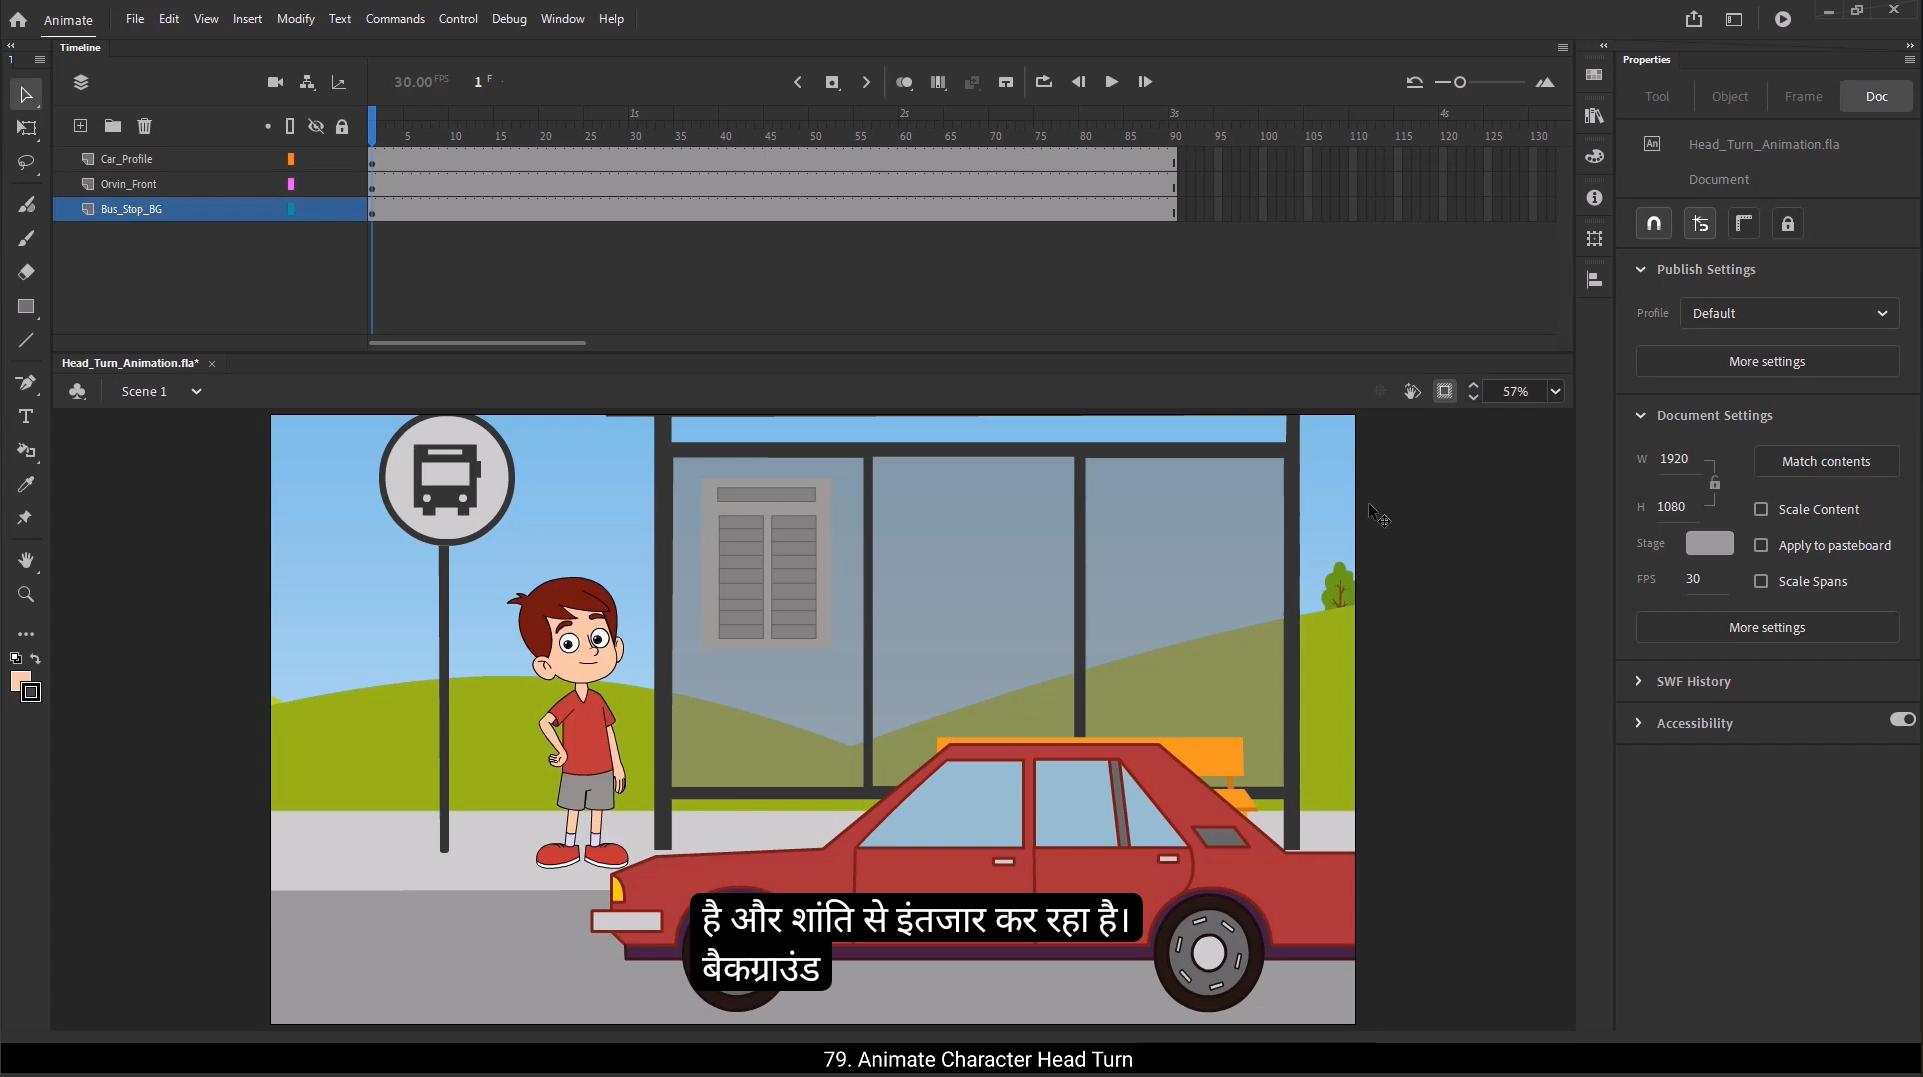
Hello students. Today we're going to learn how to animate a head turn. We'll see how to smoothly turn a character's head from 1 angle to another, giving life and personality to the action. In this particular scene, we have our character Orvin. He's standing at a bus stop, waiting patiently. The background is set with a bus stop sign, a road, and a car that will soon pass by.Now here's what's going to happen in our scene.First, we'll animate the car speeding past on the road. As the car rushes by, Orvin, who is initially standing in a three quarter view, will turn his head towards the car. He will smoothly turn from that three quarter angle to a front facing position and then to three quarter angle on other side, as if he's following the car with his eyes and head. I've already created the initial pose of Orvin standing casually waiting for the bus, so we'll be building on that.Let's learn how to animate this head turn step by step.We'll start by animating the car. First, I'll move the car to the left, completely out of the screen.I'll begin this action from the 21st frame on the car layer. That means for the 1st 20 frames, Orvin will simply be standing at the bus stop waiting patiently.Next, at frame 50, I'll add another keyframe on the car layer and move the car towards the right side out of the screen.Then at frame 51, I'll insert a blank keyframe on the same car layer. This will stop the car's animation.Next I'll create a classic tween between the keyframes on the car layer.After setting this up, I'll quickly play the animation to check the speed of the car.At this stage, it's moving at a good pace.Now I'll create a new layer for the audio and import a car passing sound effect onto this audio layer.
😘
It's always a good practice to test the sink, so I'll play the animation with the sound to see if the car's movement matches the audio cue.It seems like we need a little adjustment here to sync the visuals better with the sound. I'll move the cars starting frame to the 25th frame.Finally, I'll insert frames on all layers up to 4 seconds.Now that our car animation is set, it's time to bring our character Orvin to life.The first thing we need to handle is the eye position.Since the car will be entering the scene, Orvin's eyes should follow its movement. So let's start by entering the head symbol of the character.Inside this head symbol, I'll select both of Orvin's eyeballs on frame one and adjust their position to make it look like he's looking towards the car.On the main timeline, we'll start animating the head turn from frame 45, since the car begins entering the frame around frame 37 and passes by very quickly.Before we move into the head turn itself, let's make sure the eyeball movement is properly timed.To manage this better, I'll duplicate the scene window from the window menu. This way I can have two windows opened for the same scene.One will show the layers inside the head symbol and the other will display the main timeline. This setup makes it easier to coordinate the internal eye animation with the overall scene.Now, on the main timeline, we'll decide the exact moment when the eyes should start following the car. We will start the eye movement from frame 43.I'll go inside the head symbol and on frame 43 I'll add a keyframe, both eyeball layers.
Then I'll move both eyeballs to the left.If you notice on frame 39, Orvin is still looking at the car's initial position, which isn't quite right.
😘
By that time, the car has already moved ahead, so Orvin's eyes should follow where the car actually is on frame 39. To fix this, I'll go inside the head symbol and on frame 39 I'll add keyframes on both layers.Then I'll adjust the position of the eyeballs.Since the car animation begins at frame 25 on main timeline, the eyes should start reacting from there as well inside head symbol.So inside the head symbol, I'll add a keyframe at frame 25 on both eyeball layers. Then I'll create a classic tween between frames.When I play it back now, you'll see that Orvin's eyes are smoothly and naturally following the car's path.Before jumping straight into animating head turn, I'll take a moment to review the scene in the second window. This will help us pinpoint the exact frame where the head turn should begin. Looking closely, it makes sense to keep Orvin's head in the same position until frame 43, while his eyes alone do the following. Then on frame 44, the head should turn towards the front view. By frame 45, the head should have reached the three quarter position on the left side.Now let's apply a key animation principle, anticipation.On frame 43, inside Orvin front symbol, I'll add a keyframe on all the layers. I'll also add a keyframe on frame 38, since that's where we'll start building anticipation. Between frames 38 and 43, Orvin will make a slight movement, leaning a little towards the front as if preparing to shift his weight.At the moment his weight is primarily on his left leg. After the car passes, I want him to shift his weight onto his right leg, giving us a nice follow through and contrast from the original pose. I'll also add a keyframe on frame 49. On this frame I'll flip the head horizontally so it's facing the opposite three quarter angle.
😘
Then I'll go inside the head symbol again, and on frame 49 I'll add keyframes on both eyeball layers.I'll adjust the eyeballs position here too.Next I'll exit the symbol and on frame 44 of the head layer I'll insert a blank keyframe. Then I'll drag the frame 49 and place it on frame 45 and add another keyframe on frame 49 to hold that final pose.On frame 44, I'll go ahead and insert the front head symbol from the library.I'll simply select the Orvin front head symbol and drag it onto the stage, making sure it's properly aligned with the characters body and checking its proportion so the transition between poses feels clean and seamless.Let's quickly play the head turn animation so far to see how it's looking.Here, as you can see, Orvin is blinking his eyes as he turns, so I want to make sure this blink continues even in the front head pose.To do this, I'll enter inside the front head symbol and I'll adjust the blink of the character so that on frame 44 his eyes are closed.1st I'll enter the right eye symbol inside. Here I'll move the blink patches slightly towards the right.Then I'll do the same for the left eye symbol, shifting the blink patches towards the right so both eyes close evenly.Next, on the eyebrows layer, I'll add a keyframe at frame 44.I'll slightly rotate both eyebrows downward.Now If you look closely, you'll notice that in our oven front symbol, the characters eyes still aren't closing. That's because we haven't synced the head animation yet. So to fix this, head over to the looping section in the properties panel and adjust the 1st frame to 44.The head turn animation is looking good now, but we need to bring the character's body into the action too.Let's start with frame 43. Here, select all the upper body elements, set the pivot point at bottom center and rotate the upper body towards the left.
😘
Next, select the lower part of the body except the shoes, along with the upper body. Set a pivot point and scale it down just a little. This will help create a nice shift in posture as the character begins to move.Moving on to frame 44, gently move the front head symbol down.Now on frame 49, select the torso and both arm symbols together. Set the pivot point at the top and rotate them towards the right. This way the characters weight will visibly shift onto the right leg.Next up, select the right leg, set its pivot point at the bottom, then match the leg position with the upper body.Do the same with the left leg.If the patch shape or any other small details look off, feel free to adjust them now.I'll add a keyframe for settling pose on frame 53.Here I'll rotate the upper body and pant symbols slightly to soften the end of the movement.Then I'll make sure the leg positions are properly aligned with the pants.On frame 43 I'll rotate the hand slightly to the right.And then on frame 49 I'll rotate it back to the left.Once all these keyframes are in place, I'll go ahead and create a classic tween across them.Now's the time to preview the animation, watch it carefully, and make adjustments wherever needed.On frame 45, I'll quickly adjust the head position to keep it consistent with the body's motion.On frame 49, I'll fine tune the upper body once more and make sure the lower body is following along properly.Now on frame 43 I will move the head slightly down and rotate it as well.On frame 44, I'll scale the head down just a little.Then on frame 45, I'll rotate the head to the left, move it a bit to the right and down, and scale it down again.To apply the follow through and overlapping action principle, I'll add one more movement at the end. On the last keyframe, I'll rotate the head back to the left.
😘
This creates that nice sense of drag and delay, making it feel like the head is catching up to the body's motion.For a smooth transition between these movements, I'll select all the keyframes and apply a classic sign ease out effect. This will slow down the motion naturally as it reaches the end.Next, we need to synchronize the head symbol with these changes. So I'll select the head layer, right click on it and choose Synchronize symbol.This makes sure all the changes we made to the head are reflected properly.Now you might notice that on frame 48 the eyeball position looks mismatched. This Happened because earlier on the head layer we moved keyframe 49 to frame 45, but we didn't update it inside the head symbol. To fix this I'll go inside the head symbol and on both the eyeball layers I'll move the keyframe from 49 to 45.Then on frame 55 I'll add a new keyframe on both eyeball layers and move the eyeballs upwards.Finally, I'll add a classic tween.Next, insert keyframes at frame 43 and frame 39 on both eyebrow layers.Then I'll create a classic tween between these two keyframes.At frame 43, I'll rotate both eyebrows a little and move them downward.To hold this position for a moment, I'll add keyframes at frame 44 on both eyebrow layers.Next, on frame 48 I'll add new keyframes, then copy the pose from frame 37 and paste it onto frame 48.After that I'll create a classic tween.Now, towards the end of the animation, you'll notice that the character is looking up. That's because we rotated the head earlier, so we need to adjust the eyeballs as well.I'll go inside the head symbol and on frames 55 and 45 I'll move both eyeballs down.There's one more little bug to fix. Currently, the eyeball animation is starting too early, before the car even arrives.
😘
To fix this, inside the head symbol I'll drag the 1st 2 eyeball keyframes to the right.Then remove the keyframes on frame 43.And drag the keyframe from frame 42 to frame 44. This will properly time the eyeball movement with the cars arrival.Now let's increase the length of our animation. I'll insert frames up to frame 180 on the main timeline.Along with that, I'll also add a blank frame inside the character symbol and head symbol so everything stays properly In Sync.Let's add an eye blink in there too. I'll simply copy the blink keyframes and paste them at frame 120.In the same way, I'll copy the eyebrow keyframes and paste them at frame 120 as well to keep the expression consistent.Since our character has been waiting for the bus for quite a while, let's make him look a little sad. I'll go inside the lip drawing and to quickly give him a sad expression by flipping the lip drawing vertically.And just like that, now he looks a bit disappointed. Waiting for that bus that's just not showing up.Now we'll add a slight motion to the eyeballs, making it seem like he's still following that long car as it drives away.For this, I'll add a keyframe on frame 150 on both eyeball layers.Then I'll select both eyeballs and move them slightly towards a direction where the car is going.After that, I'll create a classic tween between frame 55 and frame 150 to smoothly animate the eyeball movement.Next, inside the Orvin front symbol, I'll add a keyframe on frame 89 on all the layers.Then I'll rotate the upper body as if he's still trying to follow the car.And I'll create a classic tween.Now there's one important adjustment to make on frame 44. During the head rotation, the head position needs to align perfectly with the neck.
It's slightly off right now, so I'll adjust the head's position to sit correctly on the neck joint.Also, our character is still smiling, so let's give him a little sadness in his expression.I'll go inside the lip drawing and flip it vertically to turn that smile into a frown.
😘
To complete the look, I'll also adjust the position of the eyebrows, bringing them down slightly to match the sad, tired expression.And that's it, our head turn animation is ready.Now here is the bonus tip. As our head turn animation is ready, let's take a moment to talk about a very important part of animation that is composition. Composition is basically the way you arrange and organize all the elements in your scene to create a certain visual effect or to tell your story clearly. Technically, this is something you'd normally set up before you start animating, but since our main goal here was to focus on the head turn.Animation. We jumped into that first.Now, if you look at this scene, you'll notice a problem. The background isn't composed properly, The bus stop and sign pole is getting cut off at the top, and the road isn't fully visible. Because of this, the scene isn't telling the story as clearly as it should. So let's fix that. First, I'll select the background symbol and using the free transform tool, I'll scale down the background a bit. This way we can fit all the.And elements like the bus stop sign pole, the road and the environment properly inside the frame.But here's something to remember.When you scale the background, you also need to scale the character proportionally.
Otherwise it'll look off and the perspective won't match.It's really important to compose your entire scene before starting the animation process, making sure all the necessary elements are in the frame and working together visually. Alright, with that fixed, our head turn animation is now officially complete. Let's do a final preview and check out the result.I hope you enjoyed this video and learned something new today. Thanks a lot for watching and I'll see you in the next video.
हेलो स्टूडेंट्स। आज हम सीखेंगे कि हेड टर्न एनीमेशन कैसे बनाया जाता है। हम देखेंगे कि किसी कैरेक्टर के सिर को एक एंगल से दूसरे एंगल तक स्मूद तरीके से कैसे घुमाया जाए, जिससे एक्शन में लाइफ और पर्सनैलिटी आए। इस खास सीन में हमारा कैरेक्टर ऑर्विन है। वह बस स्टॉप पर खड़ा है और शांति से इंतज़ार कर रहा है। बैकग्राउंड में बस स्टॉप का साइन, एक रोड और एक कार सेट की गई है, जो थोड़ी देर में वहाँ से गुज़रेगी। अब देखते हैं कि इस सीन में होने वाला क्या है। सबसे पहले हम रोड पर कार को तेज़ी से गुजरते हुए एनीमेट करेंगे। जैसे ही कार तेज़ी से पास से निकलेगी, ऑर्विन जो शुरुआत में थ्री क्वार्टर व्यू में खड़ा है, अपना सिर कार की तरफ घुमाएगा। वह स्मूद तरीके से थ्री क्वार्टर एंगल से फ्रंट फेसिंग पोज़ में आएगा और फिर दूसरी तरफ के थ्री क्वार्टर एंगल में चला जाएगा, जैसे वह अपनी आँखों और सिर से कार को फॉलो कर रहा हो। मैंने पहले ही ऑर्विन का इनिशियल पोज़ बना रखा है, जहाँ वह कैज़ुअली बस का इंतज़ार कर रहा है, तो हम उसी पर आगे काम करेंगे। अब चलो स्टेप बाय स्टेप सीखते हैं कि यह हेड टर्न एनीमेशन कैसे बनाया जाए। हम शुरुआत कार को एनीमेट करने से करेंगे। सबसे पहले मैं कार को लेफ्ट साइड की तरफ मूव करूँगा, पूरी तरह स्क्रीन के बाहर। मैं यह एक्शन कार लेयर पर फ्रेम 21 से शुरू करूँगा। इसका मतलब है कि पहले 20 फ्रेम्स तक ऑर्विन बस स्टॉप पर खड़ा होकर आराम से इंतज़ार करता रहेगा। इसके बाद फ्रेम 50 पर मैं कार लेयर पर एक और कीफ्रेम ऐड करूँगा और कार को राइट साइड की तरफ, स्क्रीन के बाहर की ओर मूव कर दूँगा। फिर फ्रेम 51 पर उसी कार लेयर पर एक ब्लैंक कीफ्रेम इंसर्ट करूँगा, जिससे कार की एनीमेशन वहीं रुक जाएगी। इसके बाद मैं कार लेयर पर इन कीफ्रेम्स के बीच एक क्लासिक ट्वीन क्रिएट करूँगा। यह सेटअप करने के बाद मैं जल्दी से एनीमेशन प्ले करके कार की स्पीड चेक करूँगा। इस स्टेज पर कार अच्छी स्पीड से मूव कर रही है। अब मैं ऑडियो के लिए एक नई लेयर बनाऊँगा और उसमें कार के गुजरने की साउंड इफेक्ट इम्पोर्ट करूँगा।
😘
यह हमेशा एक अच्छी प्रैक्टिस होती है कि हम सिंक को टेस्ट करें, इसलिए मैं साउंड के साथ एनीमेशन प्ले करूँगा ताकि देख सकूँ कि कार की मूवमेंट ऑडियो क्यू से मैच कर रही है या नहीं। ऐसा लगता है कि यहाँ हमें विज़ुअल्स को साउंड के साथ बेहतर सिंक करने के लिए थोड़ा एडजस्टमेंट करना पड़ेगा। इसलिए मैं कार के स्टार्टिंग फ्रेम को फ्रेम 25 पर शिफ्ट कर दूँगा। अंत में, मैं सभी लेयर्स पर 4 सेकंड तक फ्रेम्स इंसर्ट कर दूँगा। अब जब हमारी कार की एनीमेशन सेट हो चुकी है, तो अब समय है हमारे कैरेक्टर ऑर्विन को ज़िंदा करने का। सबसे पहले हमें आँखों की पोज़िशन को हैंडल करना होगा। चूँकि कार सीन में एंटर करने वाली है, इसलिए ऑर्विन की आँखों को उसकी मूवमेंट को फॉलो करना चाहिए। तो चलिए सबसे पहले कैरेक्टर के हेड सिम्बल के अंदर चलते हैं। इस हेड सिम्बल के अंदर, मैं फ्रेम 1 पर ऑर्विन की दोनों आईबॉल्स को सेलेक्ट करूँगा और उनकी पोज़िशन एडजस्ट करूँगा ताकि ऐसा लगे कि वह कार की तरफ देख रहा है। मेन टाइमलाइन पर हम हेड टर्न की एनीमेशन फ्रेम 45 से शुरू करेंगे, क्योंकि कार लगभग फ्रेम 37 के आसपास फ्रेम में एंटर होती है और बहुत जल्दी पास होकर निकल जाती है। हेड टर्न शुरू करने से पहले, यह सुनिश्चित करना ज़रूरी है कि आईबॉल की मूवमेंट सही टाइम पर हो। इसे बेहतर तरीके से मैनेज करने के लिए, मैं विंडो मेन्यू से सीन विंडो को डुप्लिकेट कर लूँगा। इस तरह मेरे पास एक ही सीन के लिए दो विंडो ओपन होंगी। एक विंडो में हेड सिम्बल के अंदर की लेयर्स दिखेंगी और दूसरी में मेन टाइमलाइन। यह सेटअप इंटरनल आई एनीमेशन और ओवरऑल सीन के बीच कोऑर्डिनेशन को आसान बना देता है। अब मेन टाइमलाइन पर हम यह तय करेंगे कि आँखों को कार को फॉलो करना कब शुरू करना चाहिए। हम आई मूवमेंट को फ्रेम 43 से शुरू करेंगे। मैं हेड सिम्बल के अंदर जाऊँगा और फ्रेम 43 पर दोनों आईबॉल लेयर्स पर एक कीफ्रेम ऐड करूँगा। फिर मैं दोनों आईबॉल्स को लेफ्ट साइड की तरफ मूव कर दूँगा। अगर आप फ्रेम 39 पर देखें, तो ऑर्विन अभी भी कार की शुरुआती पोज़िशन की तरफ देख रहा है, जो पूरी तरह सही नहीं लग रहा।
😘
उस समय तक कार आगे निकल चुकी होती है, इसलिए फ्रेम 39 पर ऑर्विन की आँखों को कार की असली पोज़िशन को फॉलो करना चाहिए। इसे ठीक करने के लिए मैं हेड सिम्बल के अंदर जाऊँगा और फ्रेम 39 पर दोनों आईबॉल लेयर्स पर कीफ्रेम ऐड करूँगा, फिर आईबॉल्स की पोज़िशन एडजस्ट कर दूँगा। क्योंकि मेन टाइमलाइन पर कार की एनीमेशन फ्रेम 25 से शुरू होती है, इसलिए आँखों की रिएक्शन भी हेड सिम्बल के अंदर फ्रेम 25 से ही शुरू होनी चाहिए। तो हेड सिम्बल के अंदर मैं फ्रेम 25 पर दोनों आईबॉल लेयर्स पर एक कीफ्रेम ऐड करूँगा और फिर फ्रेम्स के बीच एक क्लासिक ट्वीन क्रिएट करूँगा। अब जब हम एनीमेशन प्ले करेंगे, तो आप देखेंगे कि ऑर्विन की आँखें स्मूद और नैचुरल तरीके से कार की मूवमेंट को फॉलो कर रही हैं। सीधे हेड टर्न एनीमेशन में जाने से पहले, मैं सेकंड विंडो में पूरे सीन को एक बार ध्यान से रिव्यू कर लूँगा ताकि यह तय किया जा सके कि हेड टर्न किस फ्रेम पर शुरू होना चाहिए। ध्यान से देखने पर यह समझ में आता है कि फ्रेम 43 तक ऑर्विन का सिर उसी पोज़िशन में रहना चाहिए और सिर्फ आँखें ही कार को फॉलो करें। फिर फ्रेम 44 पर सिर फ्रंट व्यू की तरफ टर्न करना शुरू करे और फ्रेम 45 तक वह लेफ्ट साइड के थ्री-क्वार्टर एंगल तक पहुँच जाए। अब हम एनीमेशन का एक अहम प्रिंसिपल, एंटिसिपेशन, अप्लाई करेंगे। फ्रेम 43 पर, ऑर्विन फ्रंट सिम्बल के अंदर मैं सभी लेयर्स पर एक कीफ्रेम ऐड करूँगा और फ्रेम 38 पर भी एक कीफ्रेम डालूँगा, क्योंकि यहीं से हम एंटिसिपेशन बनाना शुरू करेंगे। फ्रेम 38 से 43 के बीच ऑर्विन हल्का सा आगे की तरफ झुकेगा, जैसे वह अपना वज़न शिफ्ट करने की तैयारी कर रहा हो। इस समय उसका वज़न ज़्यादातर लेफ्ट लेग पर है, लेकिन कार के निकल जाने के बाद मैं चाहता हूँ कि वह अपना वज़न राइट लेग पर शिफ्ट करे, जिससे हमें एक अच्छा फॉलो थ्रू और ओरिजिनल पोज़ से कॉन्ट्रास्ट मिले। इसके अलावा, मैं फ्रेम 49 पर भी एक कीफ्रेम ऐड करूँगा और इस फ्रेम पर हेड को हॉरिज़ॉन्टली फ्लिप कर दूँगा, ताकि वह अपोज़िट थ्री-क्वार्टर एंगल की तरफ फेस करे।
😘
फिर मैं दोबारा हेड सिम्बल के अंदर जाऊँगा और फ्रेम 49 पर दोनों आईबॉल लेयर्स पर कीफ्रेम ऐड करूँगा। यहाँ भी मैं आईबॉल्स की पोज़िशन को एडजस्ट करूँगा। इसके बाद मैं सिम्बल से बाहर आऊँगा और हेड लेयर के फ्रेम 44 पर एक ब्लैंक कीफ्रेम इंसर्ट करूँगा। फिर मैं फ्रेम 49 को ड्रैग करके फ्रेम 45 पर रखूँगा और फ्रेम 49 पर ही एक और कीफ्रेम ऐड कर दूँगा ताकि फाइनल पोज़ होल्ड रहे। फ्रेम 44 पर मैं लाइब्रेरी से फ्रंट हेड सिम्बल इंसर्ट करूँगा। मैं बस Orvin का फ्रंट हेड सिम्बल सेलेक्ट करके स्टेज पर ड्रैग करूँगा और यह सुनिश्चित करूँगा कि वह कैरेक्टर की बॉडी के साथ सही तरह से अलाइन्ड हो और उसका प्रपोर्शन ठीक हो, ताकि पोज़ेस के बीच का ट्रांज़िशन क्लीन और सीमलेस लगे। अब चलिए जल्दी से अब तक की हेड टर्न एनीमेशन प्ले करके देखते हैं कि यह कैसी लग रही है। यहाँ जैसा कि आप देख सकते हैं, हेड टर्न के दौरान Orvin अपनी आँखें ब्लिंक कर रहा है, इसलिए मैं चाहता हूँ कि यह ब्लिंक फ्रंट हेड पोज़ में भी कंटिन्यू रहे। इसके लिए मैं फ्रंट हेड सिम्बल के अंदर जाऊँगा और कैरेक्टर के ब्लिंक को इस तरह एडजस्ट करूँगा कि फ्रेम 44 पर उसकी आँखें बंद हों। सबसे पहले मैं राइट आई सिम्बल के अंदर जाऊँगा और वहाँ ब्लिंक पैचेस को हल्का सा राइट की तरफ शिफ्ट करूँगा। फिर मैं यही प्रोसेस लेफ्ट आई सिम्बल के लिए भी करूँगा, ताकि दोनों आँखें बराबर तरीके से बंद हों। इसके बाद आईब्रोज़ लेयर पर फ्रेम 44 पर एक कीफ्रेम ऐड करूँगा और दोनों आईब्रोज़ को थोड़ा सा नीचे की तरफ रोटेट कर दूँगा। अब अगर आप ध्यान से देखेंगे, तो आपको लगेगा कि हमारे Orvin फ्रंट सिम्बल में अभी भी आँखें ठीक से क्लोज़ नहीं हो रही हैं। ऐसा इसलिए है क्योंकि हमने अभी तक हेड एनीमेशन को सिंक नहीं किया है। इसे ठीक करने के लिए प्रॉपर्टीज़ पैनल के लूपिंग सेक्शन में जाएँ और 1st फ्रेम की वैल्यू 44 पर सेट कर दें। अब हेड टर्न एनीमेशन अच्छी लग रही है, लेकिन अब हमें कैरेक्टर की बॉडी को भी इस एक्शन में शामिल करना होगा। चलिए फ्रेम 43 से शुरू करते हैं। यहाँ सभी अपर बॉडी एलिमेंट्स को सेलेक्ट करें, पिवट पॉइंट को बॉटम सेंटर पर सेट करें और अपर बॉडी को लेफ्ट की तरफ रोटेट करें।
😘
इसके बाद शूज़ को छोड़कर बॉडी के लोअर पार्ट को अपर बॉडी के साथ सेलेक्ट करें। अब एक पिवट पॉइंट सेट करें और उसे थोड़ा सा स्केल डाउन करें। इससे कैरेक्टर के मूव करना शुरू करते ही पोस्टर में एक अच्छा सा शिफ्ट आएगा। अब फ्रेम 44 पर जाएँ और फ्रंट हेड सिम्बल को हल्का सा नीचे की तरफ मूव करें। फिर फ्रेम 49 पर टॉर्सो और दोनों आर्म सिम्बल्स को एक साथ सेलेक्ट करें। पिवट पॉइंट को ऊपर की तरफ सेट करें और उन्हें राइट की तरफ रोटेट करें। इससे कैरेक्टर का वज़न साफ़ तौर पर राइट लेग पर शिफ्ट होता हुआ दिखाई देगा। इसके बाद राइट लेग को सेलेक्ट करें, उसका पिवट पॉइंट नीचे सेट करें और लेग की पोज़िशन को अपर बॉडी के साथ मैच करें। यही प्रोसेस लेफ्ट लेग के साथ भी करें। अगर पैच शेप या कोई भी छोटा डिटेल थोड़ा सा ऑफ़ लग रहा हो, तो इस स्टेज पर उसे आराम से एडजस्ट कर लें। अब मैं फ्रेम 53 पर एक सेटलिंग पोज़ के लिए कीफ्रेम ऐड करूँगा। यहाँ मैं अपर बॉडी और पैंट सिम्बल्स को थोड़ा सा रोटेट करूँगा ताकि मूवमेंट का एंड सॉफ्ट लगे। फिर मैं यह भी सुनिश्चित करूँगा कि लेग्स की पोज़िशन पैंट के साथ सही तरह से अलाइन्ड हो। फ्रेम 43 पर मैं हाथ को हल्का सा राइट की तरफ रोटेट करूँगा और फिर फ्रेम 49 पर उसे वापस लेफ्ट की तरफ रोटेट कर दूँगा। जब ये सारे कीफ्रेम्स प्लेस हो जाएँ, तो मैं इनके बीच एक क्लासिक ट्वीन क्रिएट कर दूँगा। अब एनीमेशन को प्रीव्यू करने का समय है, इसे ध्यान से देखें और जहाँ भी ज़रूरत लगे वहाँ एडजस्टमेंट करें। फ्रेम 45 पर मैं हेड की पोज़िशन को जल्दी से एडजस्ट करूँगा ताकि वह बॉडी की मूवमेंट के साथ कंसिस्टेंट रहे। फ्रेम 49 पर मैं एक बार फिर अपर बॉडी को फाइन ट्यून करूँगा और यह चेक करूँगा कि लोअर बॉडी सही तरह से फॉलो कर रही है या नहीं। अब फ्रेम 43 पर मैं हेड को थोड़ा सा नीचे मूव करूँगा और उसे हल्का सा रोटेट भी करूँगा। फ्रेम 44 पर हेड को थोड़ा सा स्केल डाउन करूँगा। फिर फ्रेम 45 पर हेड को लेफ्ट की तरफ रोटेट करूँगा, उसे थोड़ा सा राइट और नीचे की तरफ मूव करूँगा और एक बार फिर हल्का सा स्केल डाउन कर दूँगा। फॉलो थ्रू और ओवरलैपिंग एक्शन के प्रिंसिपल को अप्लाई करने के लिए, मैं एंड में एक और मूवमेंट ऐड करूँगा। लास्ट कीफ्रेम पर मैं हेड को वापस लेफ्ट की तरफ रोटेट कर दूँगा।
😘
यह एक अच्छा सा ड्रैग और डिले का एहसास क्रिएट करता है, जिससे ऐसा लगता है कि सिर बॉडी की मूवमेंट को कैच-अप कर रहा है। इन सभी मूवमेंट्स के बीच स्मूद ट्रांज़िशन के लिए मैं सारे कीफ्रेम्स को सेलेक्ट करूँगा और उन पर क्लासिक ईज़-आउट इफ़ेक्ट अप्लाई करूँगा। इससे मूवमेंट एंड तक पहुँचते-पहुँचते नैचुरली स्लो हो जाएगी। इसके बाद हमें हेड सिम्बल को इन बदलावों के साथ सिंक्रोनाइज़ करना होगा, इसलिए मैं हेड लेयर को सेलेक्ट करके उस पर राइट-क्लिक करूँगा और “Synchronize Symbol” ऑप्शन चुनूँगा। इससे यह सुनिश्चित होगा कि हेड पर किए गए सारे चेंज सही तरह से अप्लाई हो जाएँ। अब आप नोटिस कर सकते हैं कि फ्रेम 48 पर आईबॉल की पोज़िशन थोड़ी मिसमैच लग रही है। ऐसा इसलिए हुआ क्योंकि पहले हमने हेड लेयर पर कीफ्रेम 49 को फ्रेम 45 पर शिफ्ट किया था, लेकिन हेड सिम्बल के अंदर उसे अपडेट नहीं किया। इसे ठीक करने के लिए मैं हेड सिम्बल के अंदर जाऊँगा और दोनों आईबॉल लेयर्स पर कीफ्रेम को फ्रेम 49 से मूव करके फ्रेम 45 पर ले आऊँगा। फिर फ्रेम 55 पर दोनों आईबॉल लेयर्स पर नए कीफ्रेम ऐड करूँगा और आईबॉल्स को थोड़ा ऊपर की तरफ मूव कर दूँगा। इसके बाद मैं एक क्लासिक ट्वीन अप्लाई करूँगा। अब दोनों आइब्रो लेयर्स पर फ्रेम 43 और फ्रेम 39 पर कीफ्रेम्स इंसर्ट करूँगा और इन दोनों के बीच एक क्लासिक ट्वीन क्रिएट करूँगा। फ्रेम 43 पर मैं दोनों आइब्रो को थोड़ा सा रोटेट करूँगा और नीचे की तरफ मूव कर दूँगा। इस पोज़िशन को थोड़ी देर होल्ड करने के लिए, मैं फ्रेम 44 पर दोनों आइब्रो लेयर्स पर कीफ्रेम ऐड करूँगा। इसके बाद फ्रेम 48 पर नए कीफ्रेम्स ऐड करूँगा, फिर फ्रेम 37 की पोज़ को कॉपी करके फ्रेम 48 पर पेस्ट कर दूँगा। इसके बाद एक क्लासिक ट्वीन बना दूँगा। अब एनीमेशन के एंड की तरफ आप देखेंगे कि कैरेक्टर ऊपर की तरफ देख रहा है। ऐसा इसलिए है क्योंकि हमने पहले हेड को रोटेट किया था, इसलिए अब हमें आईबॉल्स को भी एडजस्ट करना पड़ेगा। मैं हेड सिम्बल के अंदर जाकर फ्रेम 55 और फ्रेम 45 पर दोनों आईबॉल्स को नीचे की तरफ मूव करूँगा। अभी एक छोटा सा बग और है जिसे ठीक करना ज़रूरी है। फिलहाल आईबॉल एनीमेशन बहुत जल्दी स्टार्ट हो रहा है, कार के सीन में आने से भी पहले।
😘
इसे ठीक करने के लिए, मैं हेड सिम्बल के अंदर जाकर आईबॉल के पहले दो कीफ्रेम्स को दाईं तरफ ड्रैग करूँगा। इसके बाद फ्रेम 43 वाले कीफ्रेम्स को हटा दूँगा और फ्रेम 42 के कीफ्रेम को खींचकर फ्रेम 44 पर ले आऊँगा। इससे आईबॉल की मूवमेंट कार के सीन में आने के साथ सही टाइम पर मैच हो जाएगी। अब चलिए अपनी एनीमेशन की लेंथ बढ़ाते हैं। मैं मेन टाइमलाइन पर फ्रेम 180 तक फ्रेम्स इंसर्ट करूँगा। इसके साथ-साथ कैरेक्टर सिम्बल और हेड सिम्बल के अंदर भी एक-एक ब्लैंक फ्रेम ऐड करूँगा, ताकि सब कुछ सही तरह से सिंक में रहे। अब इसमें एक आई ब्लिंक भी ऐड कर लेते हैं। मैं बस ब्लिंक के कीफ्रेम्स को कॉपी करके फ्रेम 120 पर पेस्ट कर दूँगा। उसी तरह, आइब्रो के कीफ्रेम्स भी कॉपी करके फ्रेम 120 पर पेस्ट करूँगा, ताकि एक्सप्रेशन कंसिस्टेंट बना रहे। चूँकि हमारा कैरेक्टर काफी देर से बस का इंतज़ार कर रहा है, तो चलिए उसे थोड़ा सा उदास दिखाते हैं। मैं लिप ड्रॉइंग के अंदर जाकर, जल्दी से सैड एक्सप्रेशन देने के लिए लिप ड्रॉइंग को वर्टिकली फ्लिप कर दूँगा। और बस, अब वह थोड़ा डिसअपॉइंटेड लग रहा है, उस बस का इंतज़ार करते हुए जो अभी तक आई ही नहीं है। अब हम आईबॉल्स में हल्की सी मूवमेंट ऐड करेंगे, ताकि ऐसा लगे कि वह अब भी उस लंबी कार को जाते हुए देख रहा है। इसके लिए मैं दोनों आईबॉल लेयर्स पर फ्रेम 150 पर एक कीफ्रेम ऐड करूँगा। फिर दोनों आईबॉल्स को उस दिशा में थोड़ा सा मूव कर दूँगा, जिधर कार जा रही है। इसके बाद फ्रेम 55 और फ्रेम 150 के बीच एक क्लासिक ट्वीन क्रिएट करूँगा, ताकि आईबॉल की मूवमेंट स्मूदली एनिमेट हो सके। अब Orvin फ्रंट सिम्बल के अंदर जाकर मैं फ्रेम 89 पर सभी लेयर्स पर कीफ्रेम ऐड करूँगा। फिर अपर बॉडी को थोड़ा रोटेट करूँगा, जैसे वह अब भी कार को फॉलो करने की कोशिश कर रहा हो, और इसके लिए भी एक क्लासिक ट्वीन बना दूँगा। अब फ्रेम 44 पर एक ज़रूरी एडजस्टमेंट करना है। हेड रोटेशन के दौरान हेड की पोज़िशन नेक के साथ बिल्कुल सही अलाइन होनी चाहिए। अभी यह थोड़ी सी ऑफ है, तो मैं हेड की पोज़िशन को एडजस्ट करूँगा ताकि वह नेक जॉइंट पर सही से बैठ जाए। इसके अलावा, हमारा कैरेक्टर अभी भी स्माइल कर रहा है, तो चलिए उसकी एक्सप्रेशन में थोड़ी उदासी और लाते हैं। मैं लिप ड्रॉइंग के अंदर जाकर उसे वर्टिकली फ्लिप कर दूँगा, जिससे वह स्माइल एक फ्रोउन में बदल जाएगी।
😘
लुक को पूरा करने के लिए, मैं आइब्रो की पोज़िशन भी एडजस्ट करूँगा और उन्हें थोड़ा नीचे की तरफ लाऊँगा, ताकि वह सैड और थका हुआ एक्सप्रेशन अच्छे से मैच करे। और बस इतना ही, हमारी हेड टर्न एनीमेशन अब पूरी तरह से रेडी है। अब यहाँ एक बोनस टिप है। चूँकि हमारी हेड टर्न एनीमेशन तैयार हो चुकी है, तो चलिए एनीमेशन के एक बहुत ही ज़रूरी हिस्से के बारे में बात करते हैं, जिसे हम कंपोज़िशन कहते हैं। कंपोज़िशन का मतलब होता है सीन के अंदर मौजूद सभी एलिमेंट्स को इस तरह से अरेंज और ऑर्गनाइज़ करना कि एक अच्छा विज़ुअल इफेक्ट बने और आपकी स्टोरी साफ़-साफ़ समझ में आए। टेक्निकली, यह वो चीज़ है जो आपको एनीमेशन शुरू करने से पहले सेटअप करनी चाहिए, लेकिन क्योंकि हमारा मेन फोकस यहाँ हेड टर्न एनीमेशन पर था, इसलिए हमने सबसे पहले उसी पर काम किया। अब अगर आप इस सीन को ध्यान से देखेंगे, तो आपको एक प्रॉब्लम नज़र आएगी। बैकग्राउंड सही तरीके से कंपोज़ नहीं किया गया है। बस स्टॉप और साइन पोल ऊपर से कट रहे हैं और रोड भी पूरी तरह से दिखाई नहीं दे रही है। इस वजह से सीन अपनी स्टोरी उतनी क्लियर तरीके से नहीं बता पा रहा है, जितना बताना चाहिए। तो चलिए इसे ठीक करते हैं। सबसे पहले, मैं बैकग्राउंड सिम्बल को सिलेक्ट करूँगा और फ्री ट्रांसफॉर्म टूल का इस्तेमाल करके बैकग्राउंड को थोड़ा सा स्केल डाउन करूँगा। इससे बस स्टॉप साइन पोल, रोड और पूरा एनवायरनमेंट फ्रेम के अंदर सही से फिट हो जाएगा। लेकिन यहाँ एक बात याद रखना बहुत ज़रूरी है। जब आप बैकग्राउंड को स्केल करते हैं, तो आपको कैरेक्टर को भी उसी प्रपोर्शन में स्केल करना होता है। वरना सीन ऑफ़ लगेगा और परस्पेक्टिव मैच नहीं करेगा। एनीमेशन शुरू करने से पहले पूरे सीन की कंपोज़िशन करना बहुत ज़रूरी होता है, ताकि सभी ज़रूरी एलिमेंट्स फ्रेम के अंदर हों और विज़ुअली एक-दूसरे के साथ सही तरह से काम करें। तो अब यह सब ठीक करने के बाद, हमारी हेड टर्न एनीमेशन ऑफ़िशियली पूरी हो चुकी है। चलिए एक फाइनल प्रीव्यू देखते हैं और रिज़ल्ट चेक करते हैं। मुझे उम्मीद है कि आपको यह वीडियो पसंद आया होगा और आपने आज कुछ नया सीखा होगा। देखने के लिए बहुत-बहुत धन्यवाद, और मैं आपसे अगले वीडियो में मिलूँगा।