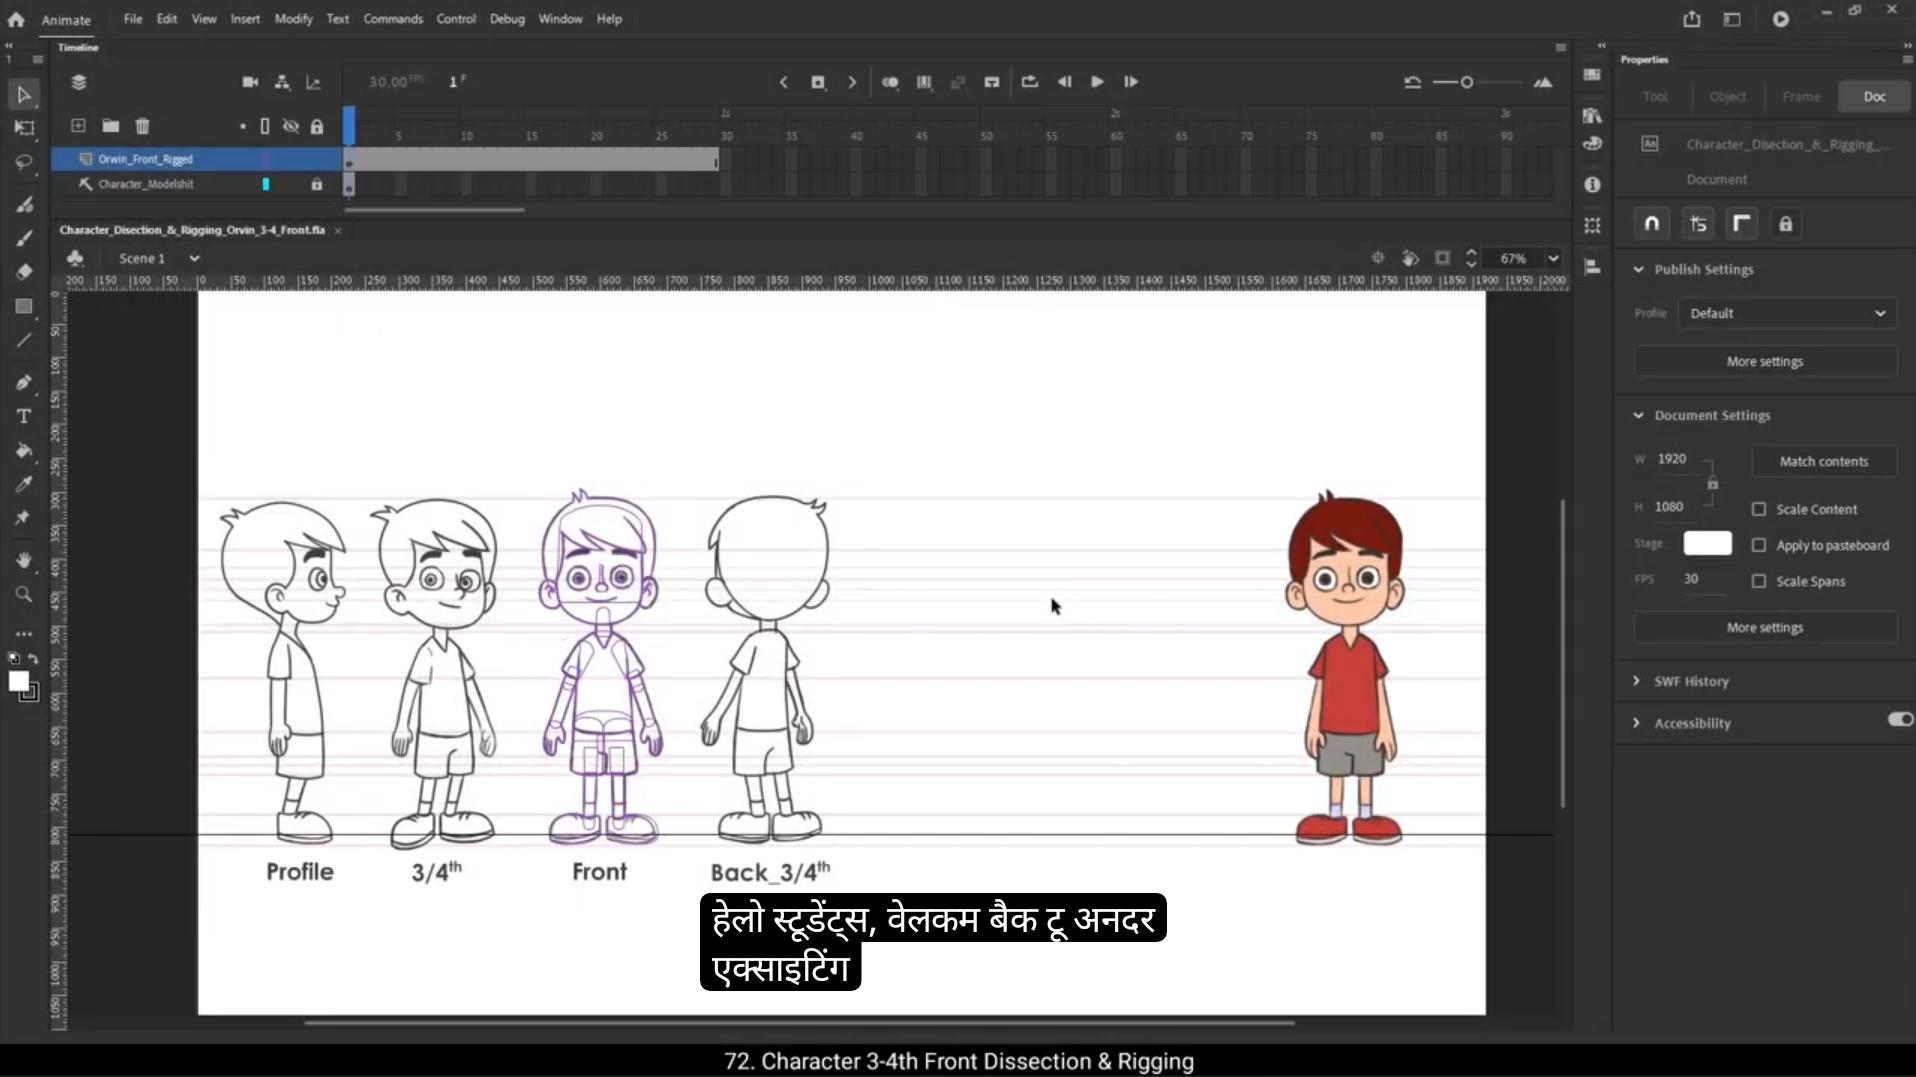
Hello students, welcome back to another exciting tutorial. Today we are going to take the next step in our character rigging journey by dissecting and rigging our character Orvin in the three quarters angle or three fourth angle, whichever way you like to say it. In our previous tutorial, we successfully rigged Orvin in the front view, breaking down the character into different parts and preparing them for animation.If you followed along and practiced the front angle rigging, you should now have a solid understanding of the dissection and rigging process. We're going to follow the exact same steps and techniques to rig Orvin in the three quarters angle. This will not only reinforce what you've already learned, but also help you understand how rigging works in different perspectives. So let's get started.The first step is tracing. As always, we need to be organized, so the very first thing we'll do is create a new layer for this 3/4 angle tracing.Let's rename this new layer as Orvin 3/4 Front Tracing so that we can easily identify it later. Keeping our layers separate and properly labeled is key to maintaining a smooth workflow.Next, we need to group our elements within this layer. To do this, we'll use the shortcut control G to create a group for hair inside our new layer. To trace hair, we'll draw a rectangle using the Rectangle tool shortcut key R.Once the rectangle is in place, we need to remove the fill color and we'll adjust the stroke size to 2 units, making sure we have a clear and visible outline.Next, we will refine the rectangle shape to ensure it aligns perfectly with the outline of the reference model sheet. For this, we'll be using the selection tool and the sub selection tool. 😘 The selection tool will help us move and adjust the overall shape, while the sub selection tool allows us to fine tune individual anchor points for a more precise match.Take your time adjusting the rectangle until it follows the contours of the reference correctly. Once we have completed the tracing for the hair, we will move on to the skull. We will create a new group for the skull. Using the rectangle tool. We will draw a new rectangle. Since we have already followed this process in the front angle rigging, we will repeat the same steps here with one key difference. We need to angle the skull slightly to match the 3/4 perspective of the character.The skull shape will be drawn only down to the lips position, keeping the jaw separate.This is important because we want independent control over the jaw movement, allowing for more flexibility when animating facial expressions or lip syncing dialogues.With the skull tracing complete, we can now move on to the jaw.Just like before, we will create a separate group for the jaw and start tracing it using the rectangle tool.Again, the key here is to ensure that the outline perfectly matches the reference model sheet.Keeping the jaw in a separate group will help us animate it smoothly and naturally, especially when the character is speaking or changing expressions.Next, we will set up a new group for the lips.Then we will use the line tool to draw a simple line, and we will add a curve to the line, adjusting it carefully to match the outline of the reference.Now we will start tracing the eyebrows. First, we will create a new group for the right eyebrow using the rectangle tool. 😘 We'll draw a simple rectangle and then adjust its shape carefully to match the outline of the reference model sheet.Once we have refined it, we'll move on to the left eyebrow.Just like before, we will create a separate group, draw another rectangle and reshape it to match the left eyebrow perfectly. Now let's focus on the nose.For this we will use the pencil tool. We'll keep the stroke size to 2 and make sure to turn on the object drawing mode carefully. We will trace the nose to match the reference.Next, let's move on to the ears.We will start with the right ear.Just like before, we will create a new group, use the rectangle tool to draw a base shape and then refine it to match the ears outline. For the esr inner details, We will switch to the pencil tool and carefully trace the inner lines. We will do the same for the left ear. Create a new group, draw a base rectangle, refine the shape and add the inner ear details using the pencil tool.Now, instead of tracing the eye from scratch for the three quarters angle, we will take a more efficient approach. Since we already have a ready eye symbol from our front angle rig character, we'll simply copy it and paste it onto our 3/4 angle layer. Once pasted, we'll carefully adjust it to match the outline of our model sheet. So for now, we won't be tracing the eye. We'll come back to this step later when refining the details.Now let's move on to tracing the remaining body parts of our character. We'll start with the neck as always. Create a new group and use the Rectangle tool to draw a base shape. Then refine the rectangle to match the shape of the neck according to the model sheet.At this stage we now have two separate groups, one for the head and one for the neck. 😘 To keep our rig organized, we'll select both groups and convert them into a single group. This means we now have a group, and inside this main group we still have separate groups for the head and neck, making it easier to animate later.Next, let's work on the torso. Just like before, we'll create a new group, then use the Rectangle tool to trace the torso shape.To keep our outline clean, I'll remove the fill color, leaving only the stroke visible.One important detail to remember while tracing the torso is to also trace the hidden part behind the bicep.This is crucial for animation because if the character raises its arm, the hidden area will be revealed. If we don't trace this part now, we might end up with empty gaps in the animation later. Now let's add the V shape at the neck. Using the Pencil tool, carefully trace the shape to match the outline in the reference model sheet.Once the V shape is drawn, press control B to break apart these drawings to keep our elements flexible for animation.Next, we'll move on to the arms. Since both the right and left arms will need to move independently in the animation, we will create separate groups for each arm. Let's start with the right arm first. We begin by drawing the sleeve of the character, making sure it matches the reference outline.After that, in the same group of sleeve, we trace the bicep, carefully shaping it to fit the model.It's important to add a slight curve at the joint areas so that the movement looks smooth when animating.Once the bicep is done, we continue by tracing the forearm. Here, precision is key. We need to match the outlines of both the bicep and forearm perfectly to ensure there are no gaps or glitches when animating arm movements. 😘 Now that the forearm is complete, we move on to the right hand.For the fingers I will use the pencil tool as it allows for a more natural and flexible drawing process.I'll carefully trace the fingers and shape them according to the reference.With the right arm fully traced, we will now repeat the same steps for the left arm.We begin by creating a new group. Then we follow the same process, tracing the sleeve, bicep, forearm and hand, ensuring that everything aligns smoothly with the model sheet. Now let's move on to tracing the legs of the character. We'll start with the right leg, beginning with the pant section. To do this, I'll create a new group and carefully trace the shape of the pant leg, ensuring it follows the reference outline precisely.Next we'll draw the knee section. I'll use the Rectangle tool to create a simple rectangular shape that represents the knee. After that, I'll create a new group for the lower leg, adjusting its shape so it fits seamlessly with the knee and pant leg. Once the right leg is fully traced, we move on to the shoe.For this I will use the pencil tool as it allows for more flexibility in shaping the shoe outline. Carefully I'll trace the right shoe making sure it aligns with the reference model sheet. Now instead of drawing this manually, I will copy the bottom outline of the shoe.I'll press Alt on the keyboard and drag the outline upwards to create a duplicate. This will ensure that the shoe and sole maintain the correct shape and flow. Once copied, I'll slightly scale the new outline to match it perfectly with the reference. 😘 Now that the right leg and shoe are complete, let's move on to the left leg. The process is similar. First, we trace the left pant leg, making sure it matches the reference exactly.Instead of manually drawing the knee and lower leg again, we can duplicate the right leg components. To save time, I will simply copy the knee and lower leg from the right leg, then drag and position them on the left leg. Once placed correctly, I'll make minor adjustments to ensure everything aligns perfectly with the outline. Now that I have created a separate group for the character I will continue using the pencil tool to refine the details just like we did for the right shoe. I will copy the bottom line of the left shoe to Make a duplicate and align it perfectly with the sole line to maintain consistency. Once the shoe outline is properly adjusted, I will delete any extra lines that extend beyond the main outline. This will help to keep it clean and well defined. Next I will add a new group for the pelvis part, just like we did in the front angle rig.The pelvis is an essential element when animating because it serves as the connecting part between the upper and lower body.When the character lifts a leg, jumps, or performs any dynamic movement, this section becomes visible. By including the pelvis, we can avoid blank gaps in the animation, ensuring smooth emotion. I will carefully match the outlines of the pelvis with the waist and pant of the character, making sure it blends seamlessly.Now to handle overlapping areas, add a separate group and draw a rectangle to create an overlapping patch. We will delete any extra outlines once we start filling color.At this point we have successfully traced the entire character except for the eyes, which we will add later. 😘 With the tracing complete, it's now time to fill in the colors for all the groups bringing our character to life. First, we will unhide the front angle layer, which will serve as our reference for picking colors. This will help maintain color consistency across different angles of the character.We'll start with the hair. Using the eyedropper tool, we will pick the exact hair color from the front angle layer. Then using the paint bucket tool, we will fill the hair group in the three quarters angle rig.Next, we move on to the skin tone. Again using the eyedropper tool, we will select the skin color and fill it inside both the skull and jaw groups.For the nose, instead of just filling it with a flat color, we will add a subtle color patch using the brush tool.We will then adjust its shape to match the contours of the nose. Once the nose is done, we will fill color into other facial features including both ears, eyebrows and the neck area.To achieve a more natural blend, we will delete the outline of the skull and jaw near the lips. This will seamlessly blend both parts, avoiding any unnecessary separation lines. To maintain the correct layer order, press Control down arrow to send the ears behind the head. For the right ear, delete the right side outline to blend the skin tone seamlessly, then send it behind the head to ensure a natural look.Now we will continue coloring the remaining body parts following the same process. Pick the color using the Eyedropper tool. Fill the respective groups using the Paint Bucket tool.While doing this, it's essential to maintain the correct layering order. We can use send to back and bring to front commands to properly adjust the layer hierarchy. Also, we will delete any extra outlines that might interfere with the blending of body parts. This ensures a clean and polished look for our character. 😘 Now that we have filled in all the colour of our character It's time to add the eyes.Instead of tracing them again, we will reuse the I symbol from the front angle rigged character.First, let's select the eyeball and the pupil from the front angle layer.Once selected we will copy them, but before pasting we need to create a new group specifically for the right eye.Now we paste the copied eye into the new group.We will take a reference line to ensure that the eye alignment is accurate. Proper alignment is crucial for maintaining a natural look.Once the right eye is positioned correctly, we will duplicate it and drag it to the left eye position.Since the left eye is slightly different in the three quarters angle due to perspective, we need to manually adjust its position to match the model sheet.To do this, we will exit the I group and turn on outline mode. This will help us see the exact positioning of the left eye relative to the nose and facial structure.Place the left eye just behind the nose to match the perspective.Since the left eye is further away in this angle, we will also slightly scale it down using the free transform tool.Check the alignment in outline mode to make sure the positioning is accurate. If needed, we will move the left eye down slightly to match the reference model sheet.Finally, select the pupil and adjust its position within the eyeball to maintain the correct focus and direction.Now that the coloring is complete, it's time to move on to the next step, converting our groups into symbols.First, select the entire group that makes up the character. Now press F8 on the keyboard to convert it into a symbol. Name this symbol Orvin 3/4 front so it's easy to identify later, and keep the registration point at the bottom center.Next, select the free transform tool and double click the pivot point to position it correctly. 😘 This is important because it defines the rotation Center for symbol. Now that we have our character symbol, I need to break it apart so I can rig the individual body parts separately. So I'll select the entire character symbol and press Control B to break it back into its separate groups.Now let's start with the head. Select the head group and convert it into a symbol by pressing F8. Rename it Orvin 3/4 front head so it's clear what this symbol represents, and set the registration point at the bottom center.Now, using the free transform tool, immediately adjust the pivot point, placing it where the head should naturally rotate.Double Click to enter the head symbol and move the head slightly to the left and down to align it correctly.Then exit the symbol and move the entire head symbol upwards and slightly to the right. This small tweak is important. It ensures that when we animate the head movement, it rotates from a natural position instead of looking off balance.Now we will convert the neck and torso into symbols. We will follow the exact same steps. Now, moving on to the arms, we need to adjust the angle of each part before converting them into symbols. Just like we did for front angle. We'll begin with the sleeve. Before making it a symbol, we need to rotate it to a straight 90° angle, then convert it into a symbol. Name it properly and set the registration point at the top left corner.After that, we rotate it back to its original position and adjust the pivot point accordingly. This will ensure that we can animate it smoothly without any distortion. Next, we'll follow the same process for the forearm. First, we rotate it to a straight position, Then we convert it into a symbol, give it a proper name, and this time we set the pivot point at the top center. 😘 Once done, we rotate it back to its original position and set the pivot placement.Now let's do the same for the right palm.Again, we follow the same steps.With these adjustments in place, we ensure that each arm part can be scaled and skewed smoothly without any distortion.Now that the right arm is set, we repeat the exact same process for the left arm, converting the sleeve, forearm, and hand into cymbals while ensuring that everything is aligned properly. We make sure to adjust the layer positions so that everything is in the correct order. Now let's continue with the remaining body parts of our character and follow the same process. For the left leg, we first need to rotate it to a straight angle before converting it into a symbol.Once it's properly aligned, we convert it into a symbol, then rotate it back to its original position and set the pivot point.To adjust the pivot point for the shoe, we first need to move the entire shoe symbol to the left. Then we enter inside the symbol and move the inner group to the right. This ensures that the shoe rotates naturally when animated.Once that's done, we proceed to convert the left leg groups into a symbol. Now Let's move on to the facial features inside the head symbol. Before we start converting, we first need to break apart the entire head group so that each feature can be converted separately. We then begin the symbol conversion process starting with the hair, followed by the eyebrows, nose, lips, ears, skull, and jaw. All right, now that we've completed the dissection and rigging process, let's do a quick check to ensure that all groups have been properly converted into symbols.To verify this, simply select all the elements and look at the Object tab in the Properties panel. 😘 If it displays graphics, then all groups have been successfully converted into symbols.And with that, our 3/4 front angle dissection and rigging is complete to reinforce what you've learned. Your task is to complete the profile angle dissection and rigging by yourself.The model sheet file for the profile angle will be available in the Downloadable Materials section for your reference key points to remember.While tracing the profile angle R, since the character is in a profile view, you don't need to trace both ears, eyes or eyebrows. Trace only the ones visible in the given angle. However, you must trace the invisible arm and its parts like sleeves, bicep, forearm and hand, as well as the pant leg and shoe. These parts might not be visible in the static drawing, but they will become visible when animating movements.So it's essential to include them.To maintain a clean and structured workspace, always organize your symbols inside the library. For better workflow efficiency, create a new folder for each angle and store their respective symbols in those folders. This will help you quickly locate and manage elements during animation.By practicing both the front and three quarters angle, you will gain a solid understanding of the dissection and rigging process, an essential skill for character animation. So keep practicing, keep experimenting, and most importantly, keep animating.Thank you for following along and see you in the next tutorial.