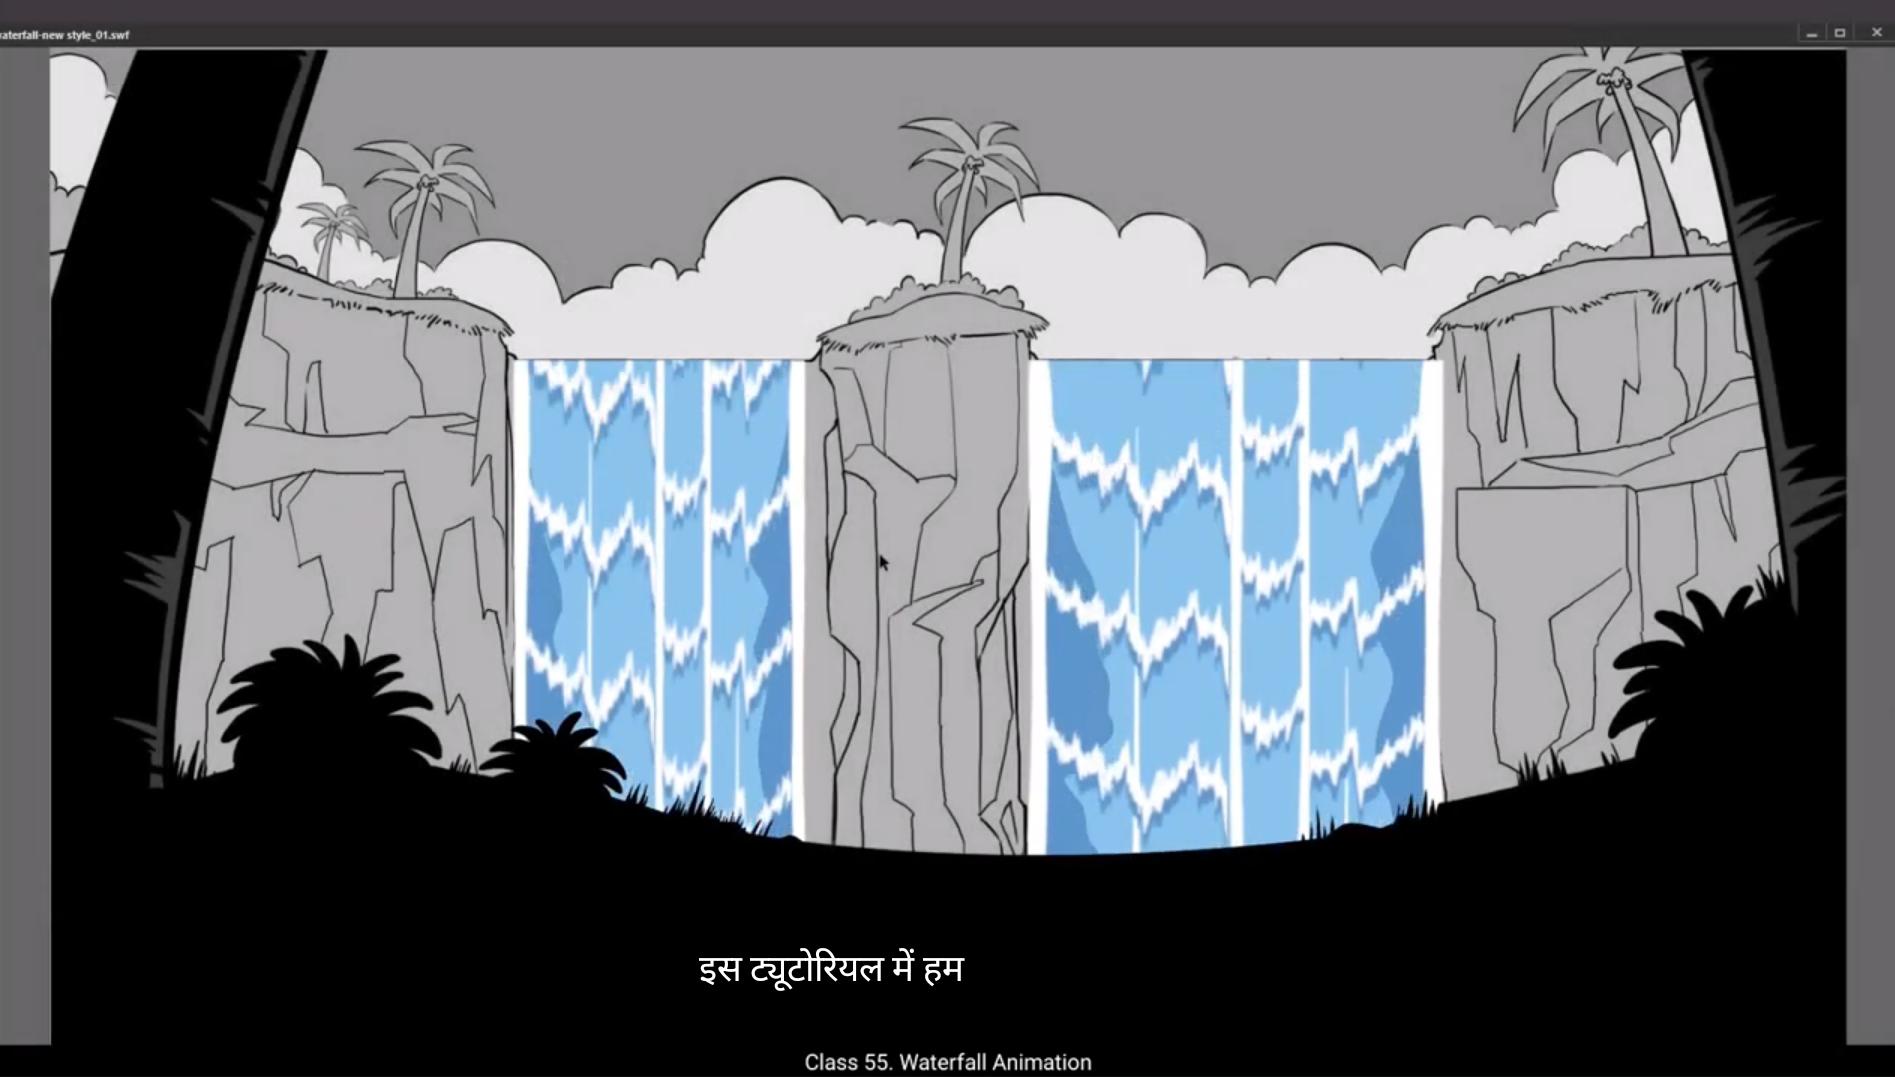
In this tutorial we are going to animate a waterfall.You can see that we have 3 layers with us. 1 is a background, one has some trees and shrubs on it and the third is our animation layer which sits in between the background and the overlay. This is obviously where we animate the waterfall. You can also see that we have set 30 frames as the length of our animation on the timeline. To do this we go to frame 30 and use F5 to add frames. We now lock the background layer and also lock and hide the overlay layer.For the time being.Next we draw a rectangle using the rectangle tool. The shortcut key is R We are going to keep the rectangle blue. As you will see in the video we are not going to have outlines to it. We now select the rectangle and convert it into a symbol using F8 and we call it Waterfall. We double click on it and enter the symbol. We then extend the length to 30 frames on the timeline by selecting frame 30 and using F5 to Add frames.We then lock layer 1 and add a new layer 2 next.We draw a rectangle again using the rectangle tool. The shortcut is R and we keep a white fill to this rectangle.
Please follow the video for the details. Once we've drawn the thin white rectangle as it is in the video, we select it and convert it into a symbol using F8 and call it Pattern. We again double click the symbol, go to frame 30 and add frames using F5 so that our length remains 30 frames throughout all our symbols. We now switch off the Snap to Object tool. Please see the video to locate it.Now doing this so that we can modify the shape of this rectangle easily. We are now going to make some distortions to the shape by using the selection tool and holding down the alt key. The shortcut for the selection tool is V.
Now please follow the video for the shape we need to make.Once The shape is done. We switch on the snap to object tool again to smoothen our curves as seen in the video.
We now go to frame 30 and add a keyframe using F6. Then we select some frames in between random. Right click on anyone and select create.Shaped twin from the drop down menu.
Next we Go to Keyframe 1 and using the shortcut control Shift H, we are going to add 4 shape hints A, B, C, and D and place them at the four corners of our shape.
We keep the snap to object tool on while placing the hints.This will help us place our hands easily at the corners of the shape. We then go to the last keyframe and place the same hints on the same corners. We are now adding another hint on keyframe 1 and placing it close to the hint as you can see in the video. We now go to the last key, add the same hint. We place it closer to the hint see on this keyframe. Please make sure that your position on the hints fairly close to the way they are placed in the video.You can now see that the left side of our shape is animated. We now follow the same process for the right side of our shape. On keyframe one, we add a new hint and place it on the right side of our shape close to the hint B. We then go to the last frame and add the same hint, only place it closer to the D On this keyframe. We now exit the symbol by clicking Waterfall on the tab next to scene 1.We now select our symbol which we have called pattern, copy it using the shortcut control C and using the shortcut control Shift V we place it in place. Then using the arrow keys on the keyboard, we move it to the right side of the rectangle shape which we had created.
Once it's placed on the right side, we select it, go to Modify on the main menu, then go to Transform from the drop down menu and select Flip Horizontal from the extended menu. Once this flip is done, we add a new layer 3 and using the rectangle tool, the shortcut key is our Draw another rectangle as seen in the video. Then Create a keyframe on frame 15 using the shortcut F6. We stretch the bottom part of the very thin rectangle so that it's a bit broader than the top. Then we select keyframe 1 and holding down the Alt key, we drag it to the last keyframe which is on frame 30. This will help our animation get into a seamless loop.Then we select a few in between frames at random as seen in the video. Right click on anyone frame.And choose Create Shape Tween from the drop down menu. Please follow the video. We now create a new layer. On this layer we are going to animate some highlights on the surface of the falling water. For this we are going to draw a pattern using the brush tool. The shortcut for this is B. But before this we need to hide layer 3 and lock all the other layers except layer 4. Now we go to the brush tool. On the tabs to our right we can see the properties of our brush.Let's check in properties, Object Color and Style and we'll see that we are using a white fill. Now we zoom in a little bit and start drawing our patterns. Make sure you follow the video to refer to the patterns.
Once the pattern is done, we select it, The shortcut is Control A and convert it to a symbol by using F8 and we name the symbol lines. We select our layers which has the lines again and convert it to a symbol using F8 and we call this one lines one. We then enter the symbol copying it using control C, paste it in place using Control Shift V and then we move it As you can see in the video, we are going to replicate this line symbol several times to make a larger pattern out of it.
Please follow the video for this.
Once we've made 5 copies, we can select all 5 and copy them all together and paste in place and move them up exactly like it is done in the video.Once this is done, we exit the symbol by clicking on Waterfall on the tab as seen in the video. On layer four, we select frame 30 and add a keyframe layer using F6.And they dragged the whole pattern down. Please follow the video for how much you need to move the pattern. Then you select some frames in between the first and last keys. Right click on any one of them and choose Create Classic Tween from the menu.Next we unlock layer one and create a new layer 5. We select keyframe 1 and holding down the Alt key we drag this up to new layer 5, keyframe 1, then right click on the layer 5 and select Mask from the dropdown menu.
Next we.Hide the mask layer 5:00 and also the pattern layer 4 for now. Then we unhide layer 3, go to keyframe 1 and make some changes to the shape here. Please follow the video for the changes.Now We copy keyframe 1 and paste it to keyframe 2, which is on frame 30. Of course. We do this by selecting frame one, holding down the Alt key and dragging it to frame 30. Next we adjust the second keyframe on frame 15 on layer 3.We now look and unhide all the layers. We go to layer 5 and add a new layer 6 on top of it.
Draw a Rectangle using the Rectangle tool. The shortcut key is R, and we use the same light blue fill as at off the waterfalls main colour.
We now go to layer 2 and copy the shape here using Control C We then log the layer and create a new layer 7.We now paste our shape in place using Control Shift V, which we had copied from layer two.
We then moved to the center of the waterfall and at the left of our newly created rectangle. Please follow the video to see where to position it.We then squash the shape vertically using the free transform tool. The shortcut for this is Q. Again. We select the symbol on layer 7, copy it using Control C and paste it in place using Control Shift V and drag it to the right of our newly created rectangle. Please follow the video for the position here. Then we go to Modify on the main menu and choose Transform from the drop down menu and select Flip Horizontal from the sub menu.We then create a new layer 8. Here we are going to create highlights for our new rectangle or flowing water.
Once this new highlight is done, we select it and convert it to a symbol by pressing F8 and we call it lines two. We convert it to a symbol again and call it lines 3 and enter the symbol. Then we copy our highlights and paste it several times to create a pattern just like we have done for the earlier highlights. Please follow the video for the positions of the copies.
Now Add another keyframe on frame 30 using F6 and move the pattern symbol down by using the arrow keys and match it with the keyframe 1.
Now we select some Frames in between the 1st and the last frames. Right click on anyone and select Create Classic Tween from the drop down menu.
We add a new layer 9.We unlock layer 7, copy the shape using Control C and paste it in place on the new layer 9 using Control Shift V.We are now going to level the top of this rectangle using the selection tool so that it is aligned with the top of the bigger rectangle which we had created earlier which is the main flow of the water.
The shortcut for the selection tool is V.We then right click on the layer 9 and select Mask from the drop down menu. Then we drag layer 7 and layer 6 into the mask layer. Please see the video to be clear on this. We can see a quick preview here by pressing Enter. This looks OK.Then we go to layer 4 which has the earlier highlights on it. We double click the highlight and enter the symbol where we have the pattern of highlights and double click again to enter the symbol where we have created the single highlight.We now copy the symbol, create a new layer 2 and drag it down South. It plays under layer one. Please see the video here.We then paste this in place using Control Shift V On layer two we drag it down as seen in the video.We then go and change the shade of blue. Here we go to Fill which is in Properties tab Colour and Fill section. We select a darker shade of blue and place it very close to the earlier highlight. This gives a nice volume and once we add it to this symbol we can see that it will be added to the entire pattern. We are now going to add the same dark tone to the highlight in the middle of the waterfall.We go to layer 8 and the rest of the process is the same as it was for the earlier highlight. Please follow the video.Once this is done, we exit the symbol by clicking the waterfall on the tab as seen in the video and then click enter and see what our animation looks like. This looks like it's going right.Now we go to layer 2 and drag it up and place it over the layer 9. We then exit the symbol by clicking on the scene 1 tab and checking our animation again. We are going to make a few changes to this. We start by creating a new layer 10 and add some dark tones to the waterfall to give it more texture. First of all, let's hide all the other layers except layer 10.
Then we add some shapes randomly using the brush tool just as seen in the Video.
We then fill our newly created shape with the darkish blue. We add a keyframe on frame 15 using F6. We then make some changes to the shape of this keyframe randomly so that we will get some motion here.Then we select keyframe 1 and drag it to the last frame which is frame 30. Holding down the Alt key. We then select some frames random between the 1st and the last keyframes, Right click on anyone and select Create Shape Between from the menu. We can see what this motion looks like by pressing the Enter key.
Now add another layer 11:00 and we are going to repeat the exact process only to the right of the waterfall. Please follow the video.Next, we drag both layers 10 and 11 down and place them just above layer one.Next we exit the symbol By clicking the scene 1 tab and by pressing enter we look at our animation. we now select our highlight layers and add blur to them by going to Filter tab which is located in Properties frames. We select blur from the drop down menu we get by clicking on the plus sign next to the filters. We Keep the quality high and values for the X&Y axis will be two. Now we do the same process for the highlights which are in the middle of the waterfall. Please watch the video closely so you don't miss out anything.
We can now exit the Symbol by clicking on the scene 1 tab and pressing enter to see what the animation looks like. OK, we are going to tweak a couple of things. So we enter the symbol again, we go to layer 3 and create a new layer 12 on top of it. We then select all the frames on layer 3 and drag it up to layer 12 by holding down the alt key.
Now we lock all the layers except 12 and then we go and select Edit multiple frames at the top just below the main menu. Please see the video to locate the switch.
Once the switch is on, we select all the frames on layer 12 using control A and move them down to right side exactly seen in the video.We then exit the symbol by clicking on the scene 1 tab and add a new layer below the layer overlay and call it animation 2.Then we copy our animation symbol from the animation layer and paste it onto animation layer 2.Then we squash it vertically using free transform tool. Shortcut is Q. We do this so that this waterfall fits perfectly into the background as you can see in the video. We then go to the looping options in the property tab and go to the box next to the first box and add a value of 10 there.Now we use control enter to see our preview. The waterfall looks fine. Hope you found this tutorial helpful. Thank you for watching.
इस ट्यूटोरियल में हम एक waterfall को animate करने जा रहे हैं। जैसा कि आप देख सकते हैं, हमारे पास तीन layers हैं — एक background layer, दूसरी trees और shrubs, झाड़ियाँ वाली layer, और तीसरी है हमारी animation layer, जो background और overlay layer के बीच में है। यही वह layer है, जिस पर हम waterfall का animation बनाएंगे।
आप देख सकते हैं कि हमने timeline पर 30 frames की animation length सेट की हुई है। ऐसा करने के लिए हम frame 30 पर जाकर F5 दबाते हैं ताकि frames add हो जाएँ। अब हम background layer को lock करते हैं, और overlay layer को lock और hide कर देते हैं — फिलहाल के लिए।
इसके बाद हम Rectangle Tool, shortcut key R का इस्तेमाल करके एक rectangle बनाते हैं। हम इस rectangle को नीले रंग में रखेंगे, और जैसा कि वीडियो में दिखाया गया है, इसमें कोई outline नहीं होगी।
अब हम इस rectangle को select करते हैं और F8 दबाकर इसे symbol में convert करते हैं, और इसका नाम रखते हैं “Waterfall”। इसके बाद हम double click करके इस symbol के अंदर जाते हैं। यहाँ हम timeline पर frame 30 तक जाते हैं और F5 दबाकर frames add करते हैं ताकि length 30 frames तक बढ़ जाए।
अब हम Layer 1 को lock करते हैं, और एक नई layer जोड़ते हैं। फिर से हम Rectangle Tool का उपयोग करते हैं और इस बार हम white fill color वाला एक पतला rectangle बनाते हैं, जैसा कि वीडियो में दिखाया गया है।
जब यह white rectangle बन जाता है, तो हम इसे select करते हैं, F8 दबाकर symbol में convert करते हैं, और इसका नाम रखते हैं “Pattern”।
अब हम फिर से double click करके Pattern symbol के अंदर जाते हैं, और frame 30 पर जाकर F5 दबाकर frames add करते हैं, ताकि इस symbol की length भी 30 frames तक रहे।
इसके बाद हम “Snap to Object” tool को off करते हैं — कृपया वीडियो में देखें कि यह tool कहाँ स्थित है। हम ऐसा इसलिए कर रहे हैं ताकि हम rectangle के shape को आसानी से modify कर सकें।
अब हम Selection Tool, shortcut V का उपयोग करते हैं, और Alt key दबाकर rectangle के shape में थोड़े distortions करते हैं, जैसा कि वीडियो में step-by-step दिखाया गया है।
इस तरह हम waterfall के शुरुआती shape को तैयार करते हैं।
अब वीडियो को ध्यान से फॉलो कीजिए ताकि आप समझ सकें कि हमें किस तरह का शेप बनाना है। जब शेप तैयार हो जाए, तो हम Snap to Object Tool को दोबारा ON कर देते हैं ताकि हमारे curves स्मूथ हो जाएं, जैसा कि वीडियो में दिखाया गया है। अब हम frame 30 पर जाते हैं और F6 दबाकर एक keyframe जोड़ते हैं। इसके बाद कुछ बीच के फ्रेम्स को रैंडम तरीके से सेलेक्ट करते हैं और किसी एक पर right click करके Create Shape Tween ऑप्शन चुनते हैं।
इसके बाद हम Keyframe 1 पर जाते हैं और Control + Shift + H शॉर्टकट दबाकर चार shape hints – A, B, C और D ऐड करते हैं और इन्हें अपने शेप के चारों कोनों पर रखते हैं। Snap to Object Tool को ON ही रखते हैं ताकि hints कोनों पर आसानी से प्लेस हो जाएं। फिर हम last keyframe पर जाते हैं और वहीं चारों hints को उन्हीं कोनों पर दोबारा प्लेस करते हैं। अब हम एक और hint Keyframe 1 पर ऐड करते हैं और इसे पहले वाले hint के पास रखते हैं जैसा कि वीडियो में दिखाया गया है। फिर हम last keyframe पर जाकर वही नया hint दोबारा ऐड करते हैं और उसे इस keyframe पर मौजूद hint C के पास रखते हैं। ध्यान रहे कि hints की पोज़िशन वीडियो में दिखाई गई पोज़िशन के जितना हो सके उतना करीब हो। अब आप देख सकते हैं कि हमारे शेप का बायां हिस्सा एनिमेट हो गया है।
अब हम यही प्रोसेस शेप के दाहिने हिस्से के लिए दोहराते हैं। Keyframe 1 पर एक नया hint जोड़ते हैं और इसे शेप के राइट साइड पर hint B के पास रखते हैं। फिर last frame पर जाकर वही hint ऐड करते हैं और उसे hint D के पास प्लेस करते हैं। इसके बाद हम Waterfall टैब पर क्लिक करके symbol से बाहर निकलते हैं।
अब हम अपने उस symbol या Pattern को सेलेक्ट करते हैं, Control + C दबाकर कॉपी करते हैं और Control + Shift + V दबाकर उसे same place पर पेस्ट करते हैं। फिर arrow keys का इस्तेमाल करके हम उसे rectangle shape के दाहिने हिस्से की तरफ मूव करते हैं जैसा कि वीडियो में दिखाया गया है।
अब जब यह शेप राइट साइड में सही जगह पर प्लेस हो जाए, तो हम इसे सेलेक्ट करते हैं, फिर ऊपर के Main Menu में जाते हैं, Modify पर क्लिक करते हैं, फिर Transform के ड्रॉपडाउन मेन्यू में जाकर Flip Horizontal चुनते हैं। इससे हमारा शेप मिरर होकर उल्टा हो जाएगा।
अब हम एक नई लेयर या Layer 3 बनाते हैं, और Rectangle Tool, शॉर्टकट R का इस्तेमाल करके एक और rectangle ड्रॉ करते हैं जैसा कि वीडियो में दिखाया गया है। इसके बाद Frame 15 पर जाकर F6 दबाते हैं ताकि वहाँ एक keyframe बन जाए। अब हम उस पतले रेक्टेंगल के नीचे के हिस्से को थोड़ा स्ट्रेच करते हैं ताकि वो ऊपर से थोड़ा चौड़ा हो जाए।
इसके बाद हम Keyframe 1 को सेलेक्ट करते हैं और Alt Key दबाकर उसे Frame 30 तक ड्रैग करते हैं। इससे हमारा एनिमेशन एक seamless loop में चलता रहेगा। फिर हम कुछ बीच के फ्रेम्स को रैंडम तरीके से सेलेक्ट करते हैं, किसी एक पर Right Click करते हैं और Create Shape Tween का ऑप्शन चुनते हैं जैसा कि वीडियो में दिखाया गया है।
अब हम एक नई लेयर या Layer 4 बनाते हैं। इस लेयर पर हम falling water की surface पर highlights एनिमेट करने जा रहे हैं। इसके लिए हम Brush Tool, शॉर्टकट B का इस्तेमाल करेंगे। लेकिन उससे पहले हमें Layer 3 को Hide करना है और बाकी सारी लेयर्स को Lock करना है, ताकि हम सिर्फ Layer 4 पर काम कर सकें।
अब हम Brush Tool सेलेक्ट करते हैं। दाईं ओर मौजूद Properties Panel में जाकर Object Color and Style चेक करते हैं। यहाँ हमें दिखेगा कि हम White Fill का इस्तेमाल कर रहे हैं। अब थोड़ा Zoom In करते हैं और वीडियो में दिखाए गए पैटर्न्स को फॉलो करते हुए अपने highlight patterns ड्रॉ करते हैं।
जब पैटर्न तैयार हो जाए, तो हम उसे Control + A दबाकर सेलेक्ट करते हैं और F8 दबाकर Symbol में कन्वर्ट करते हैं। इसका नाम रखते हैं “lines”।
अब हम उस Layer को, जिसमें ये lines हैं, फिर से सेलेक्ट करते हैं और F8 दबाकर उसे एक और Symbol में कन्वर्ट करते हैं — इस बार इसका नाम रखते हैं “lines one”।
अब हम symbol में Double Click करके एंटर करते हैं , और अंदर जाकर Control + C से कॉपी करते हैं, फिर Control + Shift + V से paste in place करते हैं, और फिर उसे थोड़ा Move करते हैं जैसा कि वीडियो में दिखाया गया है।
हम इस line symbol को कई बार replicate या कॉपी करेंगे ताकि एक बड़ा pattern बन सके — जैसा कि वीडियो में दिखाया गया है।
कृपया इस हिस्से के लिए वीडियो को ध्यान से फॉलो करें। जब हम 5 कॉपीज़ बना लेते हैं, तब हम उन सभी 5 symbols को एक साथ सेलेक्ट करते हैं, फिर उन्हें कॉपी करते हैं, और Paste in Place या Ctrl + Shift + V करके उन्हें ऊपर की ओर मूव करते हैं — बिल्कुल उसी तरह जैसे वीडियो में दिखाया गया है।
जब ये स्टेप पूरा हो जाए, तो हम symbol से बाहर निकलते हैं — इसके लिए ऊपर टैब में “Waterfall” पर क्लिक करते हैं, जैसा वीडियो में बताया गया है। अब Layer 4 पर जाते हैं, Frame 30 को सेलेक्ट करते हैं और F6 दबाकर वहाँ एक Keyframe जोड़ते हैं। इसके बाद हम पूरा pattern नीचे की ओर ड्रैग करते हैं — वीडियो देखकर ध्यान दें कि इसे कितना नीचे मूव करना है।
फिर हम पहले और आखिरी keyframe के बीच कुछ random frames सेलेक्ट करते हैं, किसी एक पर Right Click करते हैं और Create Classic Tween चुनते हैं।
अब हम Layer 1 को Unlock करते हैं और एक नई Layer 5 बनाते हैं। इसके बाद Keyframe 1 को सेलेक्ट करते हैं, और Alt key दबाकर उसे Layer 5 के Keyframe 1 पर Drag करते हैं। फिर Layer 5 पर Right Click करके Mask ऑप्शन चुनते हैं।
इसके बाद हम Mask Layer या Layer 5, और Pattern Layer या Layer 4 — दोनों को Hide कर देते हैं ताकि बाकी काम आसानी से हो सके। अब हम Layer 3 को Unhide करते हैं, Keyframe 1 पर जाकर Shape में कुछ बदलाव करते हैं — ये बदलाव वीडियो के अनुसार ही करें।
अब हम Keyframe 1 को कॉपी करते हैं और उसे Frame 30 पर Paste करते हैं। ऐसा करने के लिए Frame 1 को सेलेक्ट करें, Alt Key दबाएं, और उसे Frame 30 तक Drag करें।
इसके बाद हम Layer 3 के Frame 15 पर जाकर उस दूसरे Keyframe को Adjust करते हैं ताकि एनिमेशन स्मूद दिखे।
अब हम सभी लेयर्स को Unhide करते हैं ताकि पूरा एनिमेशन विज़िबल हो जाए। फिर हम Layer 5 पर जाते हैं और उसके ऊपर एक नई Layer 6 बनाते हैं।
अब हम Rectangle Tool, Shortcut R से एक Rectangle ड्रॉ करते हैं और इसमें Light Blue Fill लगाते हैं — वही कलर जो हमने Waterfall के मुख्य हिस्से में इस्तेमाल किया था।
इसके बाद हम Layer 2 पर जाते हैं, वहाँ से Shape को Copy करते हैं, फिर Layer 2 को Lock कर देते हैं और एक नई Layer 7 बनाते हैं। अब हम Copied Shape को Paste in Place या Ctrl + Shift + V करते हैं ताकि वह Layer 7 पर सही जगह पर आ जाए — बिल्कुल उसी तरह जैसे वीडियो में दिखाया गया है।
अब हम Waterfall के सेंटर की ओर मूव करते हैं, और नए बनाए गए Rectangle के लेफ्ट साइड पर जाते हैं। कृपया वीडियो देखकर ध्यान दें कि इसे exact position पर कैसे रखना है। इसके बाद हम Free Transform Tool, Shortcut Q का उपयोग करके इस शेप को Vertically Squash करते हैं यानी थोड़ा दबाते हैं ताकि इसका अनुपात सही लगे।
अब हम Layer 7 पर मौजूद Symbol को सेलेक्ट करते हैं, Ctrl + C दबाकर कॉपी करते हैं और फिर Ctrl + Shift + V से Paste in Place करते हैं। अब इसे Rectangle के राइट साइड में Drag करते हैं। इसका सटीक position वीडियो में दिखाया गया है, इसलिए उसे ध्यान से फॉलो करें। इसके बाद हम Modify मेन्यू में जाते हैं, वहाँ से Transform → Flip Horizontal चुनते हैं ताकि शेप उलटी दिशा में दिखाई दे।
अब हम एक नई Layer 8 बनाते हैं। इस लेयर पर हम नए Rectangle के लिए Highlights बनाने वाले हैं। जब यह Highlight Drawing पूरी हो जाए, तो हम इसे Symbol में कन्वर्ट करते हैं और इसका नाम Lines 2 रखते हैं। फिर हम इसे एक बार और Symbol में Convert करते हैं और इस बार नाम रखते हैं Lines 3। अब हम इस Symbol में Enter करते हैं और अपने Highlights को Copy करके कई बार Paste करते हैं ताकि एक Pattern बन जाए — ठीक वैसे ही जैसे हमने पहले Highlights के लिए किया था। वीडियो देखकर इन कॉपीज़ की सटीक positions को समझें।
अब हम Frame 30 पर जाकर एक Keyframe ऐड करते हैं और Pattern Symbol को Arrow Keys से नीचे की ओर Move करते हैं ताकि वह Frame 1 के Pattern से मैच हो जाए।
इसके बाद हम पहले और आखिरी Frame के बीच कुछ Random Frames सेलेक्ट करते हैं, किसी एक पर Right Click करते हैं और Create Classic Tween चुनते हैं ताकि पैटर्न स्मूदली मूव करे।
अब हम नई Layer 9 बनाते हैं। फिर Layer 7 को Unlock करते हैं, वहाँ से Shape को Copy करते हैं और नई Layer 9 पर Paste in Place करते हैं।
अब हम Selection Tool, Shortcut V का उपयोग करके इस Rectangle के टॉप को Adjust करते हैं ताकि यह बड़े Rectangle, जो मुख्य Waterfall Flow है, उसके के ऊपरी हिस्से के साथ बिल्कुल Align हो जाए।
Selection Tool का Shortcut “V” है। अब हम Layer 9 पर Right Click करते हैं और Dropdown Menu से Mask सिलेक्ट करते हैं। फिर हम Layer 7 और Layer 6 को Drag करके Mask Layer के अंदर ले जाते हैं। कृपया वीडियो में देखकर यह स्टेप ध्यान से फॉलो करें।
अब हम Enter Press करके एक Quick Preview देखते हैं — और हाँ, यह अब काफी अच्छा दिख रहा है।
अब हम Layer 4 पर जाते हैं, जिसमें हमने Earlier Highlights बनाए थे। हम Highlight Symbol पर Double Click करते हैं ताकि हम उसके अंदर जाएँ — जहाँ हमने Highlights का Pattern बनाया था। फिर हम एक बार और Double Click करते हैं ताकि हम उस Symbol में प्रवेश करें जिसमें Single Highlight बनाया गया था।
अब हम इस Symbol को Copy करते हैं, फिर एक नई Layer 2 बनाते हैं और इस Copied Symbol को Layer 1 के नीचे रखते हैं, वीडियो देखकर Position को ठीक करें । इसके बाद हम इसे Ctrl + Shift + V से Paste in Place करते हैं और इसे नीचे की ओर Drag करते हैं, जैसा कि वीडियो में दिखाया गया है।
अब हम Fill Color बदलने के लिए Properties Panel में जाते हैं — वहाँ Colour and Fill Section में जाकर हम Blue का एक Darker Shade चुनते हैं। इसे हम Earlier Highlight के बहुत पास रखते हैं ताकि यह Volume Effect दे। जैसे ही हम यह Dark Shade Symbol में जोड़ते हैं, यह पूरे Pattern पर Apply हो जाता है।
अब हम Waterfall के बीच वाले Highlight में भी यही Dark Tone जोड़ने जा रहे हैं। इसके लिए हम Layer 8 पर जाते हैं और वही प्रक्रिया दोहराते हैं जो हमने पहले Highlight के लिए की थी। कृपया वीडियो देखकर इस हिस्से को ध्यान से फॉलो करें।
एक बार यह पूरा हो जाने के बाद, हम Waterfall टैब पर क्लिक करके Symbol से Exit करते हैं। अब Enter Press करते हैं ताकि Animation Preview देख सकें — और हाँ, यह अब बहुत बढ़िया दिख रहा है, जैसे पानी सही दिशा में गिर रहा हो।
अब हम Layer 2 को ऊपर Drag करके Layer 9 के ऊपर रखते हैं ताकि Composition बेहतर लगे। इसके बाद हम Scene 1 टैब पर क्लिक करके Symbol से Exit करते हैं और पूरी Animation को फिर से Play करते हैं।
अब हम इसमें कुछ और सुधार करने वाले हैं। इसके लिए हम नई Layer 10 बनाते हैं ताकि Waterfall में Dark Tones जोड़कर उसे और Texture और Depth दे सकें। सबसे पहले, हम सभी अन्य Layers को Hide कर देते हैं ताकि केवल Layer 10 ही दिखाई दे।
अब हम Brush Tool, shortcut B का इस्तेमाल करके कुछ Shapes को Randomly Draw करते हैं — बिल्कुल वैसे ही जैसे वीडियो में दिखाया गया है। इसके बाद हम नई बनाई हुई Shapes को Darkish Blue Color से Fill करते हैं ताकि यह Waterfall के Shadows जैसा लगे। अब हम Frame 15 पर एक Keyframe Add करते हैं।
इसके बाद हम इस Keyframe की Shape में Random Changes करते हैं ताकि हमें थोड़ा Motion Effect मिल सके। अब हम Keyframe 1 को Alt Key दबाकर Drag करके Last Frame यानिकि Frame 30 तक ले जाते हैं। फिर हम कुछ Frames को Randomly Select करते हैं जो पहले और आखिरी Keyframe के बीच हैं, उन पर Right Click करके Create Shape Tween चुनते हैं। अब हम Enter Press करके देखते हैं कि हमारा Motion Effect कैसा लग रहा है।
अब हम नई Layer 11 बनाते हैं और ठीक यही Process दोबारा दोहराते हैं, लेकिन इस बार Waterfall के Right Side पर। कृपया वीडियो को ध्यान से देखें ताकि Positioning सही हो।
इसके बाद हम Layer 10 और 11 दोनों को Drag करके Layer 1 के ठीक ऊपर ले आते हैं ताकि यह Waterfall Structure के साथ Perfectly Blend हो जाए।
अब हम Scene 1 Tab पर क्लिक करके Symbol से Exit करते हैं और Enter Press करके पूरी Animation Preview देखते हैं। यह अब काफी Realistic दिखने लगा है।
अगले स्टेप में हम Highlights Layers पर Blur Effect लगाने जा रहे हैं। इसके लिए हम Properties Panel में Filter Tab खोलते हैं, फिर Plus आइकॉन पर क्लिक करते हैं और Blur सिलेक्ट करते हैं। Quality को High पर रखते हैं और X और Y Axis दोनों की Values को 2 सेट करते हैं। अब हम यही Process Waterfall के Middle Highlights पर भी दोहराते हैं ताकि पूरा Animation Smooth और Natural लगे। कृपया वीडियो को ध्यान से देखें ताकि कोई स्टेप मिस न हो।
अब हम दोबारा Scene 1 Tab पर क्लिक करके Symbol से Exit करते हैं और Enter Press करके Animation को Play करते हैं। यह अब और भी Smooth लग रहा है।
अब हम कुछ और Fine Adjustments करेंगे। इसके लिए हम फिर से Symbol के अंदर Enter करते हैं और Layer 3 पर जाते हैं। यहाँ हम नई Layer 12 बनाते हैं और Layer 3 की सभी Frames को Alt Key दबाकर Drag करके Layer 12 पर ले जाते हैं।
अब हम सारी layers को lock कर देते हैं, सिवाय Layer 12 के। इसके बाद हम ऊपर वाले टूलबार में जाकर Edit Multiple Frames वाला स्विच ऑन करते हैं — कृपया वीडियो में देखें कि यह स्विच कहाँ स्थित है।
जब यह स्विच ऑन हो जाता है, तब हम Layer 12 की सभी frames को Control + A से select करते हैं और फिर उन्हें नीचे और दाईं ओर move करते हैं — बिल्कुल वैसे ही जैसे वीडियो में दिखाया गया है।
इसके बाद हम Scene 1 Tab पर क्लिक करके Symbol से बाहर निकलते हैं और एक नई layer बनाते हैं, जो Overlay Layer के नीचे होगी, और उसका नाम रखते हैं Animation 2।
अब हम Animation Layer से अपने Animation Symbol को Copy करते हैं और Animation 2 Layer पर Paste in place कर देते हैं।
फिर हम Free Transform Tool या Shortcut Q का उपयोग करके इस Symbol को vertically squash करते हैं ताकि यह background में perfectly fit हो जाए, जैसा कि वीडियो में दिखाया गया है।
अब हम Properties Tab में जाते हैं, वहाँ Looping Options में पहले बॉक्स के बगल वाले बॉक्स में value “10” डालते हैं ताकि animation का timing set हो जाए।
अंत में हम Control + Enter दबाकर Preview देखते हैं। हमारा Waterfall Animation बहुत ही smooth और realistic दिख रहा है।
Hope you found this tutorial helpful. Thank you for watching!