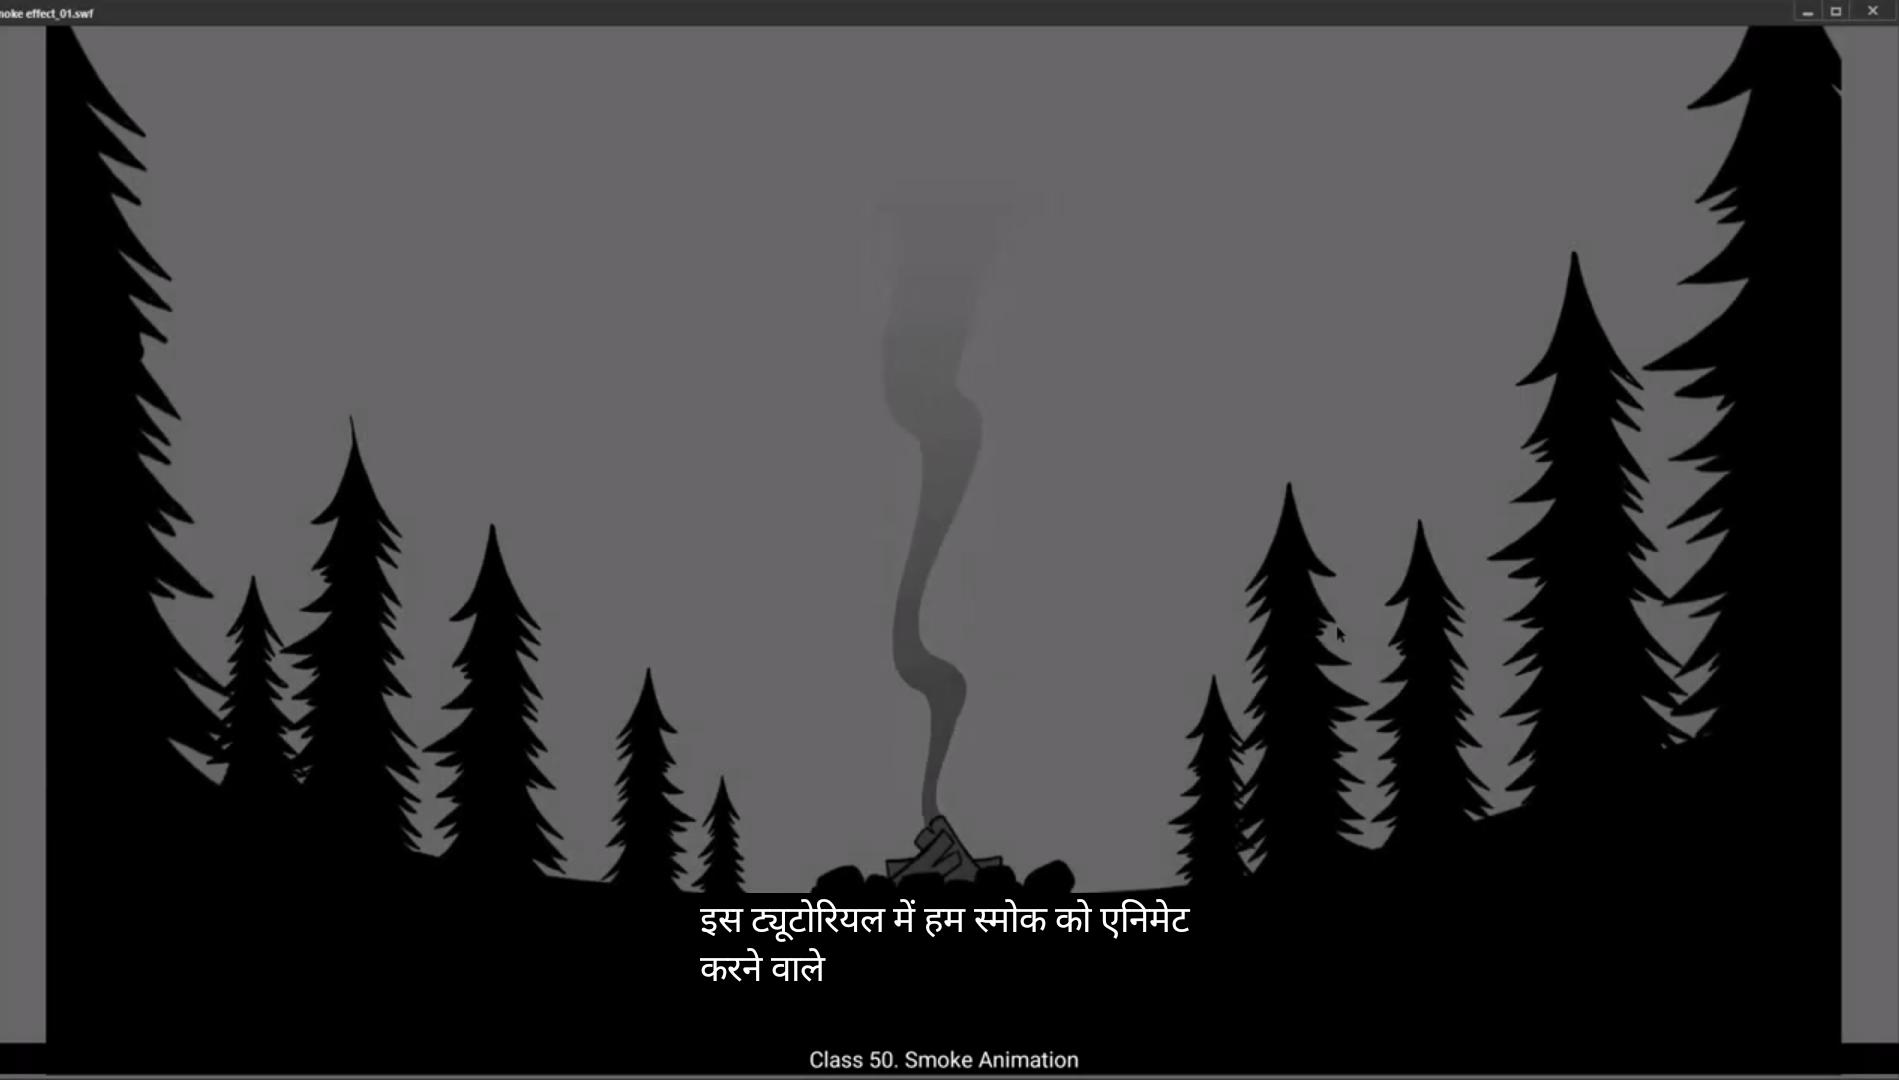
In this tutorial we are going to animate smoke. We have two layers with us. One of them has trees and campfires set up and the second one is called smoke.This is our animation layer.You can do this by clicking frame 40 and pressing F5 which is a shortcut to add frames.Now using the Rectangle tool, we draw a rectangle. As you can see in the video, the shortcut for this is R.We changed the fill to red for the time being by going to the colour palette located in the Properties tab on the right. It's in Properties, Object, Colour and Style Fill. The palette will appear when you click fill.Then we move our rectangle as you can see in the video and hide layer 2 which has the ground, trees and campfire on it.We now distort the shape of our rectangle as it's seen in the video.For this we use the selection tool. The shortcut is V .We are now going to pull out points and distort our rectangle even more. We'll do this by holding down the Alt key. Please follow the video closely.We then curve down those shapes and finally it starts looking like smoke as seen in the video. Then we select the shape and convert it into a symbol by pressing F8 and we name it smoke one. We now enter the symbol by double clicking the shape. Next we go to frame 40 and add frame using shortcut key F5. We then select the shape for our smoke and fill it with white located in the properties.Object color and style fill. We then click on the color palette as shown in the video.And here in the drop down menu, we choose linear gradients instead of solid color. Now we choose the shade of our gradient. We select the right point and keep the alpha here 0%. Then we go to left point, change the alpha here to 60%. And we've used the bluish Gray as you can see in the video. 😘 Now select the gradient transform tool by using shortcut F Then we rotate the gradient as seen in the video so that it starts at the bottom and ends at the top.We now adjust our gradient length so that it fits well inside our smooth shade.Account that the gradient is adjusted, we go to the selection tool. The shortcut here is V.Then they go to frame 40 and add a keyframe there using the shortcut F6. We then select a few frames in between the 1st and the last frame as seen in the video. Right click on anyone and choose Create Shape Tween from the drop down menu. Next we go to the keyframe 1 and using the Control Shift H key, we add a shape hint to our smoke shape. We then move each shape hint to each corner of our shape seen in the video. We can quickly convert our shape which.This gradient fill to only outline so it might be easier to work with. Please see where to locate the switch or the outline tool in the video.We now go to frame 40 and again place the shape pins that we had created on keyframe one as it's done in the video. You will see that the shape hints here on this keyframe have turned green when we place them on the corner again. We then go to keyframe 1 and add another shape hint and place it close to the shape hint B. Then again we go to the last keyframe and place the same hint closer to the shape D.We can now see one side of our shape animated. Now let's do the same on the other side of the shape. Next, let's switch off the outline mode and go to the switch on the looping option. Please see the video to locate the switch for the looping option. We then select our frames on the timeline as seen in the video and we play the animation in a loop. 😘 We get a fair idea of what our animation looks like. It looks like we can still make our animation smoother, so we go back and add more shape. Hence the shortcut is Control Shift H. Please follow the video carefully to see how we add new shape.To make our animation smoother. We then exit the symbol by clicking the scene 1 tab and then unhide the layer with the ground trees and the campfire on it. Now we adjust the position of our smoke animation symbol so that it looks like it's coming out from the campfire. We can now see our output by exporting and SWF file. The shortcut is Control Enter Animation looks good but we could improve the gradient. It doesn't seem to blend well with the sky. We double click on the.To enter the symbol, we select Keyframe one. Then we go to the color palette, which you can see on the vertical tab just left of the Properties tab. Then we go to the right point and change the light Gray to a much darker one. As you can see in the video, we are now going to do the same on the last keyframe to match the color. We can now exit the symbol by clicking on the Scene 1 tab and see what our changes look like. Well, we are still not there yet. What are we trying to do is to match the top shade of the gradient of the smoke with the shade of the sky. It'll look so much better that way.We now adjust the gradient color again on the keyframe 1.Now on the keyframe 1, using the gradient transform tool for which the shortcut is F, we move our gradient down as seen in the video.We repeat the same process for the second keyframe, which is frame #40. We can quickly see what it looks like by pressing enter.We can now export an SWF format to see a proper view.Well, it's working now. Hope you found this tutorial helpful. Thank you. इस ट्यूटोरियल में हम smoke को animate करने वाले हैं। हमारे पास दो layers हैं। उनमें से एक में trees और campfire set up किया हुआ है और दूसरी का नाम है smoke। यह हमारी animation layer है। आप ऐसा कर सकते हैं frame 40 पर क्लिक करके और F5 दबाकर जो frames add करने का shortcut है। अब Rectangle tool का use करके हम एक rectangle draw करते हैं। जैसा कि आप वीडियो में देख सकते हैं, इसका shortcut है R। हम फिलहाल fill को red में बदल देते हैं colour palette में जाकर जो right side में Properties tab में होती है। ये Properties, Object, Colour और Style Fill में है। जब आप fill पर क्लिक करते हैं तो palette दिखेगी। फिर हम अपने rectangle को वीडियो में दिखाए अनुसार move करते हैं और layer 2 को hide कर देते हैं जिसमें ground, trees और campfire है। अब हम अपने rectangle के shape को distort करते हैं जैसा कि वीडियो में दिखाया गया है। इसके लिए हम selection tool का इस्तेमाल करते हैं। इसका shortcut है V। अब हम points को खींचकर rectangle को और distort करने वाले हैं। हम ऐसा Alt key दबाकर करते हैं। कृपया वीडियो को ध्यान से follow करें। फिर हम उन shapes को curve करते हैं और आखिर में यह smoke जैसा दिखने लगता है जैसा वीडियो में दिखाया गया है। फिर हम shape को select करते हैं और F8 दबाकर इसे एक symbol में convert करते हैं और इसका नाम रखते हैं smoke one। अब हम shape पर double click करके symbol के अंदर जाते हैं। अगला step है frame 40 पर जाना और shortcut key F5 से frame add करना। फिर हम smoke के shape को select करते हैं और इसे white color से fill करते हैं जो properties में Object, color और style fill में होता है। फिर हम color palette पर क्लिक करते हैं जैसा कि वीडियो में दिखाया गया है। और यहाँ drop down menu में हम solid color की जगह linear gradients चुनते हैं। अब हम gradient का shade चुनते हैं। हम right point को select करते हैं और यहाँ alpha को 0% रखते हैं। फिर हम left point पर जाते हैं और यहाँ alpha को 60% करते हैं। और हमने bluish gray shade का इस्तेमाल किया है जैसा कि आप वीडियो में देख सकते हैं। 😘 अब Gradient Transform Tool को select करें shortcut F दबाकर। फिर हम gradient को वीडियो में दिखाए अनुसार rotate करते हैं ताकि ये नीचे से शुरू होकर ऊपर खत्म हो। अब हम gradient की length को adjust करते हैं ताकि ये हमारे smooth shade के अंदर ठीक से fit हो जाए। Gradient adjust हो जाने के बाद, हम Selection Tool पर जाते हैं जिसका shortcut है V। फिर हम frame 40 पर जाते हैं और shortcut F6 का इस्तेमाल करके वहाँ एक keyframe add करते हैं। उसके बाद हम 1st और last frame के बीच के कुछ frames को select करते हैं जैसा कि वीडियो में दिखाया गया है। किसी एक पर right click करें और drop down menu में से Create Shape Tween चुनें। अब हम keyframe 1 पर जाते हैं और Control Shift H दबाकर अपनी smoke shape में shape hint add करते हैं। फिर हर shape hint को अपनी shape के हर कोने पर move करते हैं जैसा कि वीडियो में दिखाया गया है। हम अपनी shape को, जिसमें gradient fill है, सिर्फ outline में convert कर सकते हैं ताकि काम करना आसान हो जाए। कृपया वीडियो में देखें कि switch या outline tool कहाँ locate है। अब हम frame 40 पर जाते हैं और फिर से वही shape hints place करते हैं जो हमने keyframe 1 पर बनाए थे, जैसा कि वीडियो में किया गया है। आप देखेंगे कि इस keyframe पर shape hints हरे (green) रंग के हो गए हैं जब हम उन्हें कोनों पर रखते हैं। फिर हम keyframe 1 पर जाकर एक और shape hint add करते हैं और उसे shape hint B के पास रखते हैं। उसके बाद हम फिर से last keyframe पर जाते हैं और उसी hint को shape D के पास रखते हैं। अब हम देख सकते हैं कि हमारी shape का एक हिस्सा animated है। अब चलिए shape के दूसरे हिस्से पर भी यही process दोहराते हैं। अगला step है outline mode को बंद करना और looping option को चालू करना। कृपया वीडियो में देखें कि looping option का switch कहाँ है। फिर हम timeline पर अपने frames को select करते हैं जैसा कि वीडियो में दिखाया गया है और हम animation को loop में play करते हैं। 😘 अब हमें अंदाज़ा हो गया है कि हमारी animation कैसी दिख रही है। ऐसा लग रहा है कि हम अपनी animation को और smooth बना सकते हैं, तो हम वापस जाकर और shape hints add करते हैं। इसका shortcut है Control Shift H। कृपया वीडियो को ध्यान से follow करें ताकि आप देख सकें कि हम नई shape hints कैसे add कर रहे हैं ताकि हमारी animation और smooth हो जाए। फिर हम Scene 1 tab पर क्लिक करके symbol से बाहर निकलते हैं और ground, trees और campfire वाली layer को unhide करते हैं। अब हम अपने smoke animation symbol की position adjust करते हैं ताकि ऐसा लगे कि धुआं campfire से निकल रहा है। अब हम अपना output SWF file के रूप में export करके देख सकते हैं। इसका shortcut है Control Enter। Animation अच्छी दिख रही है लेकिन gradient को और बेहतर किया जा सकता है। ये sky के साथ अच्छे से blend नहीं हो रहा। हम symbol में enter करने के लिए उस पर double click करते हैं और फिर Keyframe 1 select करते हैं। अब हम color palette में जाते हैं, जो Properties tab के बाईं ओर vertical tab पर होती है। फिर हम gradient के right point पर जाकर light gray को थोड़ा darker gray में बदलते हैं जैसा कि वीडियो में दिखाया गया है। अब हम last keyframe पर भी वही color change करते हैं ताकि दोनों keyframes का color match हो जाए। अब हम Scene 1 tab पर क्लिक करके symbol से बाहर आते हैं और देखते हैं कि हमारे बदलाव कैसे दिख रहे हैं। अब भी थोड़ी कमी लग रही है। हमारा goal ये है कि smoke के gradient के top shade को sky के shade से match करें ताकि वो और natural लगे। अब हम फिर से keyframe 1 पर gradient color adjust करते हैं। Keyframe 1 पर gradient transform tool का इस्तेमाल करते हैं, जिसका shortcut है F, और gradient को नीचे की ओर move करते हैं जैसा कि वीडियो में दिखाया गया है। हम यही process frame 40 पर भी दोहराते हैं। अब Enter दबाकर हम जल्दी से preview देख सकते हैं। अब हम SWF format में export करके proper view देख सकते हैं। अब ये perfectly काम कर रहा है। उम्मीद है आपको ये tutorial helpful लगा होगा। Thank you.