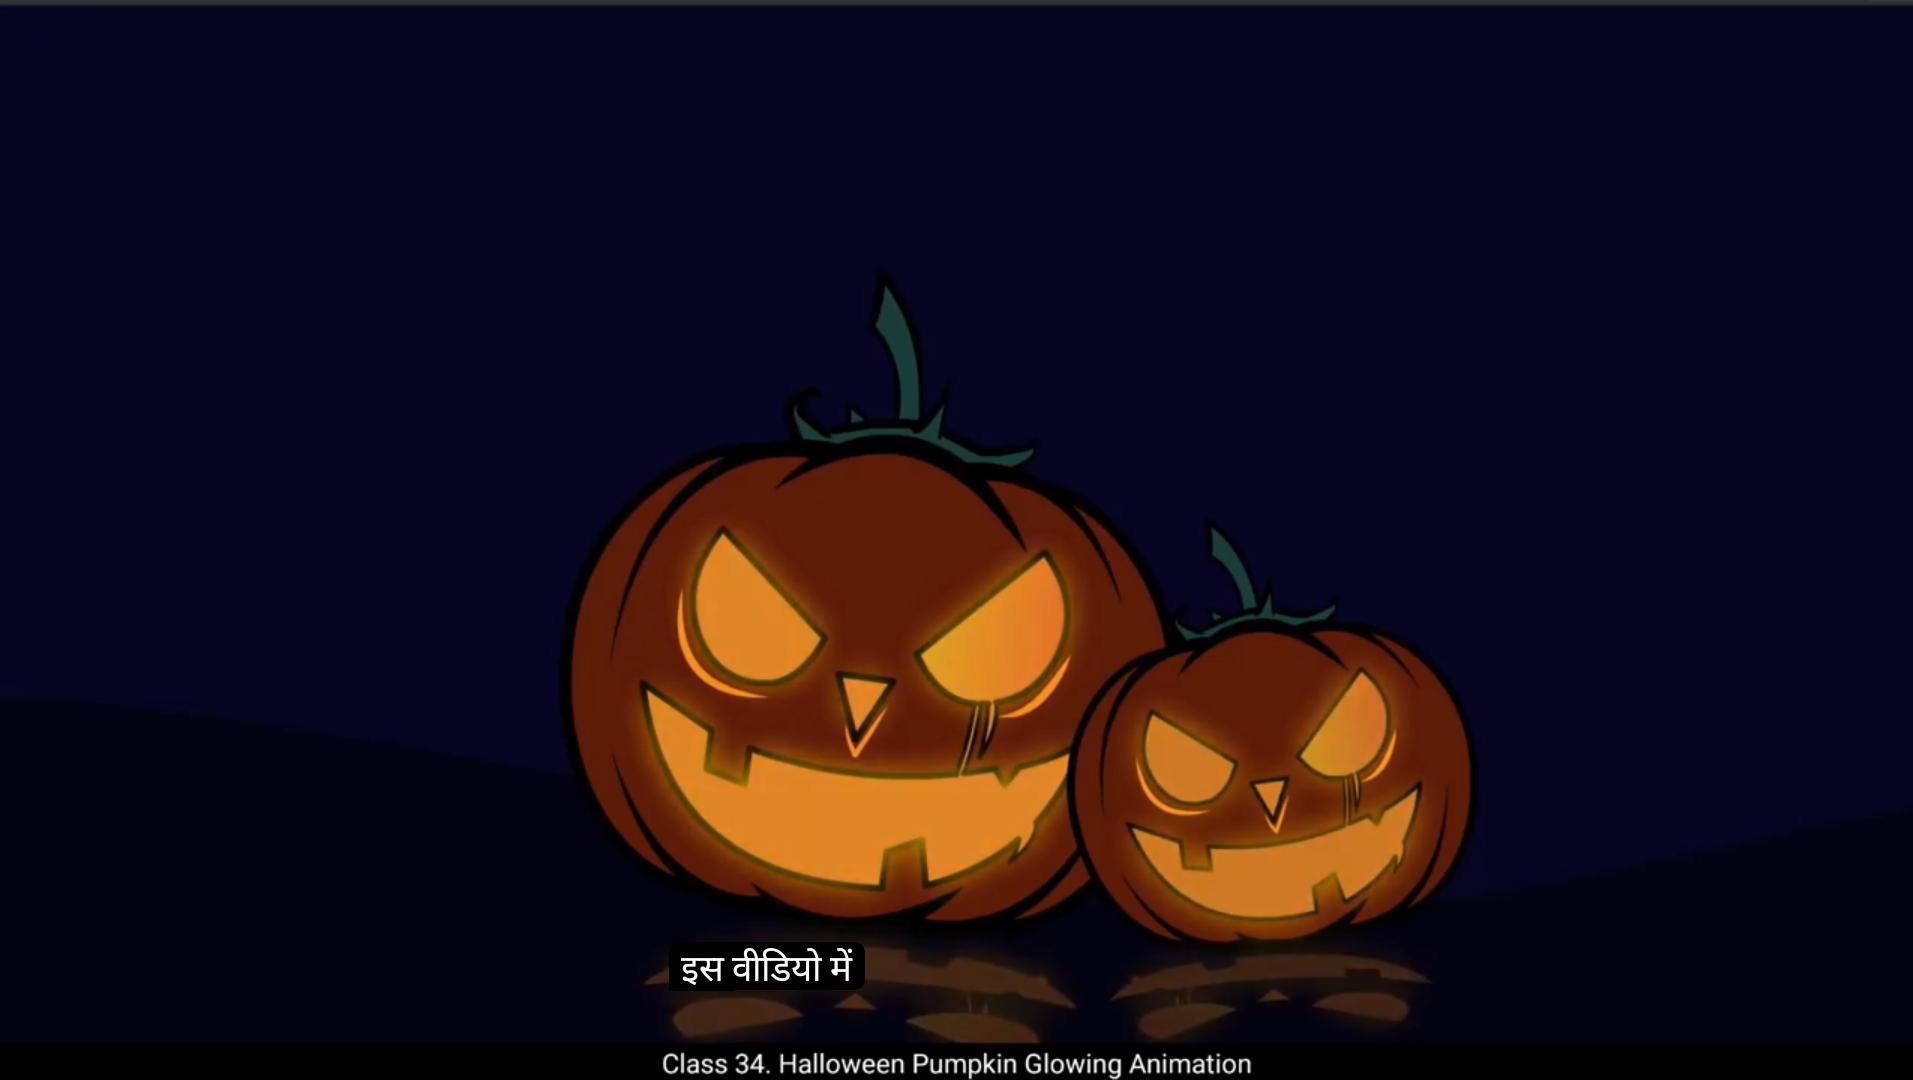
Welcome to the digital tutors. In this video, we're going to create a glowing Halloween pumpkin animation. You will learn how to add an animate glow effect and create reflections. So let's dive right into it.We've.Started with a fully rigged pumpkin vector.Double click on the pumpkin main symbol to explore its layers. Notice how every part of the pumpkin is placed on separate layer.Pumpkin base, the stem, the body, and even the colors for the eyes, nose, and mouth. This separation ensures that we have full control over individual elements during the animation. Our goal is to make the eyes, nose, and mouth glow while keeping the other parts static. To enhance the glow effect, we'll use a slightly darker shade for pumpkin for contrast.To start, first exit the symbol.We'll change the stage color. Instead of using a background layer, we'll adjust the stage color directly. Select the stage by clicking on it. Go to the Properties panel, then Dock tab and locate the Stage Color option under Document Settings. Choose a dark shade to create a subtle glow effect for the pumpkin.The animation duration will be 6 seconds, equivalent to 180 frames. Press F5 to add the frames up to frame 180. Or you can add frames by going to Insert timeline and selecting frame.Now double click the pumpkin symbol to work on its internal animation. Inside will create a glowing effect lasting 2 seconds, that is 60 frames.Select frame 60 on all layers and press F5 to add frames.Focus only on the layers for the eyes, nose and mouth as they are the ones will make glow.Block all nonessential layers such as the body, stem, and base.Go to the 1st frame. We will start the animation from here select all remaining symbols eyes, nose and mouth.Now we add glow effect. *************************** Go to properties panel under frame tab there is filter option at the bottom.Click the plus icon and choose Glow from the list of filters. Once you've done that, a range of settings will appear. We will change shadow color, adjust blur ratio and strength.Change the color to a warm yellowish shade.Right now you might notice a slight glow, but it's not very noticeable.We'll fix that by tweaking the blur values.Here you see a lock icon. If we unlocked it, we can set separate values for both axes. For example, if we increase the X axis blur, the glow will spread left and right.On the other hand, if we increase only the Y axis, the glow will expand vertically up and down.For now, we'll keep the lock enabled and set the blur value to 32 for both axes.Make sure the quality is set to high. This is really important to avoid pixelation and to ensure the glow looks smooth and professional.This will set the starting point of our animation on the 1st frame.To create a pulsating glow, insert a keyframe at the frame 7.Then in the properties panel Color effect, select Alpha and set alpha value to around 44%. Now we will repeat the keyframes, select all keyframes on frame one and holding down the Alt key, drag those keyframes to frame 13. Select first two keyframes, right click and apply a classic tween.This is how the pulsating glow effect will look.Repeat this process for the 60 frame duration to complete the glowing animation cycle. Select all keyframes and holding down the Alt key, drag those keyframes on the last keyframe.Continue this process until you filled the timeline up to frame 60.It looks like the animation extended to frame 61, so we need to add 1 extra frame to the base, body and stem layers to match the timeline. ********************* Select these layers and press F5.This is our glowing effect looks so far.Now let's add a ground layer to set the scene for our pumpkin glow animation. First, exit the symbol by clicking outside the symbol.Create a new layer and name it ground.And drag this layer at the bottom.Lock the pumpkin layer to avoid any accidental changes.Select line tool from side panel or use shortcut keyn.Set the line color to black and draw a line.Adjust the stroke size from the properties panel for better visibility.Press Alt key and drag down the line to break it.Use the sub selection tool to adjust the shape further.While holding the Alt key, adjust the center point of the curve to create a smooth and even slope.Next, we will complete the shape of the ground using the Line tool. Select the line tool and connect the ends of the curve to form a closed shape. Ensure all the edges are perfectly aligned as this will allow us to fill the ground with color in the next step.Go ahead and select the Paint Bucket tool from the toolbar or simply press K.Change the color to black.Now lock the ground layer and unlock the pumpkin layer.Select pumpkin symbol and position it on the ground by clicking and dragging it to where you want it. Make sure it looks right and sits nicely on the ground.Select free Transform tool. Shortcut key is Q.Shift the pivot point to the bottom, since we're going to move the pumpkin from its base. Next, slightly tilt the pumpkin by clicking and dragging the corners of the bounding box to rotate it. This will give it a nice angle.Right click and select Duplicate symbol.Rename it as Pumpkin second.I will scale down the symbol using free transform tool.And for the original pumpkin, go to library and drag the pumpkin main symbol onto stage.Shift the pivot point to the bottom, tilt the pumpkin and scale down slightly. ***************************** Now holding down control, keep pressed down arrow key to send the pumpkin behind other pumpkin. As You can see both pumpkins are glowing at the same time, but we want them to glow at different times. To achieve this, we'll change the start frame for the second pumpkin. First select the pumpkin second symbol on the stage.Next, head to the Properties panel. Under the Object tab, find the Looping section.Now change the 1st frame value to 18. This will make the second pumpkin start glowing at a different time.This is how our animation looks so far.Next, to enhance realism, we'll add reflections on the ground.Create a new layer named Pumpkin Reflection.Copy the original pumpkin.And paste it in place.Flip it vertically.Right click Transform and choose Flip Vertical.Using free transform tool, scale it down.Rotate and skew it.Right click and select Duplicate symbol.Rename it as Pumpkin main reflection.Enter the symbol by double clicking on it.Select the non glowing symbols that is base, stem and body.Go to Properties panel and set color effects to alpha.Change alpha value to 0. This will make the base, stem and body fully transparent, leaving only the glowing parts of the pumpkin visible.Exit the symbol.Next, select the pumpkin reflection symbol on the stage.Go to the Properties panel.Under the Color Effects section, set the color to alpha.Change the alpha value to 30. This will give the pumpkin reflection A subtle transparency, making it appear softer and more realistic on the stage.Next, we're going to duplicate the pumpkin reflection symbol. To do this, hold down the Alt key on your keyboard and drag the symbol to create a copy of it.Scale it down slightly to make it a bit smaller. ************************ Now right click on the duplicated symbol, go to Transform and select Flip Horizontal.Adjust the reflection to match perfectly to the main pumpkin.For more precision, let's use a ruler. Go to the View menu at the top and select Rulers. Once the rulers are visible, click on the ruler and drag a vertical guideline to the stage. Position the guideline so it aligns with the nose of the main pumpkin. This will act as a reference point.Now, using the arrow keys again, shift the reflection symbol until it aligns perfectly with the guideline. This will ensure your reflection is positioned precisely under the main pumpkin.Next, drag the guideline further to align with the nose of the second pumpkin.Once the guideline is positioned, use the arrow keys to shift the reflection of the second pumpkin so that it aligns perfectly with the new guideline.Now we need to adjust the start frame of the second pumpkin's reflection so that it syncs with the glow of the second pumpkin. 1st frame value of second pumpkin is 18, so we will set the reflection symbols 1st frame value to 18 as well. To do this, select the second reflection symbol on the stage. Then go to the properties panel and look under the looping section.Set the 1st frame value to 18. This ensures that the reflection will start at the same time.As the pumpkins glow, keeping everything In Sync. So our animation is now ready. Let's test the animation before that, save the animation file.Finally, test the animation. Press control, Enter to preview.As you can see, the pumpkins glow at different times, with their reflections synced perfectly. The second pumpkin's glow starts later, and its reflection follows suit, creating a smooth and realistic effect. Keep experimenting with these techniques and your animations will become even more polished. Thanks for watching and I'll see you in the next one. इस वीडियो में हम एक glowing Halloween pumpkin animation बनाएंगे। इस ट्यूटोरियल में आप सीखेंगे कि कैसे glow effect ऐड करना है और reflection बनानी है। तो चलिए, शुरू करते हैं। 🎃 हमने यहाँ एक fully rigged pumpkin vector से शुरुआत की है। अब pumpkin main symbol पर double click करें ताकि उसकी layers देख सकें। आप देख सकते हैं कि कद्दू के हर हिस्से को अलग-अलग लेयर पर रखा गया है — Pumpkin base, stem, body, और यहाँ तक कि eyes, nose, और mouth के रंग भी अलग लेयर्स पर हैं। इस तरह की layer separation से हमें हर पार्ट पर पूरा कंट्रोल मिलता है जब हम एनिमेशन बनाएंगे। हमारा goal है कि हम eyes, nose और mouth को glow कराएँ, जबकि बाकी हिस्से static, यानी बिना मूवमेंट के रहें। Glow effect को और उभारने के लिए हम pumpkin के लिए थोड़ा गहरा shade इस्तेमाल करेंगे ताकि कॉन्ट्रास्ट बने। सबसे पहले symbol से बाहर निकलें। अब हम background layer का इस्तेमाल नहीं करेंगे, बल्कि stage color को ही डार्क करेंगे। Stage पर क्लिक करें ताकि वो सेलेक्ट हो जाए। फिर Properties panel में जाएं, और Dock tab के अंदर Stage Color ऑप्शन को ढूंढें . यहाँ से कोई dark shade चुनें ताकि कद्दू का glow और उभर कर दिखे। अब एनिमेशन की duration तय करें — हम चाहते हैं कि ये 6 seconds का हो, यानि 180 frames। इसके लिए F5 दबाएँ ताकि फ्रेम्स 180 तक बढ़ जाएँ, या फिर आप Insert → Timeline → Frame जाकर भी फ्रेम्स ऐड कर सकते हैं। अब pumpkin symbol पर double click करें ताकि हम इसकी internal animation पर काम कर सकें। यहाँ हम एक glow effect बनाएँगे जिसकी लंबाई 2 seconds (60 frames) होगी। Frame 60 को सेलेक्ट करें और सभी लेयर्स पर F5 दबाएँ ताकि 60 फ्रेम तक एक्सटेंड हो जाएं। अब हमारा ध्यान सिर्फ उन लेयर्स पर होगा जो eyes, nose और mouth से जुड़ी हैं, क्योंकि यही पार्ट्स हम glow कराने वाले हैं। बाकी सारी nonessential layers — जैसे body, stem, और base — इन सबको lock कर दें। अब frame 1 पर जाएं — यहाँ से हमारा glow animation शुरू होगा। Eyes, Nose, और Mouth की सभी symbols को सेलेक्ट करें। अब इन पर glow effect अप्लाई करेंगे। इसके लिए Properties panel में जाएं, फिर Filters section में जाकर Add Filter → Glow चुनें। यहाँ से आप glow color, strength, और blur amount सेट कर सकते हैं ताकि pumpkin के features में एक सुंदर glowing effect दिखाई दे। **************** प्रॉपर्टीज़ पैनल में जाएं और Frame Tab के अंदर सबसे नीचे आपको Filter Option मिलेगा। यहाँ plus (+) आइकॉन पर क्लिक करें और Glow को लिस्ट में से चुनें। जैसे ही आप Glow सेलेक्ट करेंगे, आपको नीचे कई सारे settings options दिखेंगे। अब हम shadow color, blur ratio, और strength को एडजस्ट करेंगे। सबसे पहले color को एक warm yellowish shade में बदलें। अभी आपको थोड़ा बहुत glow दिखेगा, लेकिन वो ज़्यादा prominent नहीं लगेगा। इसे और बेहतर करने के लिए हमें blur values में थोड़ा बदलाव करना होगा। यहाँ आपको एक lock icon दिखेगा — अगर आप इसे unlock करते हैं तो आप X और Y axis के लिए अलग-अलग blur value सेट कर सकते हैं। उदाहरण के लिए, अगर आप X axis blur बढ़ाते हैं, तो glow left और right दोनों तरफ फैलेगा। और अगर आप सिर्फ Y axis blur बढ़ाएँगे, तो glow ऊपर और नीचे की तरफ फैलेगा। फिलहाल हम lock को enabled रखेंगे और दोनों axes के लिए blur value 32 सेट करेंगे। सुनिश्चित करें कि Quality “High” पर सेट है — ये बहुत ज़रूरी है ताकि glow pixelated ना लगे और smooth तथा professional दिखाई दे। इससे हमारा animation का starting point frame 1 पर सेट हो जाएगा। अब हम एक pulsating glow बनाएँगे। इसके लिए frame 7 पर एक keyframe insert करें। फिर Properties panel → Color Effect में जाएं, और Alpha ऑप्शन चुनें। यहाँ Alpha value को लगभग 44% पर सेट करें। अब हम keyframes को repeat करेंगे। Frame 1 के सभी keyframes को select करें, फिर Alt key दबाकर उन्हें frame 13 तक drag करें। अब पहले दो keyframes को सेलेक्ट करें, उन पर right click करें और Classic Tween अप्लाई करें। अब आप देखेंगे कि हमारा pulsating glow effect तैयार है। इस process को पूरे 60 frames की duration के लिए रिपीट करें ताकि पूरा glowing cycle बन सके। इसके लिए सभी keyframes को select करें, फिर Alt दबाकर उन्हें अंतिम frame तक drag करें। इसे तब तक दोहराते रहें जब तक timeline frame 60 तक भर न जाए। अभी ऐसा लग रहा है कि animation frame 61 तक extend हो गया है, तो इसके लिए हमें base, body और stem layers में 1 extra frame जोड़ना होगा ताकि सारी layers की timeline बराबर हो जाए। ************************ इन लेयर्स को select करो और F5 दबाओ। अभी तक हमारा glowing effect कुछ इस तरह दिख रहा है। अब चलो pumpkin glow animation के लिए ground layer बनाते हैं ताकि scene पूरा लगे। सबसे पहले, symbol से बाहर निकलो — यानी symbol के बाहर क्लिक करो। अब एक नई layer बनाओ और उसका नाम रखो “Ground”। फिर इस layer को सभी layers के नीचे drag करके रख दो। Pumpkin layer को lock कर दो ताकि गलती से उसमें कोई बदलाव ना हो। अब side panel से Line Tool select करो, या फिर shortcut key “N” दबाओ। Line color को black सेट करो और एक सीधी line draw करो। Properties panel में जाकर stroke size बढ़ा दो ताकि line ज़्यादा clearly दिखे। अब Alt key दबाकर line को थोड़ा नीचे drag करो ताकि वो टूट जाए (break हो जाए)। फिर Sub Selection Tool लो और curve की shape adjust करो। Alt key दबाए रखते हुए, curve के center point को ऊपर या नीचे adjust करो ताकि एक smooth और even slope बन सके। अब Line Tool से ground का पूरा shape complete करेंगे। Line Tool select करो और curve के दोनों सिरों को जोड़ दो ताकि एक closed shape बन जाए। ध्यान रहे कि सारे edges perfectly aligned हों, क्योंकि अगले step में हम इस ground को color fill करेंगे। अब Paint Bucket Tool select करो (या shortcut key K दबाओ)। Color को black सेट करो और ground shape के अंदर क्लिक करके fill कर दो। अब Ground layer को lock कर दो और Pumpkin layer को unlock करो। Pumpkin symbol select करो और उसे click and drag करके ground पर position कर दो, ध्यान दो कि वो ground पर सही तरह से बैठा हुआ लगे। अब Free Transform Tool select करो (shortcut key Q)। Pivot point को pumpkin के bottom पर shift करो, क्योंकि हमें pumpkin को base से rotate करना है। अब bounding box के कोनों को पकड़कर pumpkin को थोड़ा tilt (rotate) कर दो ताकि वो थोड़ा natural angle में दिखाई दे। अब Right click करो और Duplicate Symbol चुनो। नए symbol का नाम रखो “Pumpkin Second”। फिर Free Transform Tool से symbol को थोड़ा scale down करो ताकि वो छोटा लगे। अब original pumpkin के लिए Library में जाओ और Pumpkin Main symbol को stage पर drag करो। Pivot point को bottom पर shift करो, pumpkin को थोड़ा tilt करो और थोड़ा scale down कर दो। ******************* अब Control key दबाए रखो और Down Arrow key को बार-बार दबाओ, इससे pumpkin पीछे चला जाएगा — यानी वो दूसरे pumpkin के पीछे आ जाएगा। जैसा कि तुम देख सकते हो, दोनों pumpkins एक साथ glow कर रहे हैं, लेकिन हमें चाहिए कि वो अलग-अलग समय पर glow करें। इसको करने के लिए, हम दूसरे pumpkin का starting frame बदलेंगे। सबसे पहले, Stage पर pumpkin second symbol select करो। फिर Properties panel में जाओ। अब Object tab के अंदर Looping section ढूंढो। वहाँ पर 1st frame का value 18 कर दो। इससे second pumpkin का glowing थोड़ा बाद में शुरू होगा, जिससे animation ज़्यादा natural लगेगा। अब तक का animation काफ़ी अच्छा लग रहा है। अब realism बढ़ाने के लिए हम ground पर pumpkin की reflection बनाएंगे। सबसे पहले, एक नई layer बनाओ और उसका नाम रखो “Pumpkin Reflection”। अब original pumpkin को copy करो और फिर Paste in Place करो (यानी वही position में paste हो)। फिर Right click → Transform → Flip Vertical चुनो ताकि pumpkin उल्टा हो जाए (reflection के लिए)। अब Free Transform Tool से इसे थोड़ा scale down करो, फिर rotate और skew करके थोड़ा natural angle दो। अब Right click करो और Duplicate Symbol चुनो। नए symbol का नाम रखो “Pumpkin Main Reflection”। अब इस नए symbol को double click करके enter करो। अंदर जाओ और non-glowing elements select करो — जैसे base, stem, और body। फिर Properties panel में जाओ और Color Effect → Alpha चुनो। अब Alpha value को 0 कर दो। इससे base, stem और body पूरी तरह transparent हो जाएँगे, और सिर्फ़ glowing parts (eyes, nose, mouth) दिखेंगे। अब symbol से बाहर निकलो (exit symbol)। Stage पर Pumpkin Reflection symbol select करो। फिर Properties panel → Color Effect → Alpha चुनो और Alpha value को 30 पर सेट कर दो। इससे reflection soft और realistic लगेगी। अब हम इस pumpkin reflection को duplicate करेंगे। इसके लिए Alt key दबाए रखो और symbol को drag करो — इससे उसका copy बन जाएगा। फिर Free Transform Tool से थोड़ा scale down करो ताकि वो थोड़ा छोटा और subtle लगे। ********************** अब Control key दबाए रखो और Down Arrow key को दबाए रखो, इससे pumpkin दूसरे pumpkin के पीछे चला जाएगा। जैसा कि तुम देख सकते हो, दोनों pumpkins एक साथ glow कर रहे हैं, लेकिन हमें चाहिए कि वो अलग-अलग समय पर glow करें। इसके लिए हम दूसरे pumpkin का start frame बदलेंगे। सबसे पहले Stage पर pumpkin second symbol select करो। फिर Properties panel में जाओ। अब Object tab के अंदर Looping section ढूंढो। यहाँ पर 1st frame का value 18 कर दो। इससे second pumpkin का glowing थोड़ा delay से शुरू होगा, जिससे animation और ज़्यादा natural लगेगा। ये रहा हमारा animation अब तक — काफ़ी smooth और realistic लग रहा है। अब realism को और बढ़ाने के लिए हम ground पर pumpkins की reflection add करेंगे। सबसे पहले एक नई layer बनाओ और उसका नाम रखो Pumpkin Reflection। अब original pumpkin को copy करो और Paste in Place (Ctrl+Shift+V) करो ताकि वो exact same position में रहे। फिर Right Click → Transform → Flip Vertical चुनो ताकि pumpkin उल्टा हो जाए, जिससे वो reflection की तरह दिखे। अब Free Transform Tool (Q) से उसे थोड़ा scale down करो, और rotate व skew करके natural reflection angle दो। अब Right click करके Duplicate Symbol चुनो, और नए symbol का नाम रखो Pumpkin Main Reflection। अब इस नए symbol को double click करके enter करो। अंदर जाकर non-glowing parts (यानी base, stem और body) select करो। फिर Properties panel → Color Effect → Alpha में जाओ और Alpha value को 0 कर दो। इससे base, stem और body पूरी तरह transparent हो जाएँगे, और सिर्फ़ eyes, nose और mouth का glow बचेगा। अब symbol से बाहर निकलो (Exit Symbol)। Stage पर Pumpkin Reflection symbol select करो, फिर Properties panel → Color Effect → Alpha में जाकर Alpha value को 30 कर दो। इससे reflection soft और realistic लगेगी। अब हम इस pumpkin reflection को duplicate करेंगे। इसके लिए Alt key दबाए रखो और symbol को drag करो, इससे उसका copy बन जाएगा। अब Free Transform Tool से इस copy को थोड़ा scale down करो ताकि वो छोटी और subtle reflection लगे। क्या चाहो मैं इसका next part हिंग्लिश में बताऊँ — जहाँ हम ground reflection को fade करके और glowing transition डालते हैं? ******************* अब duplicated symbol पर right click करो, Transform → Flip Horizontal चुनो। अब reflection को adjust करो ताकि वो main pumpkin के साथ perfectly align हो जाए। ज़्यादा precision के लिए हम ruler का इस्तेमाल करेंगे। ऊपर के View menu में जाओ और Rulers चुनो। अब जब rulers दिखाई दें, तो ruler पर click करके drag करो और एक vertical guideline stage पर लाओ। इस guideline को ऐसे position करो कि वो main pumpkin की nose के साथ align हो जाए। ये guideline हमारा reference point रहेगा। अब arrow keys का इस्तेमाल करके reflection symbol को move करो, जब तक वो guideline के नीचे perfectly align न हो जाए। इससे तुम्हारी reflection बिल्कुल सही जगह पर आ जाएगी। अब guideline को drag करो ताकि वो second pumpkin की nose के साथ align हो जाए। फिर से arrow keys का इस्तेमाल करो और second pumpkin की reflection को move करो ताकि वो नई guideline के नीचे perfectly align हो जाए। अब हमें second pumpkin की reflection का start frame बदलना होगा ताकि वो pumpkin के glow के साथ sync हो जाए। पहले pumpkin का 1st frame value 18 है, तो reflection का भी 1st frame value 18 ही रखना होगा। इसके लिए — Stage पर second reflection symbol select करो, फिर Properties panel में जाओ, और Looping section में जाकर 1st frame value को 18 set करो। इससे reflection और pumpkin दोनों का glow एक साथ sync में शुरू होगा। अब हमारा animation पूरी तरह ready है Animation file को save कर लो, फिर Ctrl + Enter दबाओ animation preview करने के लिए। अब देखो — दोनों pumpkins अलग-अलग समय पर glow कर रहे हैं, और उनकी reflections perfectly synced हैं। दूसरे pumpkin का glow थोड़ा delay से start होता है, और उसकी reflection भी उसी sync में follow करती है, जिससे animation natural और realistic लगता है। बस यही था हमारा glowing pumpkin animation tutorial। Experiment करते रहो, क्योंकि हर बार तुम अपनी animation को और ज़्यादा polished और professional बना पाओगे। Thanks for watching, और next tutorial में मिलते हैं!