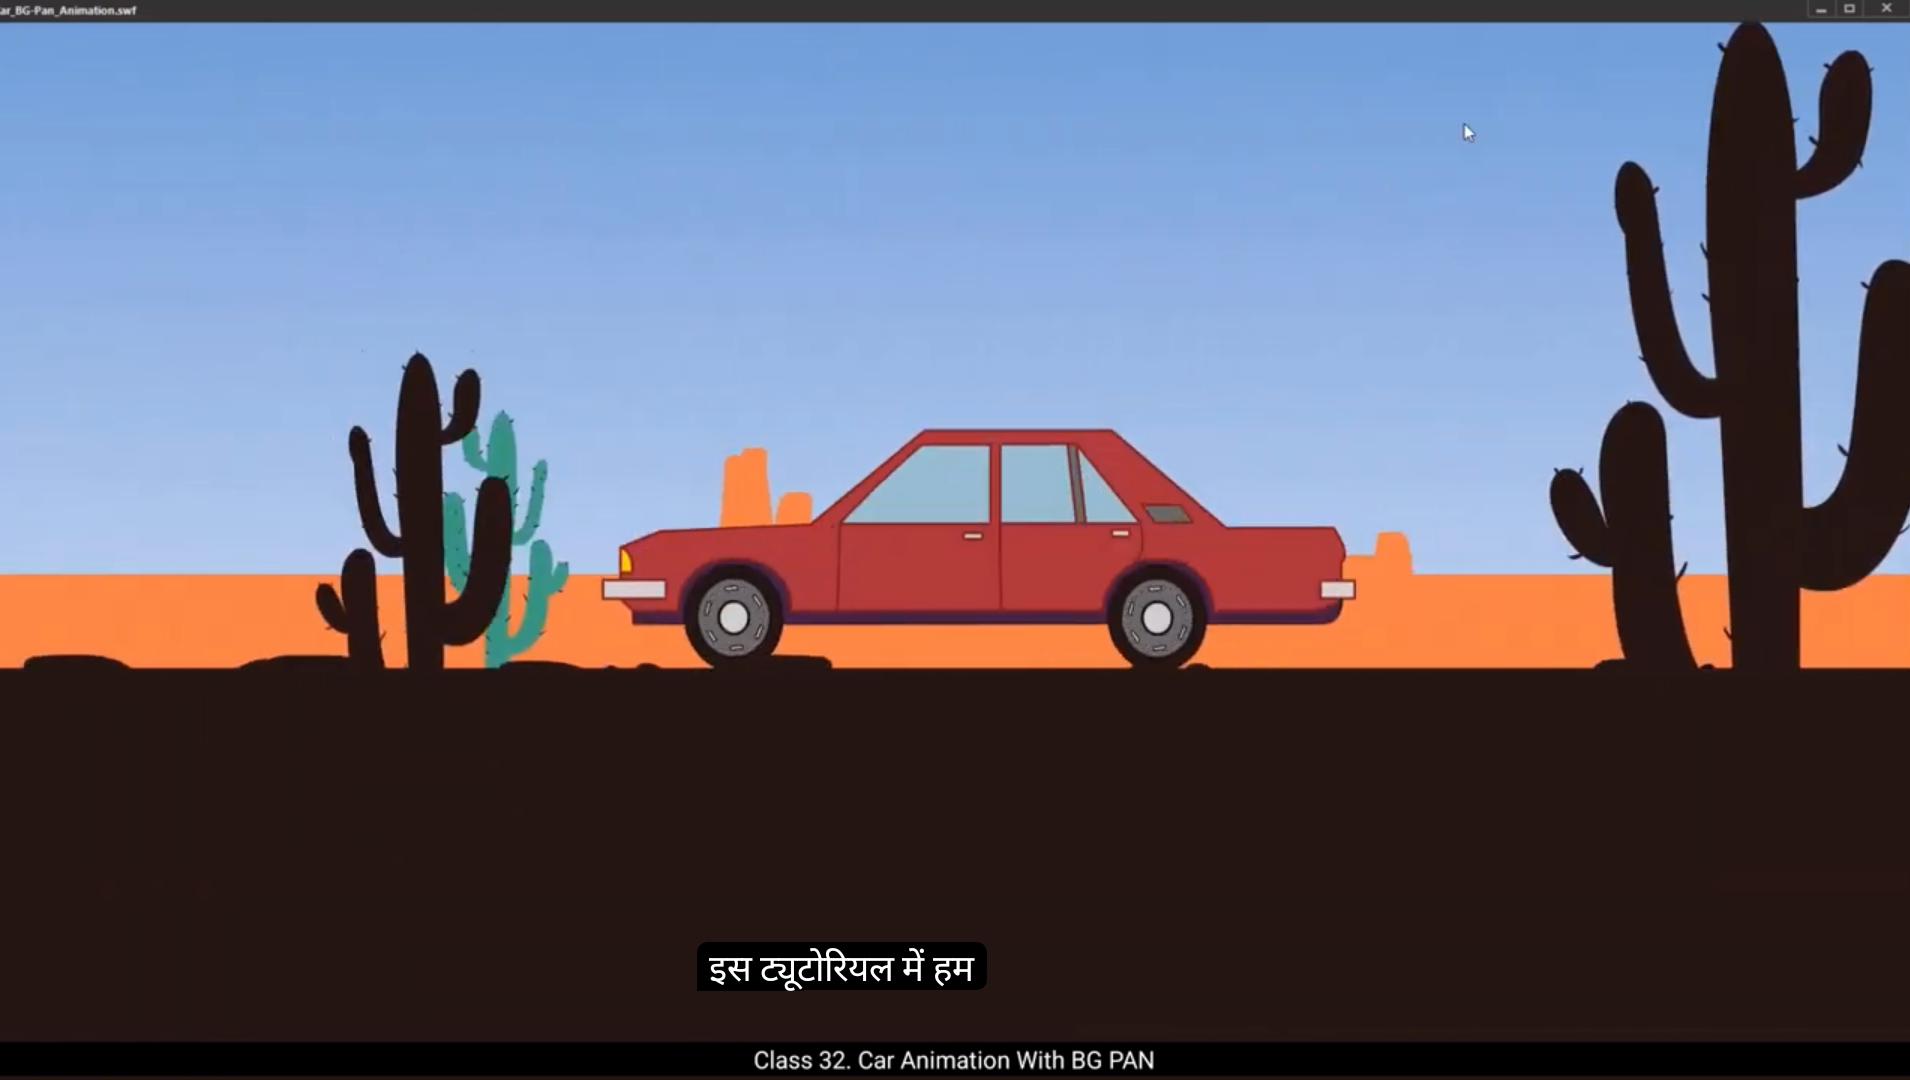
In this tutorial we're going to learn how to create a car background pan animation.To make this animation, we're using a background vector file, which we've provided in the downloadable assets for this lesson. In the Vector Background Tracing tutorial, we assigned you an activity to trace this same file. If you've completed the tracing assignment, feel free to use your own traced vector. If not, no worries, you can use the vector file we've provided. So let's get started and bring this animation to life.To begin.I've already prepared a file where each element of the scene is placed on a separate layer.This is sky layer.This is animated background layer that contains the mountains, which will scroll to create the illusion of motion. Mid ground cactus that includes cactus car layer, the centerpiece of our animation. This is ground layer and this is cactus silhouette layer. We're going to create an illusion of the car moving forward by animating the background from left to right, but the car itself will stay in the same position throughout the animation.The key idea is to keep the car stationary while animating the background and other elements to create the illusion of movement. Before animating, we must ensure our timeline is long enough. Let's extend it to 7 seconds, that is 210 frames. Select all layers on frame 210 and press F5 to add frames across all layers.Now let's animate the car. First, lock all layers except the car layer and double Click to enter the car symbol.Inside the car symbol we see 3 layers.On this layer we have the car body.Next, the front wheel and the back wheel. ************** First insert frames for all layers up to frame 25 using F5.Then select front wheel and back wheel layer and on frame 25 insert a keyframe.Apply a motion tween to the wheels.In the Properties panel, set the rotation to counterclockwise.This simulates forward movement.If we choose clockwise rotation, it would look like the car is reversing, which we don't want. The rotation of the wheels gives the illusion that the car is moving forward.Counterclockwise motion aligns with how wheels rotate in real life when a car moves forward.To add realism, we will create a slight bounce in the car body. This mimics how cars react to uneven terrain. Lock the wheel layers and unlock the car body layer.To start, I'll zoom in to closely observe and adjust the car's height during the bounce.At frame three, insert a keyframe and slightly move the car body upward using the arrow key.However, this initial bounce looks exaggerated. Too much movement.To fix this, we'll activate the Onion skin option to see the positioning across frames. Also enable outline mode for precise adjustments.Use the down arrow key to reduce the height of the bounce by half, making it more natural. After finalizing the bounce, I'll turn off the onion skin mode for clarity.Now let's create a looping bounce animation. Copy the position of the car body from frame one to frame 5 by dragging the keyframe. This ensures frames one and five have the same height. Similarly, ensure frames three and seven share the same height, representing the peak of the bounce. This alternating pattern, low and high creates a smooth bounce cycle. ***************** To extend this animation, select all keyframes by holding Shift and then press Alt to duplicate the sequence. Drag these keyframes to the next set of alternate frames, repeating the bounce across the timeline. This method ensures A seamless and natural looping bounce.Now if we check our animation, the first and last frames are identical.Exit the car symbol and return to the main timeline.Now when we play the animation, it will look like the car is moving.Now let's animate the background to complete the illusion of the moving car. First, we need to expand the background size to ensure it is large enough to move smoothly across the screen. Lock the car layer while we work on the background.The sky layer will stay unchanged because it's a static background element, so no need to increase its size.Our focus will be on the animated BG symbol which contains the mountains. This will be the element we animate to create the illusion of the car moving forward. First enter the animated BG symbol and then mountains.Name this layer as rectangle.And this layer patch.Next, copy the rectangle and align it carefully with the original design.Once that's done, go to patch layer and delete the rectangle part from the patch layer, leaving just the design we need.Then group the selected drawings by pressing Control G which will help in managing them together. After that, copy the group by pressing Alt and drag it so we get an exact copy of the design.Once the designs are ready, exit the mountain symbol and inside the animated BG symbol. Here apply a classic tween.This will make the mountains move seamlessly from left to right, and since we're using a classic tween, it will repeat the animation indefinitely, giving the effect of a continuous scroll. *************** There's a slight jerk in the animation that we need to fix for smoothness. Checking the 1st frame, I notice that the mountains patch is slightly higher on one side. To fix this we need to align it properly with the last keyframe.Add a guideline to match the height.Of drawing on the 1st frame.Then go to frame 75 and move mountain upward using arrow key.Let's check the animation on frame 1 and 75 again to ensure everything is In Sync. Even though we've adjusted it, the frame still don't match perfectly, so we need to adjust again.After making the necessary adjustments, we align the 1st and 75th frames in the animated BG symbol. This ensures that there will be no jerk or jump in the animation during the loop.Now let's work on animating the ground.The ground animation is stopping at frame 50 on the main timeline. So first we need to remove classic tween and also remove existing keyframe. Hide all the layers except for the ground layer for better visibility. Now with only ground layer visible, go inside the ground layer to work on it.Clip out the patches from the ground layer and create a symbol for the ground animation.Before this, add a new layer and name it as ground motion.Then press Control F8 to create a new symbol and name the symbol as ground motion. Next, go to the library and drag the ground motion symbol on the ground motion layer.In the Align tab, adjusted horizontal and vertical.Now we'll place both the Ground and Rough Patches layers inside the ground motion symbol. To do this, select both layers and press Control Alt X to cut them.After that, double click on the ground motion symbol to enter it. **************** Use Control Alt V to paste the layers inside.Exit the symbol and delete these empty layers to keep things tidy.At frame 50, inside the ground motion symbol, add a keyframe and move the ground to the right side of the screen to create the desired movement.Then match the last frame position with the 1st frame.Finally, add a classic tween to the ground motion symbol so the ground keeps moving smoothly from left to right, creating a continuous loop for the animation.Now, if you look, you'll notice that while the mountains and the ground are moving and repeating, the cactus and the mid ground cactus are stationary. So let's go ahead and animate the midground cactus layer first. Lock all the other layers except for the midground cactus layer to make sure we're only working on this element.Now at frame one, reposition the cactus to the left side of the screen. This will start the animation of the cactus moving from left to right.Notice that the mid ground cactus are moving a bit too fast compared to the ground. To make sure they sync up and move at a matching speed, we will slow down the cactus layer animation.For that drag last keyframe to frame 90 to add frames.On the frame 90, adjust cactus position to ensure that it move at same speed as ground.Now for the repetition of the mid ground cactus animation, we'll need to ensure that it loops seamlessly. To do this, select both the keyframes holding down the Alt key on the keyboard. Drag these keyframes on frame 100.Next, let's move on to animating the cactus silhouette layer. ****************** First, lock and hide all layer. Keep cactus silhouette layer, unlock and unhide. Also keep unhide the ground layer for reference.Now reposition the cactus silhouette to the left side of the screen, just like we did with the other elements. Since the cactus is closer to the ground, it should move In Sync with the ground as it animates on frame #50 Insert a keyframe on cactus silhouette layer and move it towards right.To make sure it aligns properly with ground, we will reference the 1st frame and adjust its position.Follow the rough patches on the ground to match.Once done, apply a classic tween between the keyframes and check the animation.Since these silhouettes are closer, their speed will be faster than the cactus in the background and they should also move out of the frame.So we'll add a keyframe at frame #100.And move it towards right to match its position with the ground. Apply classic tween and check the animation.We will remove the in between keyframe and check the speed of cactus.We need to tweak the speed a bit more, so we'll reduce the number of frames between the keyframes.Next, copy the same animation from frame 80.And also from the 160 frame.We've exceeded the animation duration.To match the duration, we will reduce some frames between these sections.Still we have five more frames so we will reduce few frame using shift F5.Add frame to mid ground cactus layer to match the duration.Now let's preview the animation.The car stays still while the background mountains and cacti move smoothly, creating the illusion of the car driving forward. The cactus layers match the ground speed and everything loops seamlessly. The timing and movement look natural, and the animation flows without any jerks.And that's it for the car background pan animation tutorial. Thanks for watching. Keep practicing and see you in the next tutorial. ******************** इस ट्यूटोरियल में हम सीखने वाले हैं कि कार बैकग्राउंड पैन ऐनिमेशन कैसे बनाया जाता है। इस ऐनिमेशन को बनाने के लिए हम एक बैकग्राउंड वेक्टर फाइल का इस्तेमाल कर रहे हैं, जो हमने इस लेसन के डाउनलोडेबल एसेट्स में दी हुई है। Vector Background Tracing ट्यूटोरियल में हमने आपको ये फाइल ट्रेस करने का असाइनमेंट दिया था। अगर आपने वो ट्रेसिंग असाइनमेंट पूरा कर लिया है, तो आप अपनी खुद की ट्रेस की हुई वेक्टर फाइल इस्तेमाल कर सकते हैं। अगर नहीं किया, तो कोई बात नहीं, आप हमारी दी हुई वेक्टर फाइल का इस्तेमाल कर सकते हैं। तो चलिए शुरू करते हैं और इस ऐनिमेशन को ज़िंदा करते हैं। शुरुआत के लिए, मैंने पहले से ही एक फाइल तैयार कर रखी है, जिसमें सीन के हर एलिमेंट को अलग-अलग लेयर पर रखा गया है। ये है Sky Layer। ये है Animated Background Layer, जिसमें पहाड़ (mountains) शामिल हैं, जो स्क्रॉल होकर मोशन का illusion बनाएंगे। Mid Ground Cactus Layer, जिसमें कैक्टस है। Car Layer, जो हमारी ऐनिमेशन का सेंटरपीस है। ये है Ground Layer और ये है Cactus Silhouette Layer। हम कार के आगे बढ़ने का illusion बनाएंगे, बैकग्राउंड को बाएँ से दाएँ ऐनिमेट करके, लेकिन कार खुद अपनी जगह पर स्थिर (stationary) रहेगी पूरे ऐनिमेशन में। मुख्य विचार ये है कि कार को एक ही जगह पर रखा जाए, और बैकग्राउंड व बाकी एलिमेंट्स को ऐनिमेट किया जाए ताकि मूवमेंट का illusion बने। ऐनिमेशन शुरू करने से पहले हमें ये सुनिश्चित करना होगा कि हमारी टाइमलाइन पर्याप्त लंबी हो। चलो इसे 7 सेकंड तक बढ़ाते हैं, यानी 210 फ्रेम्स। अब Frame 210 पर सभी लेयर्स को सिलेक्ट करो और F5 दबाओ ताकि सभी लेयर्स में फ्रेम्स जुड़ जाएँ। अब कार को ऐनिमेट करते हैं। सबसे पहले, कार लेयर को छोड़कर बाकी सभी लेयर्स को लॉक कर दो और Car Symbol में जाने के लिए उस पर डबल क्लिक करो। Car Symbol के अंदर हमें 3 लेयर्स दिखाई देती हैं। पहली लेयर पर है Car Body। इसके बाद है Front Wheel और Back Wheel। ************** सबसे पहले सभी लेयर्स पर Frame 25 तक फ्रेम्स जोड़ो F5 दबाकर। फिर Front Wheel और Back Wheel Layer को सिलेक्ट करो और Frame 25 पर एक Keyframe इंसर्ट करो। अब Wheels पर एक Motion Tween अप्लाई करो। Properties Panel में जाकर Rotation को Counterclockwise सेट करो। इससे ऐसा लगेगा कि कार आगे की ओर बढ़ रही है। अगर हम Clockwise Rotation चुनते, तो ऐसा लगता जैसे कार रिवर्स जा रही हो — जो हम नहीं चाहते। Wheels की ये रोटेशन कार के आगे बढ़ने का illusion देती है। Counterclockwise Motion रियल लाइफ में कार के पहियों की असली दिशा से मेल खाती है, जब कार आगे चलती है। अब रियलिज़्म बढ़ाने के लिए हम कार बॉडी में थोड़ा Bounce Effect जोड़ेंगे, जिससे ऐसा लगेगा जैसे कार ऊबड़-खाबड़ रास्ते पर चल रही है। Wheel Layers को लॉक कर दो और Car Body Layer को अनलॉक करो। शुरुआत में मैं Zoom In करूंगा ताकि कार की ऊँचाई में होने वाले बदलाव को ध्यान से देख सकूं। Frame 3 पर एक Keyframe इंसर्ट करो और Arrow Key की मदद से कार बॉडी को थोड़ा ऊपर मूव करो। लेकिन ये शुरुआती बाउंस थोड़ा ज्यादा लग रहा है — बहुत अधिक मूवमेंट है। इसे ठीक करने के लिए हम Onion Skin Option ऑन करेंगे ताकि हमें सभी फ्रेम्स की पोज़िशन एक साथ दिखाई दे। साथ ही Outline Mode को भी ऑन कर लो ताकि एडजस्टमेंट्स और सटीक हो सकें। अब Down Arrow Key से कार की ऊँचाई को आधा कम कर दो, ताकि बाउंस ज़्यादा नेचुरल लगे। बाउंस फाइनल होने के बाद Onion Skin Mode को ऑफ कर दो ताकि व्यू क्लियर रहे। अब एक Looping Bounce Animation बनाते हैं। Frame 1 से Frame 5 तक कार बॉडी की पोज़िशन कॉपी करो — इसके लिए Keyframe को Drag करो। इससे Frame 1 और Frame 5 की ऊँचाई समान रहेगी। इसी तरह Frame 3 और Frame 7 की ऊँचाई भी समान रखो — जो बाउंस के Peak को दर्शाएगी। इस तरह Low-High का ये अल्टरनेटिंग पैटर्न एक Smooth Bounce Cycle बनाता है। ******************** इस ऐनिमेशन को बढ़ाने के लिए, सभी Keyframes को Shift दबाकर सिलेक्ट करो और फिर Alt दबाकर उन्हें Duplicate करो। अब इन Keyframes को टाइमलाइन में अगले सेट के Alternate Frames पर Drag करो, ताकि बाउंस इफेक्ट पूरी टाइमलाइन में रिपीट हो जाए। ये तरीका एक Seamless और Natural Looping Bounce सुनिश्चित करता है। अब अगर हम अपनी ऐनिमेशन को चेक करें, तो पहला और आखिरी फ्रेम एक जैसे हैं। अब Car Symbol से बाहर निकलो और Main Timeline पर वापस आओ। जब हम ऐनिमेशन प्ले करेंगे, तो ऐसा लगेगा जैसे कार सच में मूव कर रही है। अब कार के मूवमेंट का illusion पूरा करने के लिए बैकग्राउंड को ऐनिमेट करते हैं। सबसे पहले, हमें बैकग्राउंड का साइज बढ़ाना होगा ताकि वो स्क्रीन पर स्मूदली मूव कर सके। बैकग्राउंड पर काम करते समय Car Layer को लॉक कर दो। Sky Layer को हम वैसे ही रहने देंगे क्योंकि वो एक Static Background Element है, इसलिए उसका साइज बढ़ाने की ज़रूरत नहीं है। हमारा फोकस होगा Animated BG Symbol पर, जिसमें Mountains शामिल हैं। यही वो एलिमेंट है जिसे ऐनिमेट करके हम कार के आगे बढ़ने का illusion बनाएंगे। सबसे पहले Animated BG Symbol के अंदर जाओ और फिर Mountains में एंटर करो। इस लेयर का नाम रखो Rectangle, और दूसरी लेयर का नाम रखो Patch। अब Rectangle को कॉपी करो और उसे ओरिजिनल डिज़ाइन के साथ ध्यान से Align करो। जब ये हो जाए, तो Patch Layer पर जाओ और Rectangle Part को डिलीट कर दो, ताकि सिर्फ वही डिज़ाइन बचे जिसकी हमें ज़रूरत है। अब दोनों सेलेक्टेड ड्रॉइंग्स को Control + G दबाकर Group कर दो, जिससे उन्हें एक साथ मैनेज करना आसान हो जाएगा। इसके बाद, उस ग्रुप को Alt दबाकर कॉपी करो और Drag करो, ताकि हमें डिज़ाइन की एक बिल्कुल समान Duplicate Copy मिल जाए। जब दोनों डिज़ाइन तैयार हो जाएँ, Mountain Symbol से बाहर निकलो और Animated BG Symbol के अंदर आओ। यहाँ एक Classic Tween अप्लाई करो। इससे पहाड़ (Mountains) स्मूदली Left to Right मूव करेंगे, और चूँकि हम Classic Tween का इस्तेमाल कर रहे हैं, ऐनिमेशन लगातार रिपीट होती रहेगी, जिससे एक Continuous Scroll Effect बनेगा। ***************** ऐनिमेशन में थोड़ा झटका (jerk) दिख रहा है, जिसे हमें स्मूद बनाने के लिए ठीक करना होगा। जब मैंने पहला फ्रेम (Frame 1) चेक किया, तो देखा कि Mountains Patch एक साइड पर थोड़ा ऊपर है। इसे ठीक करने के लिए हमें इसे आखिरी Keyframe के साथ सही तरीके से Align करना होगा। इसके लिए पहले Guideline जोड़ो ताकि Frame 1 पर ड्रॉइंग की ऊँचाई मैच की जा सके। फिर Frame 75 पर जाओ और Arrow Key का इस्तेमाल करके Mountains को थोड़ा ऊपर मूव करो। अब Frame 1 और Frame 75 को दोबारा चेक करो ताकि यह सुनिश्चित हो सके कि सब कुछ In Sync है। हालांकि हमने एडजस्टमेंट कर लिए हैं, लेकिन दोनों फ्रेम्स अब भी पूरी तरह मैच नहीं कर रहे, इसलिए हमें थोड़ा और एडजस्ट करना पड़ेगा। आवश्यक बदलाव करने के बाद, हमने Animated BG Symbol में Frame 1 और Frame 75 को सही तरीके से Align कर लिया है। इससे ऐनिमेशन के लूप में कोई Jerk या Jump नहीं रहेगा। अब चलते हैं Ground Animation पर काम करने के लिए। अभी ग्राउंड ऐनिमेशन Main Timeline पर Frame 50 पर रुक रही है। तो सबसे पहले, Classic Tween को Remove करो और मौजूदा Keyframe भी हटा दो। बेहतर विजिबिलिटी के लिए, Ground Layer को छोड़कर बाकी सभी लेयर्स को Hide कर दो। अब सिर्फ Ground Layer विजिबल है, तो इसके अंदर जाओ ताकि हम इस पर काम कर सकें। Ground Layer से Patches को Clip Out करो और ग्राउंड ऐनिमेशन के लिए एक नया Symbol बनाओ। इससे पहले, एक नई लेयर जोड़ो और उसका नाम रखो Ground Motion। अब Control + F8 दबाकर एक नया Symbol बनाओ और उसका नाम रखो Ground Motion। फिर Library में जाओ और Ground Motion Symbol को Ground Motion Layer पर Drag करो। Align Tab में जाकर इसे Horizontally और Vertically एडजस्ट करो ताकि यह सही पोज़िशन में आ जाए। अब हम Ground और Rough Patches Layers — दोनों को Ground Motion Symbol के अंदर रखने वाले हैं। इसके लिए दोनों लेयर्स को सिलेक्ट करो और Control + Alt + X दबाकर उन्हें Cut करो। फिर Ground Motion Symbol पर Double Click करके उसके अंदर जाओ। **************** Control + Alt + V दबाकर अभी-अभी कट की गई लेयर्स को Ground Motion Symbol के अंदर Paste करो। अब Symbol से बाहर निकलो और जो खाली लेयर्स बची हैं, उन्हें डिलीट कर दो ताकि प्रोजेक्ट साफ-सुथरा रहे। अब Ground Motion Symbol के अंदर Frame 50 पर जाओ, एक Keyframe इंसर्ट करो और Ground को स्क्रीन के Right Side की ओर मूव करो ताकि वांछित (desired) मूवमेंट बने। फिर आख़िरी फ्रेम की पोज़िशन को पहले फ्रेम के साथ Match करो। अंत में, Ground Motion Symbol पर एक Classic Tween अप्लाई करो, ताकि ग्राउंड स्मूदली Left to Right मूव करे और ऐनिमेशन में एक Continuous Loop इफेक्ट बने। अब अगर आप देखें, तो आपको नज़र आएगा कि जहाँ Mountains और Ground दोनों मूव होकर रिपीट हो रहे हैं, वहीं Cactus और Mid Ground Cactus स्थिर (stationary) हैं। तो चलिए अब Mid Ground Cactus Layer को ऐनिमेट करते हैं। बाकी सभी लेयर्स को Lock कर दो, सिर्फ Mid Ground Cactus Layer को अनलॉक रहने दो, ताकि हम सिर्फ इसी एलिमेंट पर काम करें। Frame 1 पर Cactus को स्क्रीन के Left Side पर Reposition करो। इससे ऐनिमेशन शुरू होगी जिसमें कैक्टस Left से Right मूव करेगा। ध्यान दो कि Mid Ground Cactus की स्पीड Ground की तुलना में थोड़ी ज़्यादा है। ताकि दोनों एक समान स्पीड पर मूव करें, हमें Cactus Layer Animation को थोड़ा Slow Down करना होगा। इसके लिए, Last Keyframe को Frame 90 तक Drag करो ताकि फ्रेम्स बढ़ जाएँ। अब Frame 90 पर Cactus Position को एडजस्ट करो ताकि वो Ground के समान स्पीड से मूव करे। अब Mid Ground Cactus Animation को रिपीट करने के लिए, हमें यह सुनिश्चित करना होगा कि यह Seamlessly Loop करे। इसके लिए दोनों Keyframes को सिलेक्ट करो, Alt Key दबाकर उन्हें Frame 100 पर Drag करो। अब चलिए अगली लेयर पर बढ़ते हैं — यानि Cactus Silhouette Layer को ऐनिमेट करने के लिए। **************** सबसे पहले, सभी लेयर्स को Lock और Hide कर दो। सिर्फ Cactus Silhouette Layer को Unlock और Unhide रखो। साथ ही, Ground Layer को भी Unhide रखो ताकि हमें एक Reference मिल सके। अब Cactus Silhouette को स्क्रीन के Left Side पर Reposition करो, बिलकुल वैसे ही जैसे हमने बाकी एलिमेंट्स के साथ किया था। क्योंकि Cactus Silhouette ग्राउंड के ज़्यादा करीब है, इसलिए इसे ग्राउंड के साथ In Sync मूव होना चाहिए जब ऐनिमेशन चले। अब Frame #50 पर जाओ, Cactus Silhouette Layer पर एक Keyframe इंसर्ट करो और इसे Right Side की ओर मूव करो। यह सुनिश्चित करने के लिए कि यह Ground के साथ ठीक से अलाइन हो, हम First Frame को Reference के रूप में इस्तेमाल करेंगे और उसकी पोज़िशन को उसी के अनुसार Adjust करेंगे। Ground के Rough Patches को फॉलो करते हुए कैक्टस की पोज़िशन को मैच करो। जब यह हो जाए, तो दोनों Keyframes के बीच एक Classic Tween अप्लाई करो और ऐनिमेशन को Check करो। क्योंकि ये Silhouettes कैमरा के ज़्यादा पास हैं, इसलिए इनकी स्पीड Background Cactus की तुलना में थोड़ी ज़्यादा होगी, और इन्हें स्क्रीन से बाहर मूव होना भी चाहिए। तो अब Frame #100 पर एक और Keyframe इंसर्ट करो और Cactus को दाएँ तरफ़ मूव करो ताकि वो Ground की मूवमेंट के साथ Match करे। अब फिर से Classic Tween अप्लाई करो और ऐनिमेशन को दोबारा Check करो। हम बीच वाले In-between Keyframe को हटा देंगे और ऐनिमेशन की Speed को एक बार फिर Review करेंगे। स्पीड थोड़ी और सही करनी है, तो हम Keyframes के बीच के Frames को थोड़ा कम करेंगे। इसके बाद, Frame 80 से वही ऐनिमेशन Copy करो, और फिर Frame 160 से भी। ऐनिमेशन की कुल अवधि अब ज़्यादा हो गई है, तो हमें इसे Match करने के लिए कुछ Frames कम करने होंगे। अब भी पाँच Frames ज़्यादा हैं, तो कुछ फ्रेम्स को Shift + F5 दबाकर Reduce कर दो। अब Mid Ground Cactus Layer में भी फ्रेम्स जोड़ो ताकि वो भी बाकी ऐनिमेशन की Duration से Match करे। अब ऐनिमेशन का Preview देखते हैं — कार अपनी जगह पर स्थिर (still) रहती है, जबकि बैकग्राउंड के Mountains और Cacti स्मूदली मूव करते हैं, जिससे ऐसा illusion बनता है कि कार आगे बढ़ रही है। Cactus Layers की स्पीड Ground के साथ पूरी तरह मैच करती है और सब कुछ Seamlessly Loop होता है। Timing और Movement दोनों ही बहुत नैचुरल लग रहे हैं, और ऐनिमेशन बिना किसी Jerk या Jump के स्मूदली फ्लो करती है। और बस! यही था हमारा Car Background Pan Animation Tutorial। देखने के लिए धन्यवाद Practice करते रहो, और मिलते हैं अगले ट्यूटोरियल में!