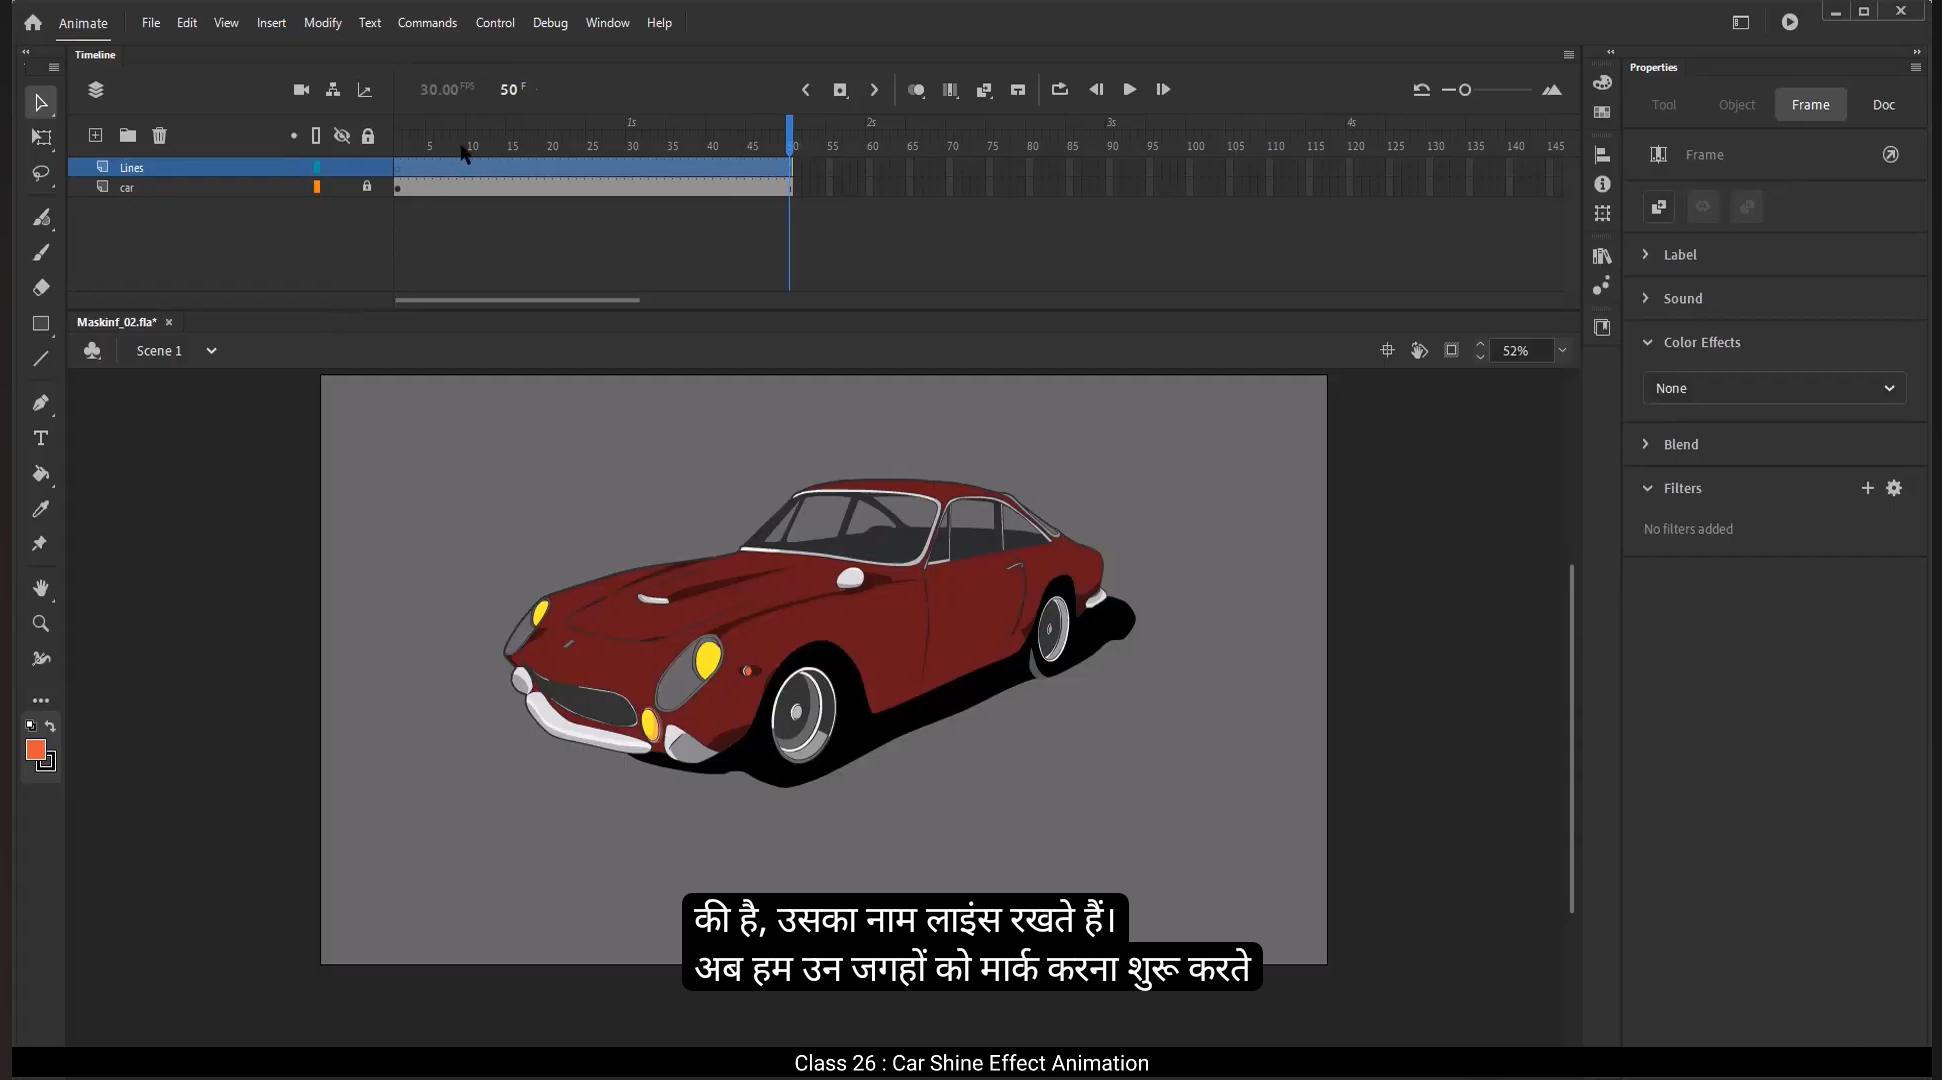
In this tutorial we are going to see how to animate a shine effect using the mask tool.We've got an image of a car here. What we are going to do is work on our glam effect on this car using the Mask tool. Let's select frame 50 on the timeline. Right click on it and from the drop down menu select the Insert Frame option. You can also press F5 on the keyboard which is a shortcut for adding frames. We now add a new layer using the Add Layer button on the timeline.We double click on the layer which has the car on it and rename it Car and the same way we name the newly added layer lines.Now let's start marking the places where we want the shine to appear. We zoom in a little using the zoom tool, the shortcut for which is Z.Let's select the Line tool from the toolbar. You can use the shortcut N we draw a line on the back of the car.Using the selection tool we can curve the lines the way we want. The shortcut for this is V .For fine tuning things, we use the sub selection tool. The shortcut is a. We select the top corner of the line. Notice how the nods and the handlebars appear. Using these handles we can tweak the line to match it with the shape of the car. We can click on the nodes and move them individually using the arrow keys.Let's draw another line using the line tool. The shortcut is N Now we are going to match the lines with the rear bumper of the car. We again use the selection tool and sub selection tool to make necessary curves and match the bumper exactly.We add corners to the line by holding the Alt key on the keyboard and dragging the cursor from the line to add the corner.We again use the sub selection tool to adjust the node handles.We add another line to match the smaller curve on the bumper.Don't forget to turn on the snap to object tool options so that the 2 lines will snap to each other and reduce the effort we need to put in to match them. Now move to the rear of the car and start matching the metal rim of the wheel. The process is the same we've seen earlier. We use the line tools and tweak the line using the selection and sub selection tools. You can use as many lines as you need to match the shape or the car exactly as they are. We'll see why we need all the procession.Tell when the glim is animated. As you can see we are adding the lines on the front of the wheel. Now we copy the lines using the shortcut control C and paste it in place using the shortcut control Shift V.Paste in place option is pasted exactly where it's copied from. This helps save all the time and effort for positioning it again.And go to modify on the main menu and from the drop down menu we select the transform option and click on the flip horizontal option.We now adjust the line according to the rim.We now add more lines to different parts of the car. After the lines are added, we increase the stroke size of the thickness by selecting all the lines using Control A and then going to the Properties tab, Object Color and Style Stroke Size and we increase the stroke size to five. We've added the lines on the parts where we want our shine to be animated. Now we add a new layer above the car layer and we name it Shine.On this layer we draw a rectangle using the rectangle tool. The shortcut is our. We select the outline of the rectangle and delete it. We select the fill and change the color by going to Properties, Object Color and Style Fill and choose white by using the free transform tool. The second tool in the toolbar we rotate the rectangle. The shortcut for this is Q. We now squash the rectangle and zoom on it.We select the rectangle and click on the color palette option on the side of the Properties tab.Please see the video for the exact location. We click on the solid colour option and from the drop down menu we select Linear gradient. We then click on the horizontal white bar to add a new colour bucket. We choose the white for all the buckets.We select the bucket on the left and bring down the alpha to zero and do the same to the bucket on the right.We can add another color bucket and bring the A200 so that we get more white area. We now right click on the rectangle and select convert to a symbol. Or we can simply press F8. We call it Shine. We use the free transform tool to stretch or squash our shine symbol. The shortcut is Q.We then add a keyframe on frame 5 on the shine layer using F6 and do the same on frame 40 on the same layer.We increase the frame still frame 70 using F5. We now hide the shine layer for now. Select the lines layer and press control A and go to modify shape and click on Convert lines to fill. This will convert our lines to fill so that the mask will work on these lines.If we zoom in on anyone of the lines, we can see that we can modify the lines as it has been converted into an object, and we can modify the lines just as we can modify a shape. We lock the lines layer and unhide and unlock the shine layer on frame. For T we move the shine symbol to the left side of the car.We stretch the shape using the free transform tool. The shortcut is Q. We select the shine layer and go to the properties tab. Click on the plus button and select the glue option. We choose whites from the palette and keep the quality high and edges the strength a bit. You can experiment with the strength value and fix a one that you like.We select the frames in between frame 5 and 14, right click and select Create Classic Tween. We make sure that the shine covers all the areas that we've marked using lines so that the shine will be visible after we mask it.If it is not covering all the areas, we can make it taller using the free transform tool.OK, now right click the lines layer and select mask option. We can now see that the shine layer is masked. Now if we press the enter key, we can see that the shine symbol is only visible in the areas which are marked using the lines. This is how the mask tool work. We can now unlock the line layer, hide the shine layer and add more lines on the lines layer to make the effect nicer.We can experiment by adding lines to the.The different areas of the car. After that's done, do not forget to convert the lines into fills or the mask tool won't work. On the particular area where there are only outlines, we bring the keyframe on frame 50 to frame 25 to make the shine travel faster. We can now use the shortcut control Enter to see the preview.Hope you found this tutorial helpful. Thanks for watching. इस ट्यूटोरियल में हम देखने वाले हैं कि mask tool यूज़ करके shine effect को कैसे animate किया जाता है। यहाँ हमारे पास एक car की image है। हम इस car पर mask tool की मदद से एक glam effect क्रिएट करने वाले हैं। चलो timeline पर frame 50 सेलेक्ट करते हैं। उस पर right click करते हैं और drop down menu से “Insert Frame” option सेलेक्ट करते हैं। आप keyboard पर F5 भी प्रेस कर सकते हैं, जो frames ऐड करने का shortcut है। अब हम timeline पर “Add Layer” बटन यूज़ करके एक नई layer ऐड करते हैं। जिस layer पर car है, उस पर double click करके उसका नाम “Car” रखते हैं। और नई जो layer ऐड की है, उसका नाम “Lines” रखते हैं। अब हम उन जगहों को mark करना शुरू करते हैं जहाँ हमें shine दिखानी है। Zoom tool यूज़ करके थोड़ा zoom in करते हैं, shortcut है Z। अब toolbar से Line tool सेलेक्ट करते हैं, shortcut है N। हम car के पीछे एक line ड्रॉ करते हैं। Selection tool यूज़ करके हम line को अपने हिसाब से curve कर सकते हैं, shortcut है V। Fine tuning के लिए हम sub selection tool यूज़ करते हैं, shortcut है A। हम line के top corner को सेलेक्ट करते हैं — देखिए nods और handlebars नज़र आते हैं। इन handles की मदद से हम line को car की shape के हिसाब से tweak कर सकते हैं। हम nodes पर क्लिक करके arrow keys से उन्हें move भी कर सकते हैं। अब हम एक और line ड्रॉ करते हैं Line tool (shortcut N) से। अब हम lines को car के rear bumper के साथ match करने वाले हैं। फिर से selection tool और sub selection tool यूज़ करते हैं ताकि curves को ठीक से match कर सकें। Alt key होल्ड करके हम line में corners ऐड करते हैं — cursor को drag करके। फिर से sub selection tool यूज़ करके node handles को adjust करते हैं। एक और line ऐड करते हैं bumper के छोटे curve को match करने के लिए। Snap to Object tool option ऑन करना मत भूलिए, ताकि दोनों lines एक-दूसरे से snap होकर जुड़ें और हमें manually ज्यादा मेहनत न करनी पड़े। अब car के पीछे वाले हिस्से पर जाएँ और wheel के metal rim को match करें। Process वही है जो पहले किया — Line tools और selection/sub selection tools से line को tweak करें। आप जितनी lines चाहें यूज़ कर सकते हैं ताकि car की shape perfect match हो जाए। हम देखेंगे कि ये precision क्यों ज़रूरी है जब glam effect animate होगा। जैसा आप देख सकते हैं, हम wheel के आगे lines ऐड कर रहे हैं। अब हम lines को copy करते हैं shortcut Control + C से, और paste in place करते हैं Control + Shift + V से। “Paste in place” option lines को उसी exact जगह paste करता है जहाँ से वो copy हुई थीं, जिससे reposition करने की मेहनत नहीं करनी पड़ती। अब main menu में Modify पर जाते हैं, drop down से Transform सेलेक्ट करते हैं, और “Flip Horizontal” पर क्लिक करते हैं। अब हम line को rim के हिसाब से adjust करते हैं। हम car के अलग-अलग हिस्सों में और lines ऐड करते हैं। सारी lines ऐड करने के बाद, हम stroke size बढ़ाते हैं। इसके लिए Control + A प्रेस करके सभी lines सेलेक्ट करते हैं, फिर Properties tab → Object → Color and Style → Stroke Size में जाकर size को 5 करते हैं। हमने उन हिस्सों में lines ऐड कर ली हैं जहाँ shine animate होगी। अब हम car layer के ऊपर एक नई layer ऐड करते हैं और उसे “Shine” नाम देते हैं। इस layer पर हम rectangle tool (shortcut R) से एक rectangle ड्रॉ करते हैं। हम rectangle की outline सेलेक्ट करके delete कर देते हैं। अब fill को सेलेक्ट करते हैं और Properties → Object → Color and Style → Fill में जाकर color को white सेट करते हैं। Free Transform tool (shortcut Q) से rectangle को rotate करते हैं। अब rectangle को squash करते हैं और थोड़ा zoom in करते हैं। अब rectangle को सेलेक्ट करते हैं और Properties tab के साइड में color palette option पर क्लिक करते हैं। (वीडियो में इसका exact location दिखाया गया है।) हम “Solid Color” option पर क्लिक करते हैं और drop down menu से “Linear Gradient” सेलेक्ट करते हैं। फिर horizontal white bar पर क्लिक करके एक नया color bucket ऐड करते हैं। सभी buckets के लिए color white रखते हैं। अब left वाले bucket की alpha को 0 करते हैं और right वाले की भी alpha को 0 करते हैं। हम एक और bucket ऐड कर सकते हैं और उसकी alpha 200 रखते हैं ताकि बीच का white area बढ़ जाए। अब rectangle पर right click करते हैं और “Convert to Symbol” सेलेक्ट करते हैं, या फिर shortcut F8 प्रेस करते हैं। हम symbol का नाम रखते हैं “Shine”। Free Transform tool (shortcut Q) यूज़ करके shine symbol को stretch या squash करते हैं। अब shine layer पर frame 5 और frame 40 दोनों पर keyframe ऐड करते हैं (F6 से)। फिर frame 70 तक frames बढ़ाते हैं (F5 से)। अब फिलहाल shine layer को hide कर देते हैं। Lines layer को सेलेक्ट करते हैं, Control + A प्रेस करते हैं, Modify → Shape → Convert Lines to Fill पर क्लिक करते हैं। इससे lines fill में convert हो जाएँगी ताकि mask उन पर काम कर सके। अगर हम किसी भी line को zoom करके देखें, तो पाएँगे कि अब वो editable shape बन गई है। हम lines layer को lock करते हैं और shine layer को unhide और unlock करते हैं। Frame 40 पर shine symbol को car के left side पर move करते हैं। Free Transform tool (shortcut Q) से shape को stretch करते हैं। अब shine layer सेलेक्ट करते हैं और Properties tab में जाकर plus बटन पर क्लिक करके “Glow” option सेलेक्ट करते हैं। Palette से white color चुनते हैं, quality high रखते हैं और edges की strength थोड़ा बढ़ाते हैं। आप strength value के साथ experiment कर सकते हैं जब तक perfect look न मिले। अब frame 5 और 14 के बीच की frames सेलेक्ट करते हैं, right click करते हैं और “Create Classic Tween” सेलेक्ट करते हैं। हम ensure करते हैं कि shine उन सभी areas को cover करे जहाँ lines हैं, ताकि mask के बाद shine properly दिखाई दे। अगर shine पूरे area को cover नहीं कर रही, तो free transform tool से उसे और tall बना सकते हैं। अब lines layer पर right click करते हैं और menu से “Mask” option सेलेक्ट करते हैं। अब हम देख सकते हैं कि shine layer masked हो गई है। Enter key प्रेस करते हैं — shine symbol अब सिर्फ उन्हीं हिस्सों में दिखेगा जहाँ lines बनाई गई थीं। यही है mask tool का actual working method। अब हम lines layer को unlock करते हैं, shine layer को hide करते हैं, और lines layer पर कुछ और lines ऐड करते हैं ताकि effect और अच्छा लगे। आप चाहें तो car के अलग-अलग हिस्सों पर experiment कर सकते हैं। बस ध्यान रहे — हर बार lines को fills में convert ज़रूर करें, वरना mask tool काम नहीं करेगा। जहाँ सिर्फ outlines हैं, वहाँ frame 50 के keyframe को frame 25 पर ले जाएँ ताकि shine तेज़ी से travel करे। अब Control + Enter shortcut यूज़ करके preview देख सकते हैं। उम्मीद है ये tutorial आपको helpful लगा होगा। देखने के लिए धन्यवाद।