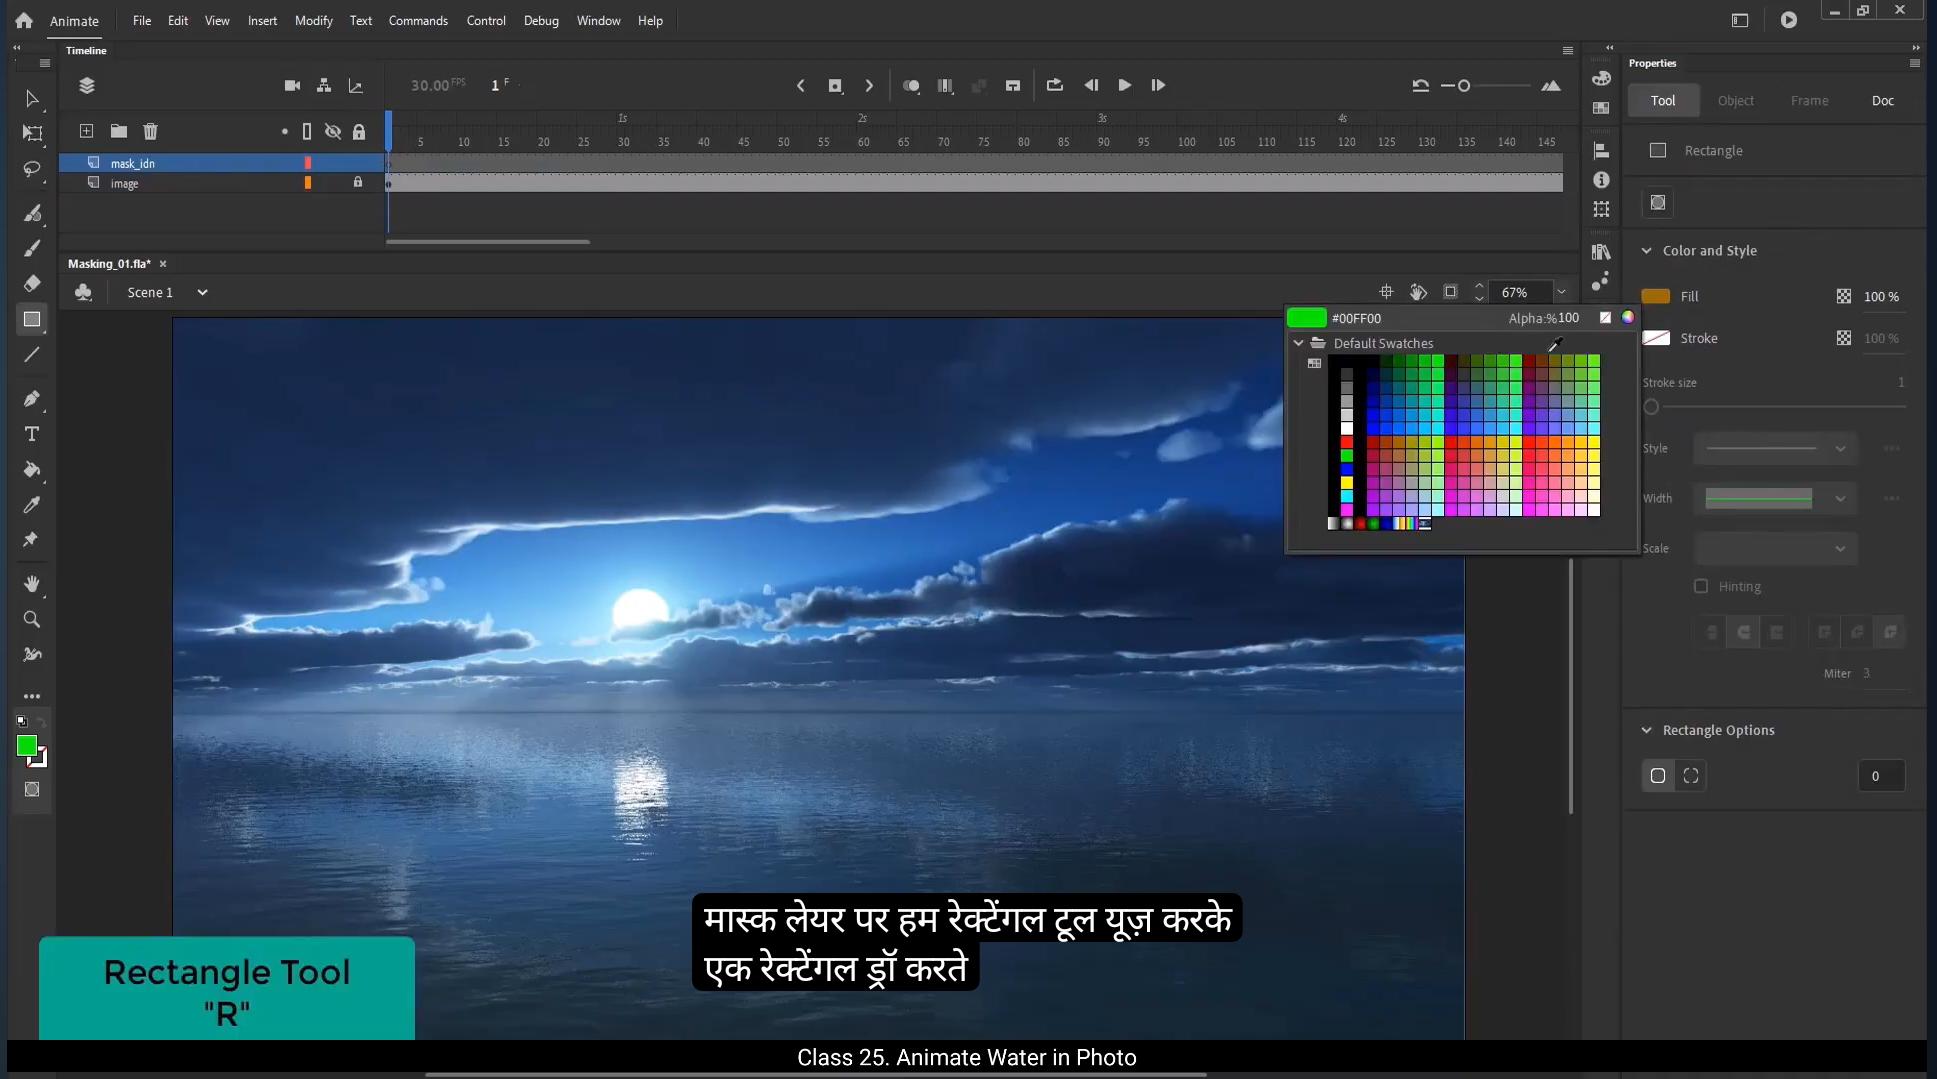
We need to use the marketplace tutorial. We are going to work on an assignment where we need to use the mask tool.We are going to animate water using the mask tool.So let's see how we can do this.1st we are going to import an image from our desktop.We go to file in the menu, select Import and click on Import to stage. From the menu you can also press Control R which is the shortcut to import. We now select the desired image which we want to animate. We double click on the image to open it in Adobe Animate. We can now see the image imported to stage. Our file is already aligned to stage. Now using this image we are going to do a trick with the mask tool to make an illusion of water being animated.We now increase our time frame by 200 by selecting it.And then we right click on it and select the insert frames. You can also press F5 to add frames.We add a new layer by clicking on the Add New Layer button. In the Layer tab, we double click on the name of the new layer and call it Mask. Similarly, we name the bottom layer image.On the mask layer, we draw a rectangle using the rectangle tool. The shortcut for this is R We keep the color of our rectangle red. We make sure we keep the sides of the rectangle out of the staging area.By using the selection tool, the shortcut is V We are going to make a selection as seen in the video.As we see the part of the rectangle which we have selected is highlighted. We click on the Colors tab and change the color to green. We now select the green rectangle and move it down using the arrow key and deselect it. You will notice that a gap is created in the red rectangle as we place the green rectangle on it.We do the same process multiple times till we get the desired mask shape. Please look at the video carefully to get a better idea.We select the part of the red rectangle which is out of the staging area at the bottom and delete it.We select every shape by pressing Control A and press the F8 key to convert it into a symbol and we call it Mask.We are going to play this animation in a loop, so we go to frame 200, right click on it and select Add keyframe from the menu. Or you can also use the shortcut F6 to add keyframes.On frame 101 on mask layer, add a keyframe.We now look and hide the mask layer.We add a new layer by clicking on the Add New Layer button in the Layer tab.We are now going to copy the image on this new layer. For that, we select the first keyframe of the image layer and drag it to the new layer by holding the Alt key. This will copy our image to the new layer. We'll now scale down the image on the new layer by using the Scale and Rotate tool, the shortcut for which is Control Alt S We scale it down to 95%. We match the edges of the new image layer to the staging area using the free Transform tool. The shortcut for this is Q.And now we unlock and unhide the mask layer.We go to frame 100 on the timeline. Here we select the free transform tool. The shortcut is Q.And stretch the mask shape from below by pressing and holding down the Alt key.We select random frames in between the key frames on the mask layer, right click on them and select Create Classic Tween from the menu.We can see that our shape is animated here.Now we right click on the mask layer and select the mask option from the menu. We can now press the Enter key to play our animation or export an SWF format by using shortcut control Enter.Here is our realistic looking water animation is ready. You can play around with mask shapes and animation timing to get desired results.Hope this tutorial was helpful. Thanks for watching. इस ट्यूटोरियल में हम marketplace tutorial यूज़ करने वाले हैं। हम एक ऐसे असाइनमेंट पर काम करने जा रहे हैं जिसमें हमें mask tool यूज़ करना होगा। हम mask tool की मदद से पानी (water) को animate करने वाले हैं। तो चलिए देखते हैं ये कैसे किया जाता है। सबसे पहले हम अपनी desktop से एक image import करने वाले हैं। हम menu में जाकर file पर क्लिक करते हैं, Import सेलेक्ट करते हैं और “Import to Stage” पर क्लिक करते हैं। आप menu से Control + R भी प्रेस कर सकते हैं, जो import करने का shortcut है। अब हम वो image सेलेक्ट करते हैं जिसे हम animate करना चाहते हैं। हम image पर double click करते हैं ताकि वो Adobe Animate में खुले। अब हम देख सकते हैं कि हमारी image stage पर import हो गई है। हमारी file पहले से stage के साथ aligned है। अब इसी image का use करते हुए हम mask tool से एक trick करने वाले हैं ताकि ऐसा illusion बने जैसे पानी animate हो रहा हो। अब हम अपनी timeline को 200 frames तक बढ़ाते हैं frame को सेलेक्ट करके। फिर हम उस पर right click करते हैं और “Insert Frames” सेलेक्ट करते हैं। आप F5 प्रेस करके भी frames ऐड कर सकते हैं। हम “Add New Layer” बटन पर क्लिक करके एक नई layer ऐड करते हैं। Layer tab में नई layer के नाम पर double click करके उसे “Mask” नाम देते हैं। इसी तरह नीचे वाली layer को “Image” नाम देते हैं। Mask layer पर हम rectangle tool यूज़ करके एक rectangle ड्रॉ करते हैं। इसका shortcut है R। हम rectangle का color red रखते हैं। हम यह भी ध्यान रखते हैं कि rectangle के sides stage area के बाहर रहें। Selection tool (shortcut V) यूज़ करके हम rectangle का एक हिस्सा सेलेक्ट करते हैं जैसा कि वीडियो में दिखाया गया है। जो हिस्सा हमने सेलेक्ट किया है वो highlighted नज़र आता है। हम Colors tab में जाकर उसका color green कर देते हैं। अब हम green rectangle को arrow key से नीचे move करते हैं और deselect करते हैं। आप देखेंगे कि red rectangle में एक gap बन गया है जहाँ हमने green rectangle रखा था। हम यही process कई बार रिपीट करते हैं जब तक हमें desired mask shape नहीं मिल जाता। कृपया वीडियो को ध्यान से देखें ताकि आपको बेहतर समझ आए। अब हम red rectangle का वो हिस्सा जो stage area के नीचे है, उसे delete कर देते हैं। हम Control + A प्रेस करके सारे shapes सेलेक्ट करते हैं और F8 प्रेस करके उन्हें symbol में convert करते हैं, और उसे “Mask” नाम देते हैं। अब हम इस animation को loop में चलाने वाले हैं। इसलिए हम frame 200 पर जाते हैं, उस पर right click करते हैं और “Add Keyframe” सेलेक्ट करते हैं। या फिर shortcut F6 यूज़ कर सकते हैं keyframe ऐड करने के लिए। Frame 101 पर mask layer में एक keyframe ऐड करते हैं। अब हम mask layer को lock और hide कर देते हैं। अब हम “Add New Layer” बटन क्लिक करके एक और नई layer बनाते हैं। अब हम image को इस नई layer पर copy करने वाले हैं। इसके लिए हम image layer के first keyframe को सेलेक्ट करते हैं और Alt key होल्ड करके उसे नई layer पर ड्रैग करते हैं। इससे हमारी image नई layer पर कॉपी हो जाएगी। अब हम नई layer की image को Scale and Rotate tool से scale down करते हैं, जिसका shortcut है Control + Alt + S। हम इसे 95% तक scale करते हैं। अब free Transform tool (shortcut Q) से हम नई image layer के edges को stage area से मैच कर देते हैं। अब हम mask layer को unlock और unhide करते हैं। हम timeline पर frame 100 पर जाते हैं। यहाँ हम free transform tool (shortcut Q) से mask shape को नीचे से stretch करते हैं, Alt key को प्रेस और hold करते हुए। अब हम mask layer में keyframes के बीच के कुछ random frames सेलेक्ट करते हैं, right click करते हैं और “Create Classic Tween” सेलेक्ट करते हैं। अब हम देख सकते हैं कि हमारी shape animated है। अब हम mask layer पर right click करते हैं और menu से “Mask” option सेलेक्ट करते हैं। अब हम Enter key प्रेस करके animation play कर सकते हैं या Control + Enter से SWF format में export कर सकते हैं। और बस! हमारी realistic दिखने वाली water animation तैयार है। आप mask shapes और animation timing के साथ play कर सकते हैं ताकि desired result मिले। उम्मीद है ये tutorial आपके लिए helpful रहा होगा। देखने के लिए धन्यवाद।