Hello students, in this video we're going to learn some super important animation principles. Straight ahead and pose to pose, secondary action and timing. Let's start with straight ahead and pose to pose. To explain this, I've got a simple example of a walk cycle. Imagine a character taking 2 steps. To animate this, I first create three main poses. In the first pose.The left leg is in front. In the middle pose, the right leg moves forward. In the last pose, the left leg is in front again. These are called key poses. They define the most important moments of the movement. Next, I added extreme poses. These are the key moments where the character moves down and up as they walk. In animation terms, we call these extreme poses. They show the highest and lowest points of movement. So in this walk cycle, they follows a pattern, down, up, down, up. Now in between these extremes we have in betweens. These are the frames that help the character transition smoothly from down to up and back again. Think of it like this. The key poses set the main action, the extremes define the movements, highs and lows, and the in betweens make everything feel natural and fluid.So this is the entire walk cycle.Let me show you just the main key poses, and as you can see, these three are the main key poses. These are the most important frames that define the movement. Now I've decided that by frame 25, the character will reach their final position and on frame one they'll start from the initial position.In post-to-pose animation, we first decide the starting pose and the ending pose of the character. So here on frame one and frame 25 I've set the characters main poses. These key poses act as a blueprint for the animation and then we add the in between frames to complete the movement. Next we have the extreme poses. Now what does extreme mean in animation?It simply means that the character won't go beyond these positions.These are the highest and lowest points in the movement. For example, on frame 4, the character is at its lowest point. It won't go any further down from here. It starts moving upward. Then on frame 10, the character reaches its highest point. It won't rise any higher. Instead it starts moving downward again. So these extreme poses create a natural rhythm down.Up, down, up.They define the limits of movement. Now to make this animation smooth, I need to add in betweens. These are the frames that help the character transition from down to up and back again. For example, if we look here, this is the extreme downpose and this is the extreme up pose. The character moves from one to the other and the in betweens help blend the motion naturally.This approach is called pose to pose animation. Why? Because we start by defining the.The main poses the first pose at frame one and the last pose at frame 25. Then we add the middle pose at frame 13, which helps break the movement into two equal parts. Next, we work backward and insert the extreme poses at frame 10 and frame 4 to define the highest and lowest points of the motion. Finally, we fill in the in betweens between these extremes to make the animation flow smoothly.By following this pose to pose principle, we can create a natural and well balanced walk cycle
Without guesswork, it helps keep the movement structured while still feeling organic and fluid.Now let's talk about straight ahead animation. In straight ahead, you start by drawing the first pose, then the second, then the third, and so on. Just going from one frame to the next. Sounds simple, right? But here's the thing, Because you're drawing one frame after the other without planning the final position, the characters movement can end up looking off.For example, you might end up with an unexpected or strange result because you didn't decide the last frame in advance.In this case, the animation could go completely in the wrong direction or feel disjointed. So in character animation we usually avoid straight ahead because we need to know where the character will end up, like I did earlier when I decided the frame 25 position for the character. Without that plan, the movement can feel unpredictable and out of control. But that doesn't mean straight ahead is useless in animation. In fact, it's a great tool for certain types of.Animation, especially when you're working with unpredictable or spontaneous movements. For example, you can use straight ahead for effects like fire, water splashes, dust, clouds of smoke, or explosions. Take fire, for instance.There's no fixed first or last pose, they're completely different from each other.With fire you just go with the flow and let the movement create itself.You don't need to plan out the first and last positions because fire is constantly changing and it's hard to predict exactly where it will go. If you look at fire from start to finish, you wouldn't even know how to add in betweens if you tried to plan it out.So for these kinds of effects, straight ahead is perfect. This principle is mostly used in visual effects animation, especially in 2D animation like here I've used straight ahead for animating fire. Similarly, we can use straight ahead for things like dust effects. For example, imagine something magical is happening, like dust coming out of a magic lamp, or any other effect.This is a perfect use for straight ahead animation.If you look here, I started by drawing a very small tiny path in the 1st frame. Then in the next frame I made it a bit bigger. You can see the difference in the shape and how it grows in size. In the following frames. The dust keeps expanding, getting bigger and bigger until it reaches the final size. This is how straight ahead works. It's all about drawing the next frame based on the previous one, allowing the effect to grow and evolve naturally.So these are two examples of pose to pose for structured movement and straight ahead for fluid unpredictable effects.Now let's move on to the next animation principle.Our next animation principle is secondary action. Let's look at a simple animation of a person lifting a weight. At first, it seems like the main action is just the person lifting the weight, right? But here's where secondary action comes in. Secondary action refers to smaller gestures or movements that support the main action and add more depth or dimension to the character's animation. For example, in this animation, the person isn't just lifting the weight.Before doing that, he's rubbing his hands together and then raising them in the air, preparing for the big lift. This small action adds an extra layer to the main action, making it feel more natural and giving it more personality. So the action that supports or adds extra depth to the main action is called secondary action. It helps the animation feel more alive and realistic by giving the character more intention and detail.
Let's look at another example. Here we have two walk cycles. In the first one, the character scratches his leg before starting to walk. This small movement makes it look like he's thinking or hesitating before taking a step. It adds more personality and makes the action feel more deliberate, almost like it's telling a little story about how he's going to walk.This is the difference between a basic animation and an animation that follows the secondary action.Principle The extra movement gives more depth and realism to the character.Now don't get confused with overlapping action or follow through. Those are separate animation principles. Overlapping action and follow through deal with how different parts of the body move at different times. Whereas secondary action is all about adding extra movements that support the main action. Like here you can see the character on the left lifts the weight directly, just a simple action. The character on the right adds extra expression before lifting.The weight may be rubbing hands, raising hands in air, or taking a deep breath, preparing for the effort. That extra movement before the main action is secondary action.Our next animation principle is timing. Let's take a look at two different objects, a boat and a bullet. Both are moving, but at very different speeds. Why? Because of timing. In animation, timing refers to how fast or slow an action happens, and this is controlled by the number of drawings or frames between two key poses. Here's how it works. If you have many drawings placed close together, the action will be.Slow. If you have fewer drawing spaced far apart, the action will be fast. So fewer drawings equals faster movement, and more drawings equals slower movement. For example, a boat moves slowly across the water, so we use more drawings to create that smooth, steady motion. But a bullet moves extremely fast, so we use fewer drawings to make it zip across the screen in just a few frames.Depending on the situation and the object you're animating, you need to adjust the timing.And to make the movement feel realistic, the timing principle states that the number of frames inserted between each main action greatly affects the personality and nature of an animation. Let's look at some examples. For a boat, we use 30 drawings over 30 frames. This makes the movement slow and steady. For a metal ball, we use 8 drawings over 21 frames. Since there are fewer drawings, it moves faster than the boat for a bullet.We use 5 drawings over 9 frames. With even fewer frames, the bullet moves extremely fast, so timing is all about how many frames we insert between key actions if our animation runs at 30 frames per second.Then placing more drawings within that time makes the action slower, while using fewer drawings makes it faster. Now let's take a closer look at how we place drawings on different frames. On the boat layer, we add one drawing for each frame. Since we have a 30 frame animation, we create 30 drawings, one for every frame. This is called drawing on ones, and it results in very smooth motion.On the bullet layer we place one drawing for every two frames.This means we have 5 drawing on 9 frames. This is called drawing on twos. On the metal ball layer, we add one drawing for every 3 frames. This is called drawing on threes. Most of the time we use drawings on twos because it gives a natural and fluid movement without needing as many drawings as ones. Now take a look at these two animations. The character on the left is animated on ones.
Meaning there's a new drawing on every single frame. The character on the right is animated on twos, meaning there's a new drawing on every other frame. At first glance you might not notice a huge difference, but drawing on ones gives a smoother animation. However, drawing on twos is more commonly used when animating fast actions. It's recommended to animate on twos.Why? Because it still looks smooth and natural, but it also reduces the amount of work.By half. That's why classical animation is usually done on twos. It's a great balance between quality and efficiency.So far we've covered 9 animation principles, but there are still three more Exaggeration, SOLID Drawing, and appeal. These principles are a bit more advanced and play a big role in character animation, so we'll learn about them in our upcoming character animation lessons. I hope you've understood these principles and will start using them in your own animations.Keep practicing and keep experimenting. Thank you, and see you in the next Tutorial.
हैलो स्टूडेंट्स, इस वीडियो में हम कुछ सुपर इम्पॉर्टेन्ट एनीमेशन प्रिंसिपल्स सीखेंगे। Straight Ahead और Pose to Pose, Secondary Action और Timing।
चलिए शुरू करते हैं Straight Ahead और Pose to Pose से।
इसे समझाने के लिए, मेरे पास एक सिंपल वॉक साइकिल का एग्ज़ाम्पल है।
सोचिए एक कैरेक्टर दो स्टेप्स लेता है।
इसे एनिमेट करने के लिए, मैं पहले तीन मेन पोज़ेस क्रिएट करता हूँ।
पहले पोज़ में लेफ्ट लेग फ्रंट में है।
मिडिल पोज़ में, राइट लेग फॉरवर्ड मूव करता है।
लास्ट पोज़ में, फिर से लेफ्ट लेग फ्रंट में है।
इन्हें Key Poses कहा जाता है। ये मूवमेंट के सबसे इम्पॉर्टेन्ट मोमेंट्स को डिफाइन करते हैं।
इसके बाद मैंने Extreme Poses ऐड किए।
ये वो मोमेंट्स हैं जहाँ कैरेक्टर वॉक करते वक्त नीचे और ऊपर मूव करता है।
एनीमेशन टर्म्स में इन्हें Extreme Poses कहते हैं।
ये मूवमेंट के सबसे हाई और लो पॉइंट्स को दिखाते हैं।
तो इस वॉक साइकिल में पैटर्न फॉलो होता है – Down, Up, Down, Up।
अब इन एक्स्ट्रीम्स के बीच हमारे पास In-Betweens होते हैं।
ये वो फ्रेम्स हैं जो कैरेक्टर को स्मूथली डाउन से अप और वापस डाउन तक ट्रांज़िशन कराते हैं।
सोचिए इसे ऐसे – Key Poses मेन एक्शन सेट करते हैं, Extremes हाई और लो डिफाइन करते हैं, और In-Betweens सबकुछ नैचुरल और फ्लुइड बनाते हैं।
तो ये पूरा वॉक साइकिल है।
अब मैं सिर्फ मेन Key Poses दिखाता हूँ, और आप देख सकते हैं कि ये तीन फ्रेम्स मूवमेंट को डिफाइन करते हैं।
अब मैंने डिसाइड किया कि Frame 25 पर कैरेक्टर फाइनल पोज़िशन तक पहुँचेगा और Frame 1 से स्टार्ट करेगा।
Pose to Pose एनीमेशन में हम पहले कैरेक्टर का स्टार्टिंग और एंडिंग पोज़ डिसाइड करते हैं।
तो यहाँ Frame 1 और Frame 25 पर मैंने मेन पोज़ेस सेट किए।
ये Key Poses ब्लूप्रिंट की तरह काम करते हैं।
फिर हम In-Between फ्रेम्स ऐड करते हैं ताकि मूवमेंट पूरा हो।
अब Extreme Poses की बात करते हैं।
Extreme का मतलब है कि कैरेक्टर इन पोज़िशन्स से आगे नहीं जाएगा।
ये मूवमेंट के हाई और लो पॉइंट्स हैं।
जैसे Frame 4 पर कैरेक्टर लोएस्ट पॉइंट पर है। इससे नीचे नहीं जाएगा।
उसके बाद वो ऊपर मूव करना शुरू करता है।
फिर Frame 10 पर वो हाईएस्ट पॉइंट पर है। इससे ऊपर नहीं जाएगा और फिर नीचे मूव करेगा।
तो Extreme Poses नैचुरल रिद्म बनाते हैं – Down, Up, Down, Up।
ये मूवमेंट की लिमिट्स डिफाइन करते हैं।
एनीमेशन स्मूथ बनाने के लिए हमें In-Betweens डालने पड़ते हैं।
ये वो फ्रेम्स हैं जो डाउन से अप और वापस डाउन तक स्मूथ ट्रांज़िशन कराते हैं।
Pose to Pose अप्रोच इसलिए कहलाती है क्योंकि हम पहले मेन पोज़ेस डिसाइड करते हैं।
जैसे Frame 1 पर पहला पोज़ और Frame 25 पर लास्ट पोज़।
फिर बीच में Frame 13 पर मिडिल पोज़ ऐड किया, ताकि मूवमेंट दो पार्ट्स में बँट जाए।
फिर हम पीछे जाकर Frame 10 और Frame 4 पर Extreme Poses डालते हैं।
आख़िर में इनके बीच In-Betweens भरते हैं ताकि एनीमेशन स्मूथ फ्लो करे।
इस प्रिंसिपल को फॉलो करके हम नैचुरल और बैलेंस्ड वॉक साइकिल बना सकते हैं।
बिना गेसवर्क, ये मूवमेंट को स्ट्रक्चर्ड रखता है और फिर भी ऑर्गैनिक फील देता है।
अब Straight Ahead एनीमेशन की बात करते हैं।
Straight Ahead में आप पहला पोज़ बनाते हैं, फिर दूसरा, फिर तीसरा और ऐसे ही आगे।
सिर्फ एक-एक फ्रेम करके।
सिंपल लगता है, है ना?
लेकिन दिक्कत ये है कि इसमें आप फाइनल पोज़ पहले से डिसाइड नहीं करते।
तो कैरेक्टर की मूवमेंट गड़बड़ दिख सकती है।
कभी-कभी रिज़ल्ट अनएक्सपेक्टेड या स्ट्रेंज आ सकता है।
क्योंकि आपने लास्ट फ्रेम पहले से प्लान नहीं किया।
ऐसे में एनीमेशन गलत डायरेक्शन में चला जा सकता है या डिसजॉइंटेड लग सकता है।
इसीलिए कैरेक्टर एनीमेशन में हम स्ट्रेट अहेड को अवॉइड करते हैं।
क्योंकि हमें पता होना चाहिए कि कैरेक्टर कहाँ एंड करेगा।
लेकिन इसका मतलब ये नहीं कि स्ट्रेट अहेड बेकार है।
असल में ये कुछ खास टाइप्स की एनीमेशन के लिए परफेक्ट है।
खासकर अनप्रेडिक्टेबल या स्पॉण्टेनियस मूवमेंट्स के लिए।
जैसे फायर, वाटर स्प्लैश, डस्ट, स्मोक या एक्सप्लोशन्स।
फायर को लीजिए – इसमें कोई फिक्स्ड पहला या आख़िरी पोज़ नहीं होता।
ये हर पल बदलता रहता है।
इसलिए स्ट्रेट अहेड में बस फ्रेम दर फ्रेम मूवमेंट बनाते हैं और रिज़ल्ट अपने आप निकलता है।
ये 2D विजुअल इफेक्ट्स एनीमेशन के लिए सबसे ज़्यादा यूज़ होता है।
जैसे यहाँ मैंने फायर को एनिमेट करने के लिए स्ट्रेट अहेड यूज़ किया।
इसी तरह Dust इफेक्ट्स में भी स्ट्रेट अहेड काम आता है।
सोचिए किसी मैजिक लैम्प से डस्ट निकल रहा है।
पहले फ्रेम में मैंने छोटा सा पाथ बनाया।
अगले फ्रेम में उसे थोड़ा बड़ा किया।
और फिर हर फ्रेम में वो और बड़ा होता गया।
ये है स्ट्रेट अहेड का तरीका।
प्रीवियस फ्रेम के बेस पर नेक्स्ट फ्रेम ड्रॉ करते हैं और इफेक्ट नैचुरली ग्रो करता है।
तो ये दो एग्ज़ाम्पल्स हैं – Pose to Pose स्ट्रक्चर्ड मूवमेंट के लिए और Straight Ahead फ्लुइड, अनप्रेडिक्टेबल इफेक्ट्स के लिए।
अब चलते हैं अगले प्रिंसिपल पर।
हमारा अगला एनीमेशन प्रिंसिपल है Secondary Action।
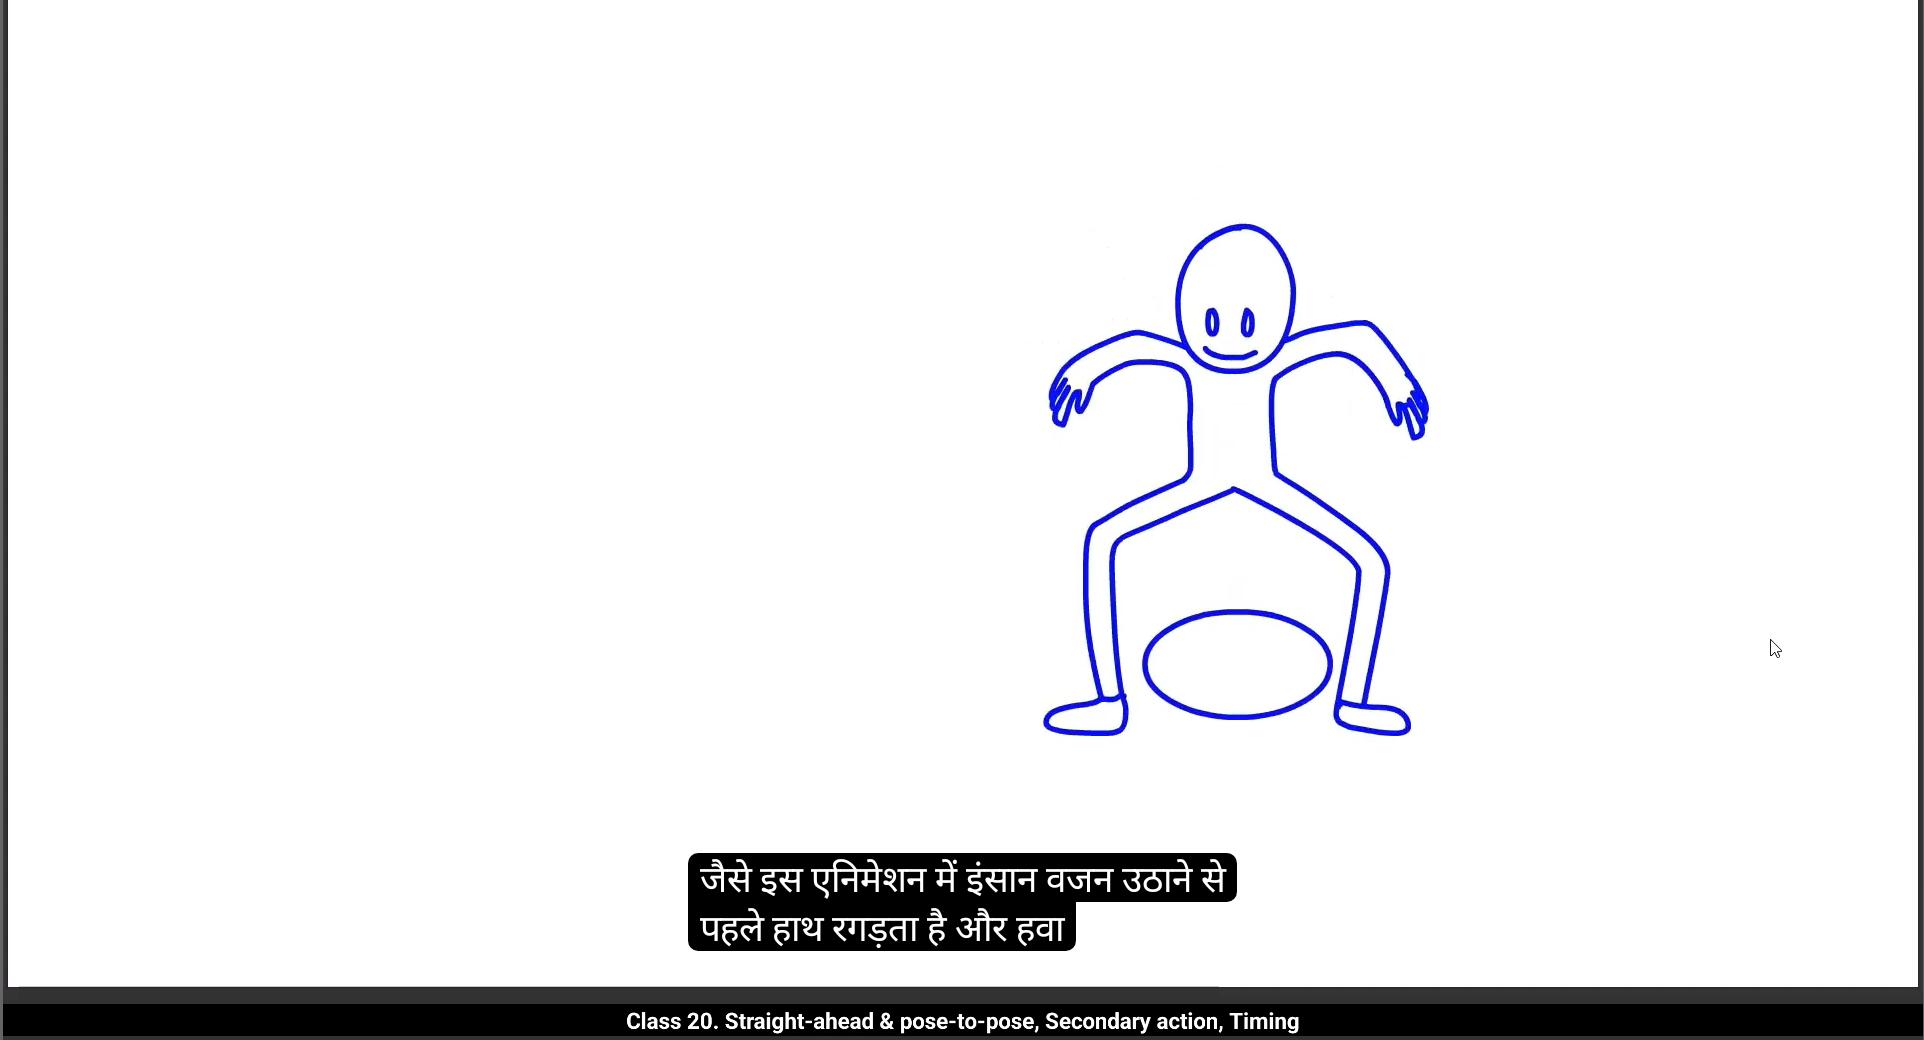
सोचिए एक इंसान वज़न उठा रहा है।
पहली नज़र में लगता है कि मेन एक्शन सिर्फ वज़न उठाना है।
लेकिन यहाँ Secondary Action आता है।
Secondary Action वो छोटे मूवमेंट्स या जेस्चर्स हैं जो मेन एक्शन को सपोर्ट करते हैं और उसे ज्यादा नैचुरल बनाते हैं।
जैसे इस एनीमेशन में, इंसान वज़न उठाने से पहले हाथ रगड़ता है और हवा में उठाता है।
ये छोटा एक्शन मेन एक्शन को ज्यादा रिलेटेबल और पर्सनैलिटी वाला बनाता है।
तो जो मूवमेंट मेन एक्शन को सपोर्ट करे, वो Secondary Action कहलाता है।
ये एनीमेशन को ज्यादा अलाइव और रियलिस्टिक फील कराता है।
एक और एग्ज़ाम्पल देखिए।
दो वॉक साइकिल्स हैं।
पहले वाले में कैरेक्टर चलने से पहले अपना पैर खुजाता है।
ये छोटा सा मूवमेंट उसे सोचते हुए दिखाता है, जैसे वो हिचकिचा रहा हो।
ये एक स्मॉल स्टोरी जैसा एहसास देता है।
यही डिफरेंस है बेसिक एनीमेशन और Secondary Action वाले एनीमेशन में।
लेकिन इसे Overlap और Follow Through से कन्फ्यूज़ मत कीजिए।
वो अलग प्रिंसिपल्स हैं।
Overlap और Follow Through बॉडी पार्ट्स के टाइमिंग पर होते हैं।
जबकि Secondary Action सिर्फ मेन एक्शन को सपोर्ट करने वाले मूवमेंट्स हैं।
जैसे एक कैरेक्टर सीधा वज़न उठाता है – सिंपल एक्शन।
दूसरा कैरेक्टर पहले हाथ रगड़ता है, हाथ हवा में उठाता है या डीप ब्रीद लेता है।
ये सारे मूवमेंट्स मेन एक्शन से पहले आते हैं और इन्हें Secondary Action कहते हैं।
अब अगला प्रिंसिपल है Timing।
सोचिए दो ऑब्जेक्ट्स – एक बोट और एक बुलेट।
दोनों मूव कर रहे हैं लेकिन अलग स्पीड से।
क्यों? क्योंकि टाइमिंग अलग है।
एनीमेशन में टाइमिंग का मतलब है एक्शन कितना फास्ट या स्लो होगा।
ये तय होता है दो Key Poses के बीच कितने ड्रॉइंग्स या फ्रेम्स रखे गए हैं।
अगर ज्यादा ड्रॉइंग्स हैं तो एक्शन स्लो होगा।
कम ड्रॉइंग्स हैं तो फास्ट होगा।
जैसे बोट स्लो मूव करती है, तो हम ज्यादा ड्रॉइंग्स डालते हैं।
लेकिन बुलेट बहुत फास्ट है, तो हम कम ड्रॉइंग्स डालते हैं।
मतलब कम ड्रॉइंग्स = फास्ट मूवमेंट, ज्यादा ड्रॉइंग्स = स्लो मूवमेंट।
तो टाइमिंग डायरेक्टली एनीमेशन की पर्सनैलिटी और नेचर को बदल देती है।
उदाहरण – बोट के लिए 30 फ्रेम्स पर 30 ड्रॉइंग्स।
स्मूथ और स्लो मोशन।
मेटल बॉल के लिए 21 फ्रेम्स पर 8 ड्रॉइंग्स।
फास्ट मोशन।
बुलेट के लिए 9 फ्रेम्स पर 5 ड्रॉइंग्स।
एक्सट्रीमली फास्ट मोशन।
अगर हमारा एनीमेशन 30 FPS पर चल रहा है तो – ज्यादा ड्रॉइंग्स स्लो मोशन देंगे, कम ड्रॉइंग्स फास्ट।
अब देखते हैं ड्रॉइंग्स को फ्रेम्स पर कैसे प्लेस करते हैं।
Boat लेयर पर हर फ्रेम पर एक ड्रॉइंग ऐड किया – 30 फ्रेम्स में 30 ड्रॉइंग्स।
इसे Drawing on Ones कहते हैं।
Bullet लेयर पर हर दो फ्रेम्स पर एक ड्रॉइंग डाली – 9 फ्रेम्स पर 5 ड्रॉइंग्स।
इसे Drawing on Twos कहते हैं।
Metal Ball लेयर पर हर तीन फ्रेम्स पर एक ड्रॉइंग डाली – Drawing on Threes।
ज्यादातर टाइम Drawing on Twos यूज़ करते हैं क्योंकि ये स्मूथ भी लगता है और वर्क भी आधा कर देता है।
अब दो एनीमेशन्स देखिए।
लेफ्ट वाला कैरेक्टर Ones पर एनिमेटेड है – हर फ्रेम पर नया ड्रॉइंग।
राइट वाला कैरेक्टर Twos पर एनिमेटेड है – हर दूसरे फ्रेम पर नया ड्रॉइंग।
Ones ज्यादा स्मूथ है, लेकिन Twos प्रैक्टिकल और एफिशिएंट है।
इसीलिए क्लासिकल एनीमेशन ज़्यादातर Twos पर किया जाता है।
क्वालिटी और एफिशिएंसी का बैलेंस।
अब तक हमने 9 एनीमेशन प्रिंसिपल्स कवर कर लिए हैं।
लेकिन अभी भी 3 बाकी हैं – Exaggeration, Solid Drawing और Appeal।
ये थोड़े एडवांस्ड हैं और कैरेक्टर एनीमेशन में बड़ी भूमिका निभाते हैं।
तो इन्हें हम अपने अगले कैरेक्टर एनीमेशन लेसन में सीखेंगे।
उम्मीद है आपने ये प्रिंसिपल्स समझ लिए होंगे और इन्हें अपनी एनीमेशन में यूज़ करना शुरू करेंगे।
प्रैक्टिस करते रहिए और एक्सपेरिमेंट करते रहिए। धन्यवाद और नेक्स्ट ट्यूटोरियल में मिलते हैं।