Hello students, in this tutorial we are going to learn 2 important animation principles, slow in and slow out and overlap and follow through.To demonstrate these concepts, I've prepared three different shapes, a square, a circle, and a triangle, each moving at a different speed. All three shapes move from point A to point B, but they do so with distinct speed variations.Let's break it down. The triangle demonstrates slow in where the movement starts slow and gradually speeds up.In animate CC. This is referred to as ease in effect.The square demonstrates slow out, where the motion starts quickly and slows down toward the end. This is known as ease out effect. In animate CC.And the circle combines both principles. An animation that starts slowly, speeds up in the middle, and then slows down again in the end. This is called ease in out effect.These principles can be applied to different objects in your animations. For example, when animating a car, you can use ease in and ease out to make its motion more realistic and smooth. Now let's explore how these principles can be applied in an animation. On frame one, I placed the car at its starting position, and on frame 29 I positioned it at the end point.I added a classic tween to the motion. Let's explore how adjusting the easing.Affects the car's movement. When I apply an ease out effect, the car starts moving quickly and slows down as it approaches its destination. You can verify this using the Onion Skin tool. Notice how the frames are spaced further apart at the start and get closer together near the end. This spacing visually represents the car decelerating as it reaches point B.If I change the tweening effect to negative, that is ease in the car behaves differently.Here the frame spacing is closer together at the start and wider apart at the end, showing acceleration. This means the car starts moving slowly from point A and gains speed as it approaches point B.Now let's use both ease in and ease out together. Initially the car moves slowly, then it speeds up in the middle, and finally it slows down again as it nears point B. This creates a natural smooth motion.You can observe this by the frame spacing. At the start the frames are close together, in the middle the spacing increases and at the end the frames are close again. How did we achieve this? By applying a combination of easing effects, we manipulated the acceleration and deceleration of the car. These subtle changes make the animation look more dynamic and realistic.We started by setting the 1st frame.And the last frame for our animation. Then in the middle we added a keyframe. For the first part of the animation I applied a tweening effect of classic ease in. For the last part on frame 15 I added a classic ease out effect.By combining these two effects, we achieve both ease in and ease out in the same animation. This creates a smooth natural motion where the objects start slowly.Speeds up in the middle and slows down again toward the end. So this is how we apply the animation principle of ease in and ease out.
Let's explore the next principle overlap and follow through. Here we have two examples, one is hand animation and second one is a circle shape with white tail. In the hand animation, the shoulder acts as the main body part while the forearm and hand follow its motion. While in the other animation, the red circle is the main body and the white tail overlaps its motion.This principle is essentially about drag.Drag or delay where secondary parts move slightly after the main body part. For example, in the hand animation, the shoulder move first, followed by the forearm and then the palm.In the circle and tail animation, the red circle moves 1st and the white tail follows, overlapping its motion toward the end. This principle shows how different parts of an object move in relation to the main body. The motion is not instantaneous, there's a drag or delay in the movement of connected parts. This principle can be applied to various scenarios, such as the extra skin of a chubby character. The tale of a.Dog or a flower pot being moved. These examples also explain how the mass of an element behaves in motion. The connected parts react to the movement of the main body, emphasizing weight and flexibility. Now let's see how did we achieve this in animation.In the hand animation, we animated the shoulder first as the main body part.The forearm and palm were animated with a slight delay, ensuring they follow the shoulder naturally. As the arm moves forward, the forearm and palm lag behind and catch up, creating a realistic follow through effect.When the arm comes back, the same principle applies but in reverse. Between frame 15 and frame 30, the hand and forearm follow the motion of the shoulder catching up to the main body part. This is an example of follow through, and from frame one to frame 15, the palm and forearm are overlapping the motion of the shoulder lagging slightly behind as the shoulder move forward.So this is how we achieve this hand movement in our animation.In the circle and tail animation, the red circle was animated as the main object. The white tail was added with a delayed motion, overlapping the circle's movement. At the end of the motion, the tail lags slightly before settling, emphasizing the flexibility and mass of the tail. In the first half of the animation, from frame one to frame 18, the white tail is following the.End of the red circle as it moves. This is an example of follow through after frame 18. Once the circle comes to a stop, the tail continues to move and overlaps the main body's motion before settling. This demonstrates overlap.This principle can enhance animations involving characters, clothing, or other flexible elements. It brings life to objects and makes the motion look natural.Follow through occurs when parts of an object or character lag slightly behind the main motion of the body, catching up as the movement progresses, and overlap happens when parts of an object continue moving even after the main body has stopped showing flexibility and natural motion. This concludes our explanation of overlap and follow through.I hope you found this tutorial helpful and enjoyable.Thank you and see you in the next tutorial.
हैलो स्टूडेंट्स, इस ट्यूटोरियल में हम दो इम्पॉर्टेन्ट एनीमेशन प्रिंसिपल्स सीखेंगे – Slow In और Slow Out, और Overlap और Follow Through।
इन कॉन्सेप्ट्स को डेमो करने के लिए, मैंने तीन अलग-अलग शेप्स तैयार किए हैं – एक Square, एक Circle, और एक Triangle, जो अलग-अलग स्पीड से मूव करेंगे।
तीनों शेप्स पॉइंट A से पॉइंट B तक मूव करते हैं, लेकिन अलग-अलग स्पीड वेरिएशन्स के साथ।
चलिए इसे ब्रेक करते हैं। Triangle दिखाता है Slow In, जहाँ मूवमेंट स्लो स्टार्ट होता है और धीरे-धीरे स्पीड अप करता है।
Animate CC में इसे Ease In Effect कहा जाता है।
Square दिखाता है Slow Out, जहाँ मोशन जल्दी स्टार्ट होता है और एंड की तरफ स्लो हो जाता है।
इसे Animate CC में Ease Out Effect कहा जाता है।
Circle इन दोनों प्रिंसिपल्स को कंबाइन करता है। एक ऐसा एनीमेशन जो स्लो स्टार्ट होता है, बीच में स्पीड अप करता है और एंड पर फिर से स्लो हो जाता है।
इसे Ease In Out Effect कहते हैं।
ये प्रिंसिपल्स आपकी एनीमेशन के अलग-अलग ऑब्जेक्ट्स पर अप्लाई किए जा सकते हैं।
जैसे कि, अगर हम एक कार को एनीमेट कर रहे हैं, तो Ease In और Ease Out यूज़ करके उसकी मोशन को ज्यादा रियलिस्टिक और स्मूथ बना सकते हैं।
अब देखते हैं कि इन प्रिंसिपल्स को एनीमेशन में कैसे अप्लाई करें।
Frame 1 पर मैंने कार को उसकी स्टार्टिंग पोज़ीशन पर रखा और Frame 29 पर एंड पॉइंट पर।
मैंने इस मोशन पर Classic Tween लगाया। अब देखते हैं easing एडजस्ट करने से कार की मूवमेंट कैसे बदलती है।
जब मैं Ease Out Effect लगाता हूँ, कार जल्दी स्टार्ट होती है और एंड के पास स्लो हो जाती है।
आप इसे Onion Skin टूल से चेक कर सकते हैं।
ध्यान दें, स्टार्ट में फ्रेम्स ज्यादा दूर-दूर होते हैं और एंड पर करीब-करीब, जो विजुअली दिखाता है कि कार स्लो हो रही है।
अगर मैं Tweening Effect को Negative कर दूँ, यानि Ease In लगाऊँ, तो कार का बिहेवियर बदल जाता है।
यहाँ फ्रेम स्पेसिंग स्टार्ट में पास-पास होता है और एंड पर ज्यादा दूर, जो एक्सेलेरेशन दिखाता है।
मतलब, कार स्लो स्टार्ट होती है और एंड की तरफ स्पीड गेन करती है।
अब चलिए दोनों, Ease In और Ease Out साथ में लगाते हैं।
स्टार्ट में कार धीरे मूव करती है, बीच में स्पीड अप करती है, और एंड पर फिर से स्लो हो जाती है।
ये एक नैचुरल स्मूथ मोशन क्रिएट करता है।
आप इसे फ्रेम स्पेसिंग से देख सकते हैं – स्टार्ट में फ्रेम्स क्लोज़ होते हैं, बीच में ज्यादा स्पेस और एंड पर फिर से क्लोज़।
हमने ये कैसे किया? Ease In और Ease Out को कॉम्बिनेशन में अप्लाई करके।
इससे कार की एक्सेलेरेशन और डी-एक्सेलेरेशन को कंट्रोल किया गया।
ये छोटे-छोटे बदलाव एनीमेशन को ज्यादा डायनेमिक और रियलिस्टिक बनाते हैं।
हमने एनीमेशन का पहला फ्रेम और लास्ट फ्रेम सेट किया।
बीच में एक की-फ्रेम ऐड किया।
फर्स्ट पार्ट के लिए Classic Ease In लगाया और फ्रेम 15 पर Classic Ease Out लगाया।
दोनों इफेक्ट्स को कंबाइन करके हमने एक स्मूथ नैचुरल मोशन बनाया।
जहाँ ऑब्जेक्ट धीरे स्टार्ट होता है, बीच में स्पीड अप करता है और एंड पर स्लो हो जाता है।
तो इस तरह हम Ease In और Ease Out प्रिंसिपल अप्लाई करते हैं।
अब चलते हैं अगले प्रिंसिपल पर – Overlap और Follow Through।
यहाँ हमारे पास दो एग्ज़ाम्पल्स हैं – एक Hand Animation और दूसरा Circle Shape with White Tail।
Hand Animation में, Shoulder मेन बॉडी पार्ट है जबकि Forearm और Hand उसकी मोशन को फॉलो करते हैं।
दूसरे एनीमेशन में, Red Circle मेन बॉडी है और White Tail उसकी मोशन को ओवरलैप करता है।
ये प्रिंसिपल असल में Drag या Delay के बारे में है, जहाँ सेकेंडरी पार्ट्स मेन बॉडी पार्ट के बाद मूव करते हैं।
जैसे Hand Animation में, Shoulder पहले मूव करता है, फिर Forearm और आखिर में Palm।
Circle और Tail Animation में, Red Circle पहले मूव करता है और White Tail उसकी मोशन को ओवरलैप करता हुआ फॉलो करता है।
ये प्रिंसिपल दिखाता है कि ऑब्जेक्ट के अलग-अलग पार्ट्स मेन बॉडी से रिलेशन में कैसे मूव करते हैं।
मोशन इंस्टैंट नहीं होता, कनेक्टेड पार्ट्स में एक Drag या Delay होता है।
इस प्रिंसिपल को कई सिनेरियो में अप्लाई किया जा सकता है – जैसे मोटे कैरेक्टर की एक्स्ट्रा स्किन, डॉग की टेल, या फ्लावर पॉट को मूव करना।
ये एग्ज़ाम्पल्स दिखाते हैं कि किसी एलिमेंट का मास मोशन में कैसे बिहेव करता है।
कनेक्टेड पार्ट्स मेन बॉडी की मूवमेंट पर रिएक्ट करते हैं, जिससे Weight और Flexibility एम्फ़ेसाइज़ होता है।
अब देखते हैं इसे एनीमेशन में कैसे अचीव किया।
Hand Animation में, Shoulder को मेन बॉडी मानकर पहले एनिमेट किया गया।
Forearm और Palm को थोड़े डिले के साथ एनिमेट किया गया ताकि वो नैचुरली Shoulder को फॉलो करें।
जब आर्म आगे मूव करता है, Forearm और Palm पीछे लग करते हैं और बाद में कैच अप करते हैं, जिससे रियलिस्टिक Follow Through Effect बनता है।
जब आर्म वापस आता है, वही प्रिंसिपल रिवर्स में अप्लाई होता है।
Frame 15 से Frame 30 तक, Hand और Forearm Shoulder की मोशन को फॉलो करते हैं।
ये Follow Through का एग्ज़ाम्पल है।
और Frame 1 से Frame 15 तक, Palm और Forearm Shoulder की मोशन को ओवरलैप करते हैं, थोड़े पीछे लग करते हुए।
तो इस तरह हमने Hand Movement अचीव किया।
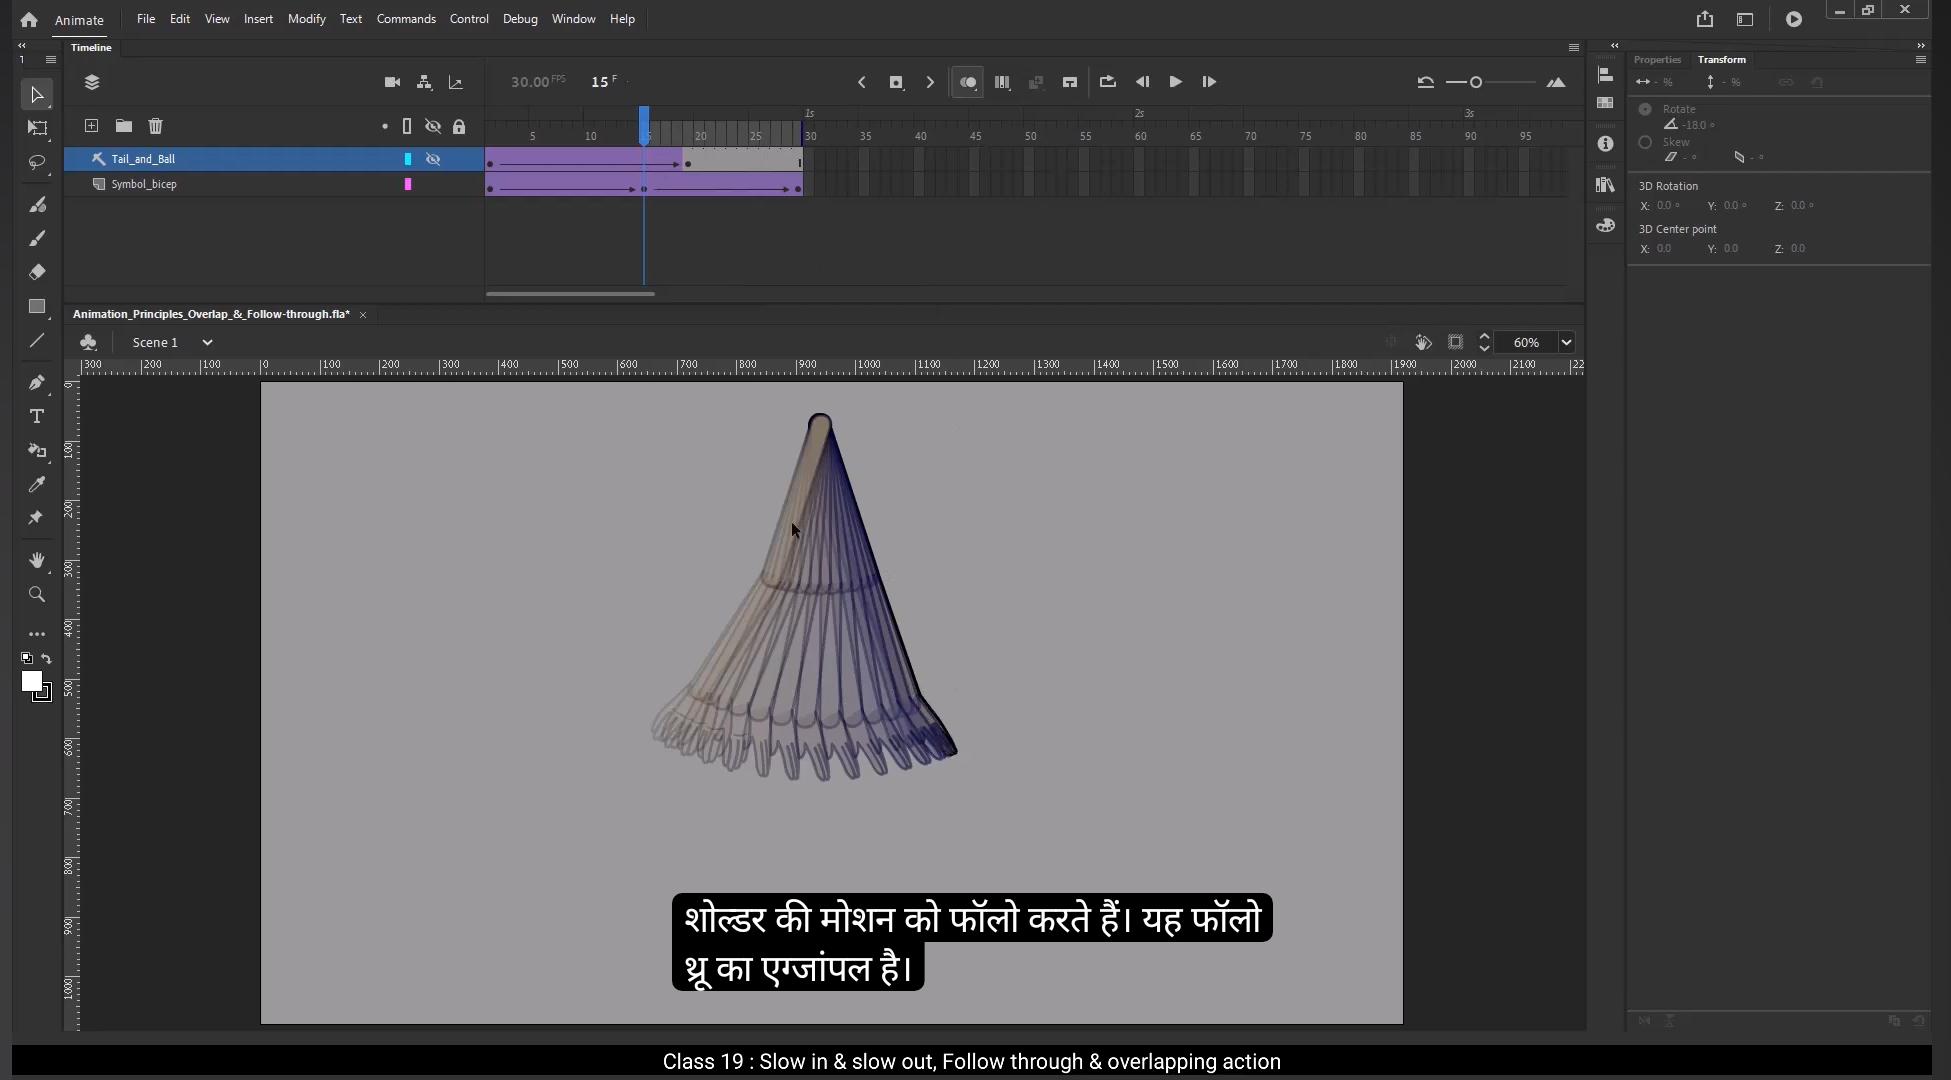
Circle और Tail Animation में, Red Circle को मेन ऑब्जेक्ट मानकर एनिमेट किया गया।
White Tail को डिले मोशन के साथ ऐड किया गया, ताकि वो Circle की मूवमेंट को ओवरलैप करे।
मोशन के एंड पर, Tail थोड़ा लेट से सेटल होता है, जिससे Flexibility और Mass हाइलाइट होता है।
एनीमेशन के पहले हाफ़ (Frame 1 से 18) में, White Tail Red Circle के एंड को फॉलो करता है।
ये Follow Through का एग्ज़ाम्पल है।
Frame 18 के बाद, जब Circle रुक जाता है, Tail थोड़ी देर मूव करता है और मेन बॉडी को ओवरलैप करके सेटल होता है।
ये Overlap को दिखाता है।
ये प्रिंसिपल कैरेक्टर्स, क्लोदिंग या फ्लेक्सिबल एलिमेंट्स वाली एनीमेशन को और बेहतर बना सकता है।
ये ऑब्जेक्ट्स में जान डालता है और मोशन को नैचुरल बनाता है।
Follow Through तब होता है जब ऑब्जेक्ट या कैरेक्टर के पार्ट्स मेन बॉडी की मोशन से थोड़ा पीछे लग करते हैं और बाद में कैच अप करते हैं।
और Overlap तब होता है जब ऑब्जेक्ट का कोई पार्ट मेन बॉडी रुक जाने के बाद भी मूव करता रहता है, फ्लेक्सिबिलिटी और नैचुरल मोशन दिखाते हुए।
इस तरह हमारा Overlap और Follow Through का एक्सप्लनेशन पूरा होता है।
उम्मीद है ये ट्यूटोरियल आपको हेल्पफुल और एंजॉयबल लगा होगा।
धन्यवाद, और नेक्स्ट ट्यूटोरियल में मिलते हैं।