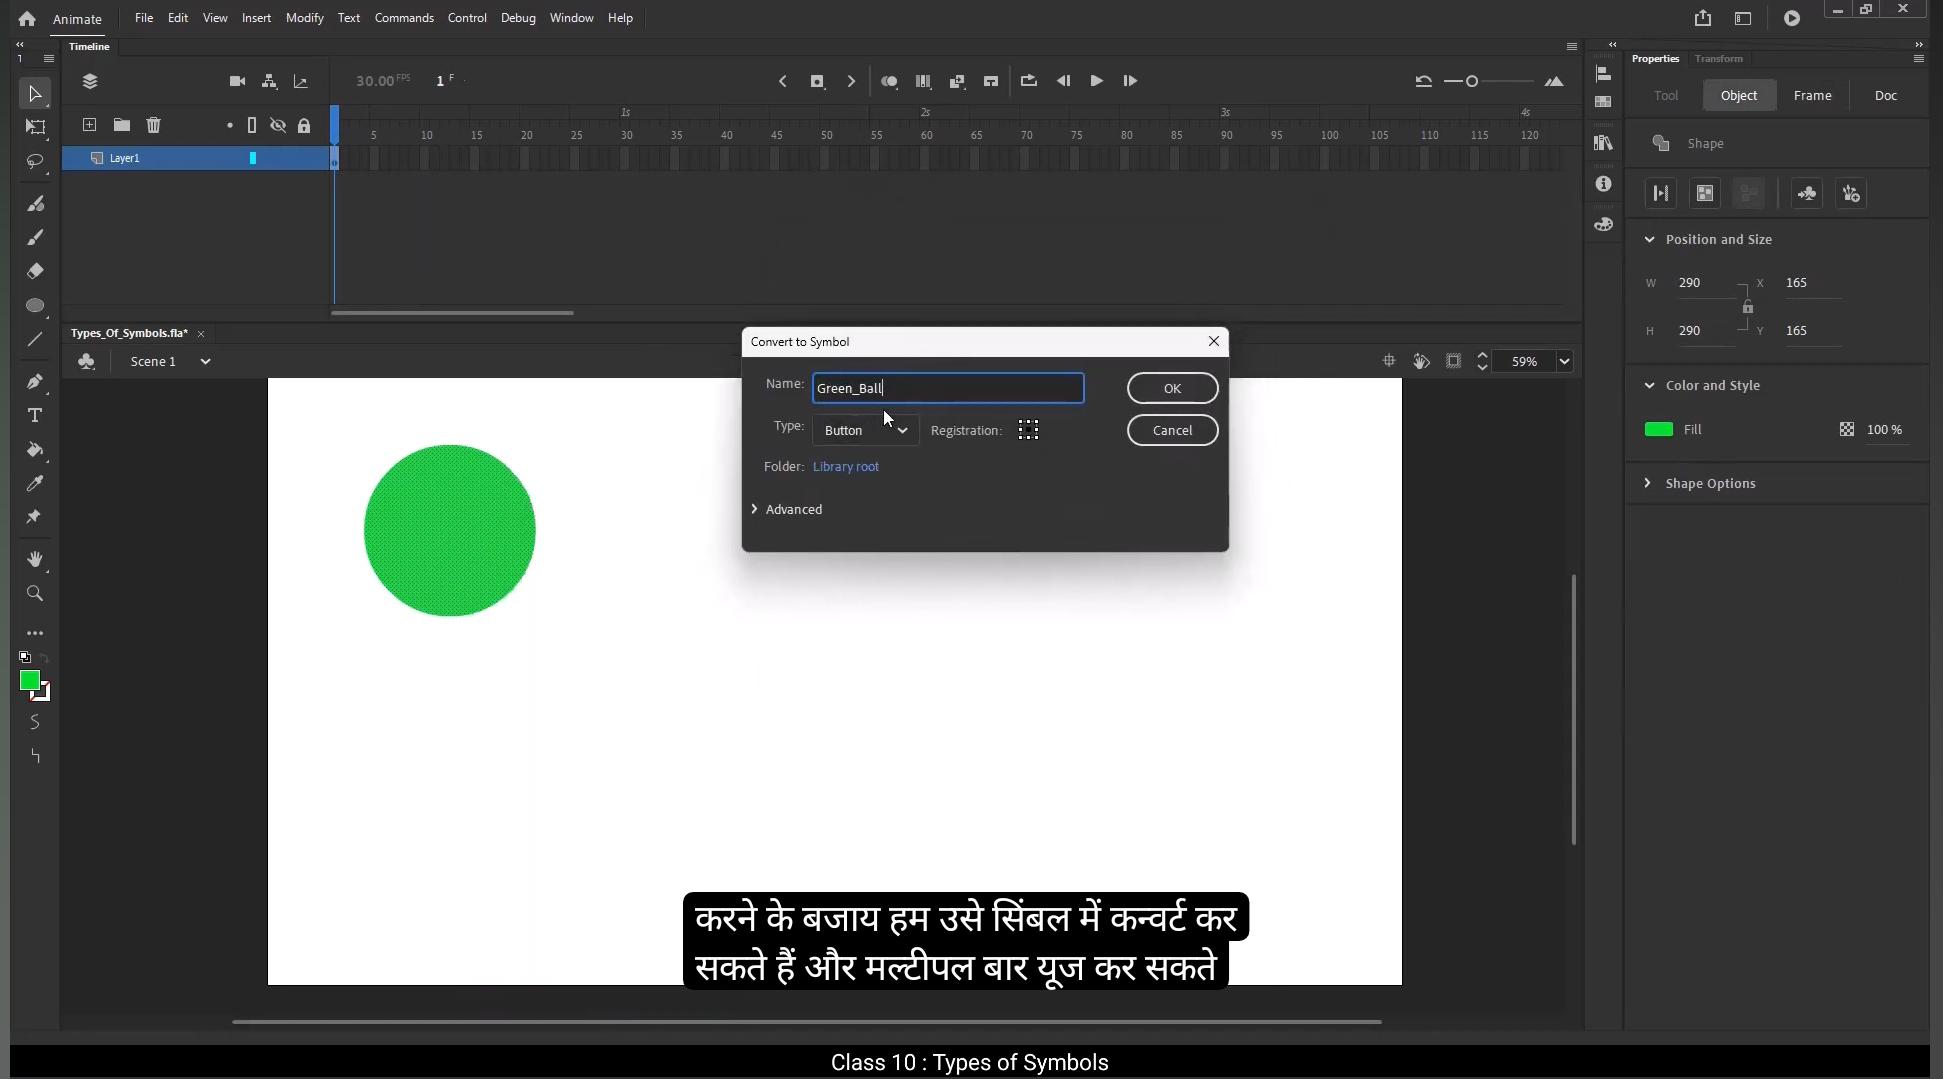
Hello students, in this tutorial we're going to talk about the different types of symbols and how they help us in animation. So what exactly are symbols? Well, symbols are super important because they help us organize and reuse elements efficiently. Instead of drawing the same thing over and over again, we can convert it into a symbol and use it multiple times without increasing the file size too much.There are three types of symbols in Adobe Animate Graphic symbol, mostly used for simple animations. Movie clip symbol used for independent animations.Button symbol used to create interactive buttons. We'll go through each one in detail, but in most animations, the graphic symbol is used the most because of its unique advantages. And that's exactly what we're going to explore. First, let's start by drawing a simple shape and converting it into a graphic symbol. Select the Oval tool from the toolbar. You can also use the shortcut key O for quick access.Choose any color you like from the color panel. Click and drag on the stage to draw a simple circle.And there you have it. But it's still just a shape if you select it and take a look in the properties panel. Right now it's just a simple shape, nothing special. But here's the problem. I can't animate it smoothly just like this. If I try to move it from one position to another, it will still be stuck on the 1st frame.That's because in Adobe Animate shapes don't automatically animate unless we add keyframes manually. So how do I animate this shape?Well, the traditional way would be to keep adding keyframes. First I insert a keyframe, then I move the shape slightly, add another keyframe, move the shape again, and I'd have to repeat this process frame by frame just to make the animation work. That's a lot of effort.Now for a simple circle this might be fine, but what if I'm animating a character? Imagine having to draw every single part of the body on each frame. It would take forever. This is where symbols make our life easier. Instead of manually adding keyframes on every frame, I can convert the shape into a symbol and animate it with just two keyframes. Much faster and way more efficient.So let's turn this shape into a symbol. There are a couple of ways to do this. First, select the shape, then go to the Modify menu. At the top, click Convert to Symbol. It's the second option in the list. Or an even faster way, just press F8 on your keyboard. Another way to do this is select the shape, right click on it, you'll see an option called Convert to Symbol. It's the second last option in the menu.Click it, or again, just press F8 for the shortcut. As soon as choose this option, a dialog box appears. This is where I can name my symbol. By default, animate gives it a generic name like symbol One, but I can change it to anything I want. Let's call this one Green Ball. Giving your symbol a proper name is a good habit because as your project gets bigger, it'll help you stay organized instead of having a bunch of symbols named symbol one.Well, too, it's much better to name them based on what they actually are. So in this case I'll name it Green Ball. Next we have the type option. This is where you choose what kind of symbol you want to create. There are three options, Movie, Clip, Button, and Graphic. Since we're talking about graphic symbols right now, I'll select Graphic and move on to the next setting.Now let's talk about registration. This setting decides the pivot point of the symbol.Basically the spot from which it will rotate or transform. You can choose from different positions like top left, top right or top, center or bottom left, bottom right or bottom, center or right in the center. Right now, I'll select the center option and click OK. Now that we've converted the shape into a symbol, a few things change. You'll see a small white circle appear inside the shape. That's the pivot point or registration point we just set. A blue bounding box appears.Around the shape. This means it's no longer just a shape, it's now officially a symbol. If we check the Properties panel, we'll see that the object type has changed. It's no longer a shape, it's now a graphic. We can change symbol type from here as well. Later on we'll explore how to change the type of a symbol if needed, but for now our shape is ready to be animated much more efficiently.First, go to frame #30 on the timeline.Now we'll add a keyframe by pressing F6. Then just move the symbol to the position you want it to end up on the stage. Next, we'll create some smooth movement by applying a classic tween. To do this, right click between the two keyframes and select Create Classic Tween. And just like that, your animation is ready with minimal effort. We'll learn more about the different types of tweens and what exactly a tween is in the next tutorial.Now let's quickly compare this to what would happen if you didn't convert the shape into a symbol. You'd have to either draw every frame manually or adjust the position on every keyframe.That's a ton of work and not very efficient. When you convert a shape into a symbol, you're basically putting it in a protective box.Inside this box, your shape is safe and can't be edited from the outside. If you want to make changes to the symbol itself, you just need to double click on it.Now you'll notice you're inside the green ball symbol. This is indicated by the icon at the top. To exit, just double click outside the symbol area and you'll be back on scene one looking at your symbol from the outside.This setup means that you can't edit the shape directly from the outside. If you want to tweak the shape, you have to go inside the symbol. Any changes you make inside will be reflected everywhere that symbol is used. All right, let's explore this a bit further.I'll add a new layer to explain more clearly. I'm going to grab the Oval tool again and create another shape. I'm going to convert this shape into a symbol.I'll rename it Small Green Ball. Since we're focusing on graphic symbols, I'll keep the type set to graphic just like before. But here's where things change. I'll set the registration point to the right bottom corner instead of the center.Now let's see what happens when we do that.Now that I have both symbols, the big green ball and the small green ball, let's compare them.If I select the big green ball, you'll see that its pivot point is in the center. That's the small cross inside a tiny white cirecle.But in the small green ball, the pivot point, the cross icon is positioned at the right bottom corner, while the tiny white circle stays in the middle by default. I'll need to manually set the pivot point first, select the symbol, then pick the free transform tool. Now double click on the tiny white circle or drag it to reposition the pivot point where you set it every time. You have to follow this process.So now after adjusting it.The pivot point is correctly set to the right bottom corner, and you can see how the rotation behaves differently. This is really useful when animating objects or characters because wherever the pivot point is placed, that's the point from which the symbol will rotate or transform. now That we have our pivot point set correctly. Let's animate this symbol.Go to frame 10 on the timeline and add a keyframe by pressing F6. Or alternatively you can go to Modify Timeline and choose Convert to keyframes. Once you've added the keyframe, I'll rotate the symbol from its starting position. Next, let's move to frame 19 and I'll add another keyframe by pressing F6 again. Then I'll rotate the symbol to its next position and on frame 26 I'll add one more keyframe.Rotate it again. If I add a classic tween between the keyframes, you'll see that the green ball rotates smoothly because we set the pivot point to the right bottom corner. That's exactly where it rotates from. Now let's move on to the next type of symbol, which is the movie clip symbol. To demonstrate this, I'll start by choosing a different shape. From the toolbar, I'll select the Polystar tool.Then I'll draw a Polygon on the stage. This is just another simple shape, but now we'll convert it into a symbol. To do that, go to the Modify menu, then choose Convert to Symbol or press F8. When the Convert to Symbol dialog box pops up, rename the symbol as Red Polygon to keep things clear. Here's where we choose the type of symbol.Since we're working with a movie clip, select Movie Clip from the options.Next, we'll set the registration point to the middle bottom. This is important because it determines the point from which the symbol will rotate. Once that's set, press OK. Now, as you can see, just like before, a white circle appears at the registration point and a blue box appears around our shape. This indicates that our shape is now officially a movie clip symbol. To check the rotation behavior, double click on the symbol to go.Side and adjust the pivot point so I can rotate the shape smoothly around that point. This way when I animate the symbol, it will rotate correctly from the bottom center. I'll rename the current layer as movie clip and add a new layer and name it symbol. On this new layer, I'll draw another shape, a simple circle, using the Oval tool. Now let's convert this shape into a symbol. To do that, go to the Modify menu and select Convert to Symbol, or just press the shortcut key F8.This time we'll select the type as graphic symbol because we want to compare the differences between a graphic symbol and a movie clip symbol. I'll keep the registration point in the center and rename the symbol as Green Ball graphic.If I double click on this symbol, I can go inside and here you'll see the graphic symbol with its unique icon. Similarly, if I go back and double click on the red Polygon, you'll notice a movie clip symbol with a different icon. So visually, this helps us identify which symbol type we're working with. Also, both these symbols are placed on separate layers for better organization. Now let's see the differences between a graphic symbol.And a movie clip symbol. With a movie clip symbol, you can create an animation inside the symbol itself without needing to extend the animation on the main timeline. Sounds interesting, right? Let me show you how it works. First, I'll double click on the red Polygon to go inside the movie clip symbol. Now I've added a few keyframes, move the Polygon around, and now we have a motion animation inside the movie clip.Here's the key thing to remember. We've only increased frames inside the movie clip symbol on the main timeline. We haven't added any extra frames.If I preview the animation, you'll see that the polygons animation runs perfectly even though we didn't add extra frames on the main timeline. This is because the animation is happening inside the movie clip symbol and it works independently of the main timeline. This feature makes movie clips extremely useful, especially for web related projects. Web developers or website designers who work with Adobe Animate often prefer using movie clip symbols because they allow animations to run smoothly without having to manage the main timeline extensively. Now let's see what happens when we create an animation inside a graphic symbol.I'll double click on the green ball graphic symbol to go inside. Here I'll add some keyframes and create a simple motion animation just like we did with the movie clip symbol.I've added the animation inside the graphic symbol, but I haven't added any extra frames on the main timeline. When I test the animation, you'll notice the movie clip symbol is playing its animation smoothly, but the graphic symbol appears still it's not showing any animation. This happens because an animated graphic symbol is tied to the main timeline. To see the animation, I need to insert frames on the main timeline to match the duration of the animation inside the.Let me do that. Now I'll add frames on the main timeline and when I preview the animation again, you'll see that the graphic symbols animation is now visible. So this is the difference between graphic and movie clip symbol. An animated graphic symbol depends on the main timeline to control its animation, but a movie clip symbol on the other hand has its own independent timeline and doesn't rely on the main timeline to play its animation. Also one more thing to note, graphic symbols add less to the file size compared to movie clips, which makes them more efficient for simple animations. That's why graphic symbols are mostly used for animations while movie clips are preferred for interactive content like web-based projects.Now let's explore the next type of symbol, which is the button symbol. First I'll create a new layer and rename it Button to keep things organized.Next, I'll select the Rectangle primitive tool. The shortcut for this tool is Shift R. What is the Rectangle Primitive tool? It's a special tool that allows you to create rectangles with curved corners. Unlike the regular rectangle tool, you can adjust the corner radius to make your shapes look more rounded. Right now it's just a simple shape. To turn it into a button symbol. I'll go to the Modify menu and select Convert to Symbol. In the Convert to Symbol dialog box I'll change the type to Button.I'll rename it Pink Play as we're going to make a simple play button. Then I'll click OK, now the shape has been converted into a button symbol. When you go inside the symbol, you'll notice a few changes. The icon for the button symbol looks different from the graphic and movie clip symbols. You'll see a unique timeline layout. Unlike the regular timeline, this one has four keyframes representing the buttons different states.Up This is the default state when the button is not being interacted with. Over This state appears when you hover your mouse over the button. Down This state shows when you click the button Hit. This defines the clickable area of the button, though it's not visible when you test the animation. Even though you can add more frames here, these 4 keyframes are the most important when working with button symbols. They are commonly used in web-based projects for creating. Interactive elements like navigation buttons, play pause controls, and more. Now I'll quickly show you how to use this button in an animation to demonstrate its functionality. I've now added a white triangle shape on top of the rectangle to represent the classic play icon, giving our button that familiar play button feel. So, This is our simple play button, but if you look at the main timeline, you'll notice that nothing seems to be happening yet. That's because for button symbols, we need to add keyframes and make changes in the four key states up, over, down and hit.Let's start with the up keyframe. This represents the Button's default state, the way it appears when nothing is interacting with it. We'll leave this as it is because this is how we want the button to look normally. Next, let's move to the over key. First, we add a keyframe here. This is the state that appears when you hover your mouse over the button. Think about when you hover over buttons on a website. They often change color or highlight to show they're interactive.To create that effect, I'll make a simple change. I'll select the rectangle shape and change its color to something darker to give that hover effect. I'll also select the white play icon and make it slightly darker as well, so the entire button reacts when hovered over. This subtle color change will make it clear to the user that the button is interactive. Now let's talk about the down keyframe. This state appears when you click the button.Insert a keyframe here and slightly scale down the entire button to give that pressed effect. To do this, I'll select the free transform tool, hold down Shift to maintain proportions, and gently scale it down. Next is the hit keyframe. This defines the clickable area of the button, but it's not visible when you test the animation. To keep things simple, we'll just use the original shape from the 1st frame. For that, I'll press Alt on the keyboard and drag the first keyframe over to the hit frame. And that's it. We've created a simple button animation for our pink play button. But here's something interesting on the main timeline.When you play the animation on the stage, you won't see any animation for button symbols or movie clip symbols. Only graphic symbol animations are visible during regular timeline playback. To actually see the button in action, go to the Control tab on top menu, click Test, or simply press Control Enter. Now you'll see the button. It looks static until I move the cursor over it as I hover. It gets darker when I.Thick. It shrinks slightly to give that pressed effect, and when I release it bounces back to its original state.So that's the complete breakdown of the three types of symbols in Adobe Animate. Graphic symbol, Movie Clip symbol, and Button symbol. Each has its unique behavior and purpose, and understanding them is key to creating dynamic animations and interactive projects. Thank you for following along. I hope this tutorial helped you understand symbols better in Adobe Animate.